On The Life Of [Dennis Ritchie]

Chances are you have already heard of the passing of [Dennis Ritchie]. We admit, we’re among the throngs who knew little of his life, but [Cade Metz] has posted an excellent remembrance of his life which we think is well worth reading.

[Dennis] passed on October 12th at the age of 70. This image shows him receiving the National Medal of Technology awarded to him by [Bill Clinton] in 1998. His legacy lives on in the work that earned him this award as the creator of the C programming language; a side project which he developed to help him achieve the creation of a new system kernel called UNIX. This work, of course, was the precursor that led to universal software packages like OSX, iOS, Linux, and even Windows (which at one point was itself written using the C language).

There has been some Internet fodder regarding media coverage of [Steve Jobs’] death and not of [Dennis’] passing. It’s harder for those lacking experience with programming to comprehend [Dennis’] contributions. We’re glad to have an opportunity to pass on the story of his life and to take a moment to appreciate his accomplishments.

[Thanks Dave]

[Photo Source]

anodizing_aluminum_without_battery_acid

Anodizing And Dyeing Aluminum Without Battery Acid

While many people have tried their hand at anodizing aluminum at home, there are plenty who would just as soon leave it up to the professionals due to the highly concentrated sulfuric acid required for the process. [Ken] started thinking about the process and wondered if there was a way to get comparable results using chemicals that are easier to obtain and dispose of.

Through some experimentation he found that sodium bisulfate (NaHSO4), which is a sodium salt of sulfuric acid, can easily be used in its place with great results. The chemical is typically advertised in hardware and pool stores as “Aqua Chem”, and can be had at a very reasonable price. When paired with the proper DC current along with a cathode, the sodium bisulfate easily anodizes an aluminum workpiece and renders it ready for coloring with RIT, readily available cloth dye.

We were impressed with the results, and when looking at [Ken’s] test pieces, it seems that the metal dyed with sodium bisulfate has a more uniform, less streaky coloring to it. It’s also worth mentioning that [Ken] has found it is fairly easy to etch the aluminum before anodizing using a solution of sodium hydroxide, which is great for individuals who prefer a more matte finish.

If this is something that interests you, be sure to swing by his site. He has a posted nice video overview of the process that may be of some help.

Halloween Hacks: Transform That Annoying Dancing Santa Into A Halloween Mummy!

Halloween Hacks Banner

santa_mummy

If you have one of those annoying dancing (Santa/Elvis/Frankenstein) decorations sitting around collecting dust, you could always repurpose it like [mischka] did. He originally wanted to enter our Santa-Pede challenge and purchased a dancing Santa, but time eventually got the best of him. With no other use for it in mind, he decided to make his dancing Christmas toy into a fun Halloween decoration.

An electronic rendition of “Jingle Bells” isn’t exactly the scariest thing around, so he dismantled the dancing toy and started fiddling with the sound board. A few well placed resistors later, his circuit-bent Santa Claus started to sound like he had five too many egg nogs, which was perfect for the dancing mummy [mischka] had in mind.

He transplanted some LEDs from Santa’s base into his head, and masked it off with some electrical tape so that only the eyes were visible. He then wrapped the mummy in the requisite bloodied bandages and set him out for the kids to enjoy.

Since it’s hard to find someone who genuinely likes these dancing toys, we think this is a great way to make them useful again. If you’ve got a few of these things kicking around, we suggest reenacting the dance routine from Thriller using an army of Santa-zombies and sending a video our way.

Continue reading to see a video of [mischka’s] mummy in action.

Continue reading “Halloween Hacks: Transform That Annoying Dancing Santa Into A Halloween Mummy!”

Monkey-powered Scooter Is All Electric

[Knife141] lets this monkey push him around all day long. It’s a whimsical touch for his scratch-built electric scooter. He started the build without a set of plans, cutting angle iron and clamping it together until the frame looked about right. Once the welding was done, he began adding all the parts to make it functional. There are front and rear brakes, operated by a lever on the handlebars. The rear wheel has a sprocket bolted to it, along with some spacers to give the chain adequate clearance.

Inside the saddle enclosure you’ll find a set of three lead-acid batteries. These are 12 volt 10 amp models that provide 36 volts of juice to the electric motor. The only thing we know about the electronics is that both the motor and the controller were purchased at a surplus store.

The sock monkey that pushes him around is sort of an afterthought. But since it’s just a couple of wheels with the feet attached, this might make a fun project for the kids to add to a bike.

LCD Backpack: From Arduino Board To Homemade Pcb

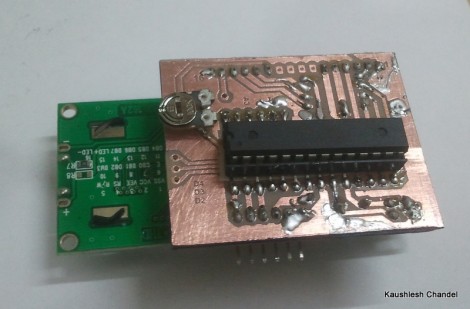
[Kaushlesh Chandel] prototyped a few projects on his Arduino that use an HD44780 Character LCD. Wanting to keep these projects in one piece, but not sacrifice his Arduino board, so he etched his own LCD backpack that is Arduino compatible. If you’ve never made it past the Arduino board to build a module that only uses the parts you need for a project, this is a great source of inspiration for you to give it a try.

The design that [Kaushlesh] drew up is quite simple. It connects directly to the single in-line header of the character LCD. It looks like he’s using the 4-bit mode for addressing that display, which leaves you with quite a few pins (both digital and analog) to work with in the future. The important components rolled into his design are the chip itself, an ATmega8/168/328, the crystal to make sure it is running at the correct speed for Arduino timing, and a trimpot for adjusting the contrast on the display. The final feature you’ll want to be sure to include in your own design is a pin header for programming the chip via an FTDI cable.

Never etched your own PCB before? Give our PCB fab tutorial a try.

PopCARD Vending Machine Enhancement Gets Upgraded

[Alex] wrote in to let us know he just completed a pretty major upgrade to his PopCARD RFID vending machine system. You may remember that earlier this year he added an Arduino based RFID reader to a soda machine so that thirsty patrons could pay with plastic instead of cold hard cash. That system worked, but at the beginning of the video after the break [Alex] goes over some of its flaws. There was a button to add cash from the card to the machine in $1 increments, rather than the system just knowing how much to charge you. Also, if you accidentally selected something that was out of stock you were out of luck and were charged anyway.

The new system does away with the button, and knows what product is sold out. The control hardware was upgraded to an Arduino mega to gain extra I/O pins. The device now sits in between the machine’s buttons and its own controller. When cash is used, the Arduino sits passively and lets the machine do its thing. But when a card is scanned, it takes over control of the buttons, sensing your selection, then simulating coin and button presses to vend accordingly. The new setup also uses an Ethernet shield which allows [Alex] to tell what items are running low without being at the machine itself.

Continue reading “PopCARD Vending Machine Enhancement Gets Upgraded”

Tactile 4-bit Maze

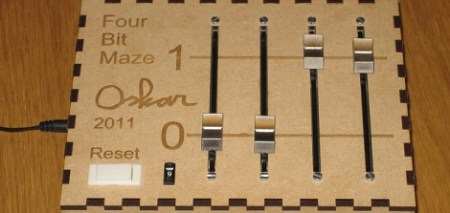
[Oskar] has been making puzzles for some time now. In 2000, he made a small electromechanical 4-bit maze that’s really fun to play. Lately though, he’s been working on an improved version that could be the beginnings of a commercial product.

The earlier electromechanical maze (you can play it in an applet on that page) is just a microcontroller hooked up to electromagnets and switches. To complete the maze, find the patterns of bits that move everything from 0 to 1. It’s a little bit like the Fox Chicken Grain puzzle, only a bit more complicated.

[Oskar]’s latest version uses motorized faders to represent the 0 and 1 states of the bits. The same logic in the electromechanical version is in the newest version. An Ardunio takes care of the motor control and game logic.

As a tiny logic game toy, it’s a great idea; everybody needs to get some hands-on action with Karnaugh maps sometime in their life. Check out the video below for the demo of the 4-bit maze in action.

Continue reading “Tactile 4-bit Maze”