Growerbot Turns Gardening Into A Science

A backyard vegetable garden can be a hit-or-miss game. You’re really not sure if your crops are getting enough sun, shade, or water until it’s time for harvest and you see the results of a season of hard work. Growerbot, a hardware project by [Luke] that’s up on Kickstarter now, hopes to change that. This box will pull down how much sun and water your crops should get, and is smart enough to correct any deficiencies.

On board the Growerbot is a soil moisture sensor, light, temperature, and humidity sensors, as well as WiFi connectivity and a few relays to run pumps and turn on grow lights. The idea is to learn from mistakes and achieve optimal growth for everything connected to the Growerbot. If you’re trying to grow some heirloom tomatoes in the midwest, you can go online and get the growth profile for your area and precisely control environmental variables for the perfect crop.

As of now, there are settings for in-ground gardens, raised beds, and hydroponic setups. There’s not much in the way of ideal growing conditions aside from what is available from the USDA, but once Growerbot is released we expect the data to start flowing in.


Blinkenwall Controlled By A C64

Looking for a dual monitor setup for your Commodore 64? Look no further than the C64 controlled Blinkenwall put together over at Metalab.

The Blinkenwall is 45 glass blocks serving as a partition between the main room and the library over at Metalab in Vienna. Previously, the Blinkenwall was illuminated by 45 ShiftBrite RGB LED boards controlled by an Arduino connected to a Fonera router over a serial port. The Metalab guys have an awesome web interface that allows them (and you) to compose 45-pixel animations and play them on the Blinkenwall.

The new hardware update includes a Commodore 64, a Final Cartridge III, and the ever popular Commodore tape drive. now, instead of sending animation patterns over the Internet to an Arduino, the folks at Metalab can write their animations as 6510 assembly and save it on a cassette.

Yes, this may be a bit of an anachronism, but think of the possibilities: Prince of Persia on a 9×5 display, or just a light show to go along with some SID tunes. You can check out the video after the break.

Continue reading “Blinkenwall Controlled By A C64”

So You Want To Run A Kickstarter?

Earlier this year, [Anthony Clay] wanted to test the waters of Kickstarter with a low-risk project. The idea he came up with was a series of EE reference posters we featured in a Hackaday links post. Now that [Anthony]’s project is over, he decided to write about the whole ordeal of putting together a Kickstarter, giving all the gory details of putting on your own crowd-sourced project.

We’ve got to give [Anthony] credit for doing his homework. Even before he designed his first poster, he looked over unsuccessful Kickstarter campaigns to see what they did wrong. Once he knew what he was going to offer, [Anthony] put on his project manager hat and made sure he knew exactly what everything was going to cost, had contingency plans in place, and knew what his Kickstarter was before he spread the word.

The best laid schemes of mice and men ‘oft go awry, so of course [Anthony] hit a few snags in his Kickstarter. In his microcontroller quicknotes poster, a few weird underlines made it into the final draft of the voltage characteristics section. Everyone he showed this to thought it was no big deal, but this is something that should have been caught in proofing. Keeping in mind that [Anthony] was only doing a poster and not an electronics project, we think this is a valuable lesson for future Kickstartees.

If you’re wondering what the one thing that [Anthony] credits for the success of his Kickstarter, it’s actually the small blurb we featured in a links post. Once that happened, word started to spread and the funding picked up. To be honest, we’re impressed by that fact, and we’ll try to wield our powers carefully in the future.

Hacked ARM Dev Board Gives You Two For The Price Of One!

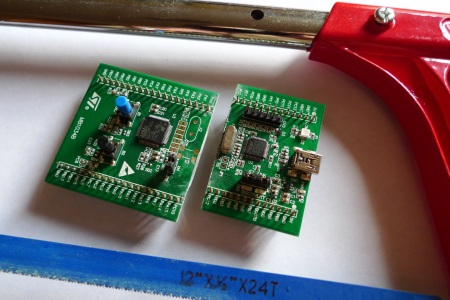
[Matt Evans] took a closer look at the popular (and cheap) STM32F0 Discovery development board and realized he could get a second board out of the deal.

The Discovery board is designed to advertise ST Microntroller’s STM32F0 microchip; which with 8k RAM, 64K Flash, a bunch of peripherals,  48MHz clock, and a low price is a great chip. Though, they needed a way to program the STM32F0. To do this they added a second, more powerful, chip to the board as an interface. The STM32F103, with 20k RAM, 64K flash, and a 72MHz clock speed. [Matt] summoned genius, and simply sawed the board in half using a hacksaw.

Of course the caveat to all this is that you need a working Discovery board, or at least a working ST-LINK programmer, at the end of the day, to get any use out of your creation. Since the boards are so cheap though, it shouldn’t be a problem to buy two.

Real Life Subtitle Glasses

[Will Powell] sent in his real-time subtitle glasses project. Inspired by the ever cool Google Project Glass, he decided he would experiment with his own version.

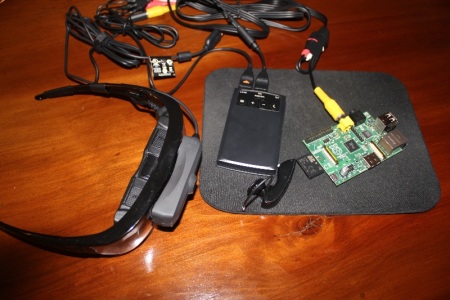
He used two Raspberry Pi’s running Debian squeeze, vuzix glasses, microphones, a tv, ipad, and iphone as the hardware components. The flow of data is kind of strange in this project. The audio first gets picked up by a bluetooth microphone and streamed through a smart device to a server on the network. Once it’s on the server it gets parsed through Microsoft’s translation API. After that the translated message is sent back to a Raspberry Pi where it’s displayed as subtitles on the glasses.

Of course this is far from a universal translation device as seen in Star Trek. The person being translated has to talk clearly into a microphone, and there is a huge layer of complexity. Though, as far as tech demos go it is pretty cool and you can see him playing a game of chess using the system after the break.

Continue reading “Real Life Subtitle Glasses”

Using An IR Remote With Your Arduino

If you’ve ever needed a short-range remote control for a project, [firestorm] is here to help you out. He put up a great tutorial on using an IR remote to do just about anything with everyone’s favorite microcontroller platform.

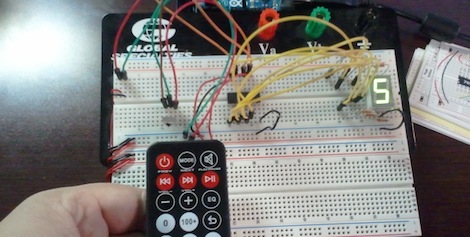
[firestorm] used the Arduino IRremote library to decode the button presses on his remote. After uploading the IR receive demo included in the library, the Arduino spit out hex codes of what the IR receiver was seeing. [firestorm] wrote these down, and was able to program his Arduino to respond to each individual button press.

After figuring out the IR codes for his remote, [firestorm] threw a shift register into his bread board and attached a seven-segment LED. Since [firestorm] knows the codes for the number buttons on his remote, it’s very easy to have the LED display flash a number when the corresponding button on the remote is pressed.

A single seven-segment display might not be extremely useful, but with [firestorm]’s tutorial, it’s easy to give your Arduino some remote control capabilities with a simple IR receiver. Not bad for a few dollars in parts.

Retrotechtacular: Recovering Lost Moon Images By Dumpster Diving

In 1966 and 67, NASA launched five probes to image the surface of the moon from orbit, eventually returning over two thousand high-resolution images of future Apollo landing sites and selenogical features to researchers on Earth. After taking its pictures of the moon, developing the film in orbit, and scanning the print with an electron gun and photomultiplier tube, the images were sent to Earth stations and recorded onto magnetic tape with a hugely expensive tape recorder, a state-of-the-art storage system costing $300,000. Researchers poured over these images of another world, made a few 35mm prints and sent the magnetic tapes off to the NASA archives.

Under the care of [Nancy Evans], the tapes sat in a warehouse eventually moving to an abandoned McDonalds at Ames Research Center. In 2005, retired and not bound by NASA, [Nancy] made a plea to preserve this milestone of human spaceflight wasting away under the golden arches which was heard by [Dennis Wingo]. [Wingo] and admin of the NASA Watch website admin [Keith Cowling] drove out to [Nancy]’s house with a truck, picked up the Ampex FR-900 tape drives she had saved in her garage from the trash heap at Eglin Air Force Base and headed to the cache of Lunar Orbiter tapes at Ames.

None of these drives worked, of course. Forty years will do a lot to expensive precision equipment. Luckily, one of the employees at Ames tasked with fixing video equipment had worked on the ancient Ampex drives before. Taking the unbroken parts of these machines and turning them into a single working unit didn’t come easily; again, parts needed to be scavenged from the Ames boneyard.

All this work was worth it for [Cowling], [Wingo], and [Evans] when the first image – an Earthrise picture seen above (sans the obvious Photoshoppery) – appeared on their monitor. Later, an amazing oblique shot of Copernicus crater was recovered.

In the years since these first images from the LOIRP project were released, many more images have been made available. These images are actually comparable to the Lunar Reconnaissance Orbiter, launched in 2012. Not bad for 45-year-old hardware that has since crashed into the moon.

As for what the future holds for the still-magnetized images from the Lunar Orbiter program, [Dennis Wingo] says they’re considering putting up a Kickstarter to close the gap between the necessary funding and what NASA provides. We’ll be sure to post a link when that happens.

via boingboing