Linux On A Nspire CAS CX Calculator

It’s great to see Linux running on a device in a way that was never intended. [tangrs] has successfully run a Linux kernel on the ARM based Nspire CAS CX graphing calculator. He’s developed an in-place bootloader that allows a kernel to be loaded from within the stock Nspire OS. It also allows for peeking and poking at memory for debugging.

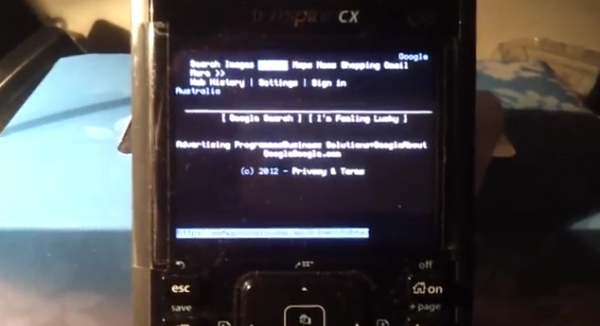
[tangrs] also managed to get USB host mode working on the calculator. This allows for a USB keyboard and Wifi dongle to be connected. At this point, the calculator can connect to the internet and browse using a text-based browser: Links. The calculator runs a SSH server for remote access, and graphical browsing is in the works.

It looks like this calculator is on the way to being a handheld Linux device. All of the source for the kernel and bootloader are available on [tangrs]’s Github and updates on his blog. After the break, check out a video of text-based browsing using a full keyboard.

Continue reading “Linux On A Nspire CAS CX Calculator”

Lucky Cat Hit Counter

[Jan] was looking for a way to monitor web site hits while sitting on the couch. This lead to the Lucky Cat Hit Counter. The hack gives a stock Lucky Cat some new hardware: a servo, a RGB led, a light sensor, and a 7 segment display. The added components are controlled by an Arduino Ethernet.

The Arduino Ethernet is set up as a web server. When a visitor fetches [Jan]’s site, a GIF is requested from the Arduino. This trigger changes the RGB LED color, increments the seven segment display, and of course, makes the cat wave by actuating the servo. The light sensor is used to make the cat silent at night. When the light value is below a threshold, night mode is engaged and the cat doesn’t wave.

After the break is a video walk through of the Lucky Cat receiving some HTTP requests.

Continue reading “Lucky Cat Hit Counter”

WAV Music Player Uses An ATtiny

We’re very accustomed to seeing small media player builds, but [txyz]’s ATtiny-powered audio player is one of the smallest and most feature-packed we’ve seen.

The audio player is powered by the very small and very inexpensive ATtiny2313. The music is stored on an SD card – a maximum of 2GB of WAV files recorded in mono at 32kBps at an 8-bit depth. On boot, the ATtiny loads the first audio file from the card and outputs it through a speaker connection.

To make things interesting, [txyz] made the audio player controllable via a serial connection. Once a small FTDI adapter is connected to the player, [txyz] can connect to it through a terminal and run through his playlist.

Even though the player is controllable through a serial port, there are a few pins left over that [txyz] could attach to buttons, if so desired. With a battery pack, this would turn his music player into the homebrew equivalent of an iPod shuffle. With the low component count, it might actually be cheaper than the shuffle, if [txyz]’s time is free, that is.

Video after the break.

Continue reading “WAV Music Player Uses An ATtiny”

Blending Real Objects With 3D Prints

It’s very subtle, but if you saw [Greg]’s 3D printed stone to Lego adapter while walking down the street, it might just cause you to stop mid-stride.

This modification to real objects begin with [Greg] taking dozens of pictures of the target object at many different angles. These pictures are then imported into Agisoft PhotoScan which takes all these photos and converts it into a very high-resolution, full-color point cloud.

After precisely measuring the real-world dimensions of the object to be modeled, [Greg] imported his point cloud into Blender and got started on the actual 3D modeling task. By reconstructing the original sandstone block in Blender, [Greg] was also able to model Lego parts.After subtracting the part of the model above the Lego parts, [Greg] had a bizarre-looking adapter that adapts Lego pieces to a real-life stone block.

It’s a very, very cool projet that demonstrates how good [Greg] is at making 3D models of real objects and modeling them inside a computer. After the break you can see a walkthrough of his work process, an impressive amount of expertise wrapped up in making the world just a little more strange.

Continue reading “Blending Real Objects With 3D Prints”

NASA Is 3D Printing Rocket Engine Parts

In case you haven’t heard, NASA is building a new rocket – a replacement for the shuttle – that will eventually take crews again outside low Earth orbit. It’s called the Space Launch System and looks surprisingly similar to the Saturn V that took men to the moon. Manufacturing technology is light years ahead of what it was in the mid-60s, and this time around NASA is printing some rocket parts with selective laser melting.

Teams at the Marshall Space Flight center are melting metal powder together with lasers to produce parts for the new J-2X engine intended for use in the earth departure stage of the Space Launch System. While the 3d-printed parts haven’t seen a use in any live fire tests of the J-2X, the goal is to test these parts out later in the year and eventually have them man-rated, to carry astronauts to the moon, asteroids, or even Mars.

This isn’t the first time 3d printing has been used to make rocket engines. Earlier this year we saw [Rocket Moonlighting] build an entire rocket engine, powered by propane and NO2, using the same technology that NASA is using. [Moonlighting]’s engine is quite small, too small to lift itself off the ground, even. Still, it’s awesome to see 3D printing that will eventually take people into solar orbit.

Upgrading A Voice Recorder With A Hex Editor

[Alex] just bought a really nice TEAC VR-20 audio recorder, a very capable recorder perfect for recording your thoughts or just making concert bootlegs. This model was recently replaced by the Tascam DR-08 audio recorder. It’s essentially the same thing, but the Tascam unit can record at 96kHz, whereas the TEAC can only record at 48kHz. [Alex] figured out a way to upgrade his less capable but cheaper VR-20 to record at a higher bit rate with just a simple firmware hack.

The mod began by downloading the firmware for both the TEAC VR-20 and the Tascam DR-08. Both of these sets of firmware were exactly the same size, and after downloading a hex editor, [Alex] found a huge difference in the first 20 bytes of the firmware – the portion that tells the microcontrollers what it actually is.

The solution to improving the bitrate for the TEAC VR-20 was as simple as copying the first 20 bytes from the TEAC firmware over to the first 20 bytes of the Tascam firmware. After that, it’s a simple matter of upgrading his TEAC and getting the ability to record at 96kHz.

A very, very simple hack that’s really just flipping a few bits. Not bad for a two-fold improvement in the recording capability of a handheld audio recorder.

The Ultimate Low-cost Dev Board

We see a lot of microcontroller dev boards here at Hackaday, so much that we’re jokingly considering changing our name to Board a Day. These devices – from Arduinos to Arduino-compatible boards, very, very small boards, to extremely powerful ARM devices – are a great way to learn about the wonders of controlling electricity with code. There’s a problem, though: if you’re teaching a class on programming microcontrollers, giving each student a $20 board is nearly out of the question.

This is where the shrimp comes in. It’s a very, very minimal Arduino-compatible circuit meant to control all the pins on an ATMega328. The components only cost about £1.40 ($2.25 USD) when bought in volume, making it perfect for teaching a class or workshop on the Arduino and giving each student a circuit to take home.

The basic circuit is just an ATMega328 – the same microcontroller used in the Arduino Uno – with a few caps, resistors, and a 16 MHz crystal. It’s a very bare-bones system, but once built and programmed provides all the functionality of a $25 Arduino.

Like all microcontroller platforms, there’s the chicken-and-egg problem of actually programming the device. The Shrimp team is using a CP2102 USB to UART bridge to program each shrimp. Not an inexpensive part, but it is of course possible to only have one serial bridge for each workshop.