Remember how we said we’d give away an oscilloscope to a random person on hackaday.io if they have voted on projects for The Hackaday Prize? Last week we tried that and no one won. This week we tried it and no one won. Then, because we’re awesome, we picked another person at random on Hackaday.io. [Rafael] is the winner, with a very nice oscilloscope heading to his doorstep. We’re going to need some contact info, hacker no. 13951, and if anyone has any advice on sending expensive electronics to Brazil, I think we’re going to need it.
We’re doing this again next week, so head on over to hackaday.io and vote. Also, pay no attention to the people who say voting is too hard and complicated and ill planned: they are wrong, and if you suck up enough the Prime Overlord will command that t-shirts and stickers be sent out to you.
Texas Instruments’ CC3000 WiFi chip is the darling of everyone producing the latest and greatest Internet of Thing, and it’s not much of a surprise: In quantity, these chips are only $10 a piece. That’s a lot less expensive than the WiFi options a year ago. Now, TI is coming out with a few new modules to their WiFi module family, including one that includes an ARM micro.
The CC3000 has found a home in booster packs, breakout boards for the Arduino, and Spark, who are actually some pretty cool dudes.Still, the CC3000 has a few shortcomings; 802.11n isn’t available, and it would be really cool if the CC3000 had a web server on it.
The newest chips add these features and a whole lot more. [Valkyrie] got his hands on a CC3100Boost board and was pleased to find all the files for the webserver can be completely replaced. Here’s your Internet of Things, people. The CC3200 is even better, with a built-in ARM Cortex M4 with ADCs, a ton of GPIOs, an SD card interface, and even a parallel port for a camera. If you’re looking to pull a hardware startup out of your hat, you might want to plan your Kickstarter around this chip.
It’s all very cool stuff, and although the bare chips aren’t available yet, you can get an eval module from TI, with an FCC certified module with the crystals and antenna coming later this year.
[Farlei Heinen] has a C programming class at school. Not wanting to do another boring cookie-cutter project out of the textbook, he decided to do something different — he’s built an Arduino controlled sentry gun!
It consists of two parts: The sentry gun itself and a sonar detection tower which can tell if you’ve successfully knocked down the pigs or not. He’s using an Arduino Mega at the heart of the project, which controls the servos and reads information off of the sonar sensors.
The sentry gun uses two servo motors to control up and down, and left and right. The loading mechanism is manual, using elastic bands to launch the projectile. The firing mechanism however is a micro (9g) servo, which can release the elastic and shoot the projectile. The target is an Angry Birds toy play set made for kids.
It’s a pretty cool project, and [Farlei] has even released the source code for it if you’re interested in building your own — check it out in action, after the break!
Battery powered soldering irons are nothing new, but what about a soldering iron that can recharge via USB? [Solarcycle] realized that it might be handy to be able to recharge a portable soldering iron using such a ubiquitous connector and power source, so he developed the Solderdoodle.
The core component of the Solderdoodle is a Weller BP645 Soldering Iron. The heating element is removed from the Weller and placed into a custom case. The case is designed to be 3d printed. The STL files for the case are available if you want to make your own.
The Solderdoodle does away with large, disposable batteries and replaces them with a lithium ion battery pack. The battery contains no built-in protection circuitry in order to save space. Instead, this circuit is added later. [Solarcycle] appears to be using a circuit of his own design. The schematic and Gerber’s are available on his website.
The Instructable walks through all of the steps to build one of these yourself if you are so inclined. If you don’t have the spare time, you can fund the project’s Kickstarter and pre-order a production model. It’s always great to see a new commercial product with an open design.
That which holds the image of an Angel becomes itself an Angel. Have fun with that.
Barbie dolls have been around since 1959, but never before have they been this terrifying. [anthropolywog] decided to kick the creepy factor up a notch by modifying some poor, defenseless Barbie dolls into weeping angels.
If you aren’t familiar with the weeping angel concept, you probably don’t watch Dr. Who. The weeping angel episode, titled “Blink“, is now considered a classic Dr. Who episode. The basic premise is that some creepy, weeping stone statues can move only when no one is looking at them. Even closing your eyes for a moment to blink is enough to get them to move. It’s actually quite terrifying, but also awesome.
[anthropolywog] started by purchasing several ordinary Barbie dolls. She then cut off all of the arms at the elbow. This is because the Barbie arms do not normally bend at the elbow, and this was required to get that classic weeping angel pose. The hair was glued up into a bun, similar to the weeping angels from the show. The Barbies were then hot glued to wooden stands to make it easier to work on them.
Crinkle cotton fabric was then cut into a simple dress shape and draped over the dolls. The entire doll was then sprayed with a mixture of Elmer’s glue and water. This stiffens up the fabric and makes the whole thing look more statuesque.
The most complicated part was the wings. [anthropolywog] hand-made the wings from cardboard and craft feathers. This process took several hours of work in order to get something that would look right.
The dolls were primed for paint separately from the wings. The wings were then attached, and the whole doll was painted with “natural stone” textured spray paint. The final touch was to re-draw the faded eyes and mouths with a fine tipped permanent marker. You can see in the photo that the result turned out very well.
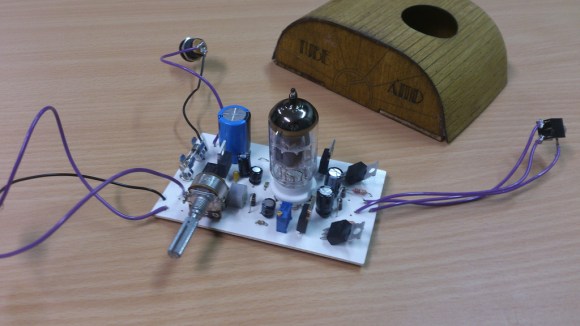
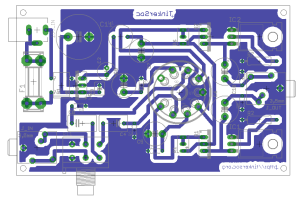
[Simon] wrote in to tell us about a headphone tube amp that he just built. It is based on schematics at diyaudioprojects.com that were actually featured on Hackaday in the past. [Simon’s] design adds an on board regulated power supply and a volume control for the input. Effort was made to keep the PCB single sided to facilitate making this at home.
The 12AU7 is popular due to its ruggedness and tolerance for low operational voltages. This amp design uses a plate voltage of 12, although the 12AU7 can handle up to about 330. Since the 12AU7 is of the Twin Triode variety, one tube can be used to amplify both a left and right audio channel.
The case for the amplifier is laser cut plywood. The top piece is kerfed so that it can bend around the radii of the front and rear panels. The top also has a hole cut in it to allow the tube to peek out through.The pieces look nice but, unfortunately, he doesn’t show the case and amp in an assembled state.
If you’re interested in building one of these, [Simon] made all of the Eagle and Case files available. The total cost of the project was £25, about $43 US. To learn more about how tube amplifiers work, check out this Retrotechtacular from earlier in the year.
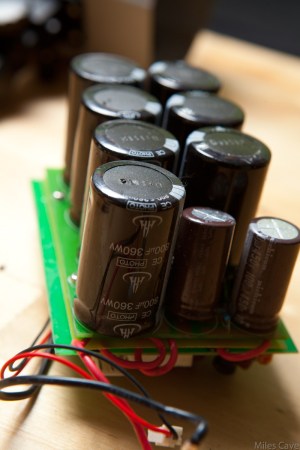
[OiD] picked up a couple of cheap studio strobes off eBay and was not happy with the power control. So he rewired it. These lights are like supercharged flashes for professional photographers, and contain some very large capacitor banks. His first hack didn’t work out too well, and he wound up welding the innards of a switch together. He was successful however, in his second attempt to tame the large voltages.
He’s using two 1N5408 diodes, which are rated at 3 amps, for charging the capacitor bank. A massive 60EPS08 diode, rated at 60 amps with a Frankenstein worthy surge rating of 950 amps is used to separate the charge between the two capacitor banks, and allows one to discharge into the flash tube.
Consisting of just a handful of components, [OiD]’s hack greatly improves the performance of the strobe’s power adjustment settings. He does an excellent job at documenting the hack for all to see. Be sure to check out his bog for full details.
 Texas Instruments’ CC3000 WiFi chip is the darling of everyone producing the latest and greatest Internet of Thing, and it’s not much of a surprise: In quantity, these chips are only $10 a piece. That’s a lot less expensive than the WiFi options a year ago. Now, TI is coming out with


 The 12AU7 is popular due to its ruggedness and tolerance for low operational voltages. This amp design uses a plate voltage of 12, although the 12AU7 can handle up to about 330. Since the 12AU7 is of the Twin Triode variety, one tube can be used to amplify both a left and right audio channel.