Bit-banging Ethernet On An ATTiny85

Ethernet bit banging

[Cnlohr] just published an ingenious but dangerous way to send Ethernet packets using an ATTiny85. The ATtiny directly drives one pair of differential TX wires of a standard Ethernet cable. Doing so will force the TX signal ground to be the same as the ATTiny’s and in some cases may put 48V on your AVR if your cable is plugged into a Power Over Ethernet switch… which may be a problem.

In the video embedded below [cnlhor] explains that the microcontroller is clocked at 20Mhz to bit-bang the Manchester encoded electrical signals. Using a neat trick his home switch will detect his platform as a 10MBit Ethernet switch which can then send hard-coded packets to his computer. As you can guess, each of this packets takes quite a bit of space inside the ATTiny’s flash memory: 2+Kbytes. All of the code used may be downloaded on the creator’s GitHub repository, though he constantly warned us that it shouldn’t be used for real life applications.

Edit: One of our readers also let us know of a similar awesome project called the IgorPlug-UDP. Make sure to check it out!

Continue reading “Bit-banging Ethernet On An ATTiny85”

Extrinsic Motivation: Daisy Kite Airborne Wind Turbine

Got another THP entry for ya’ll that didn’t quite make the cut, but is worth sharing. This time we are featuring an airborne wind turbine that, as the project description states, ‘can harvest strong and expansive wind safely and efficiently.’

Ram air kites spin a parachute that in turn transfers torque that can be captured on the ground. In a true hacker spirit way, the rig developed by [Rod] utilizes bike wheels and rollerblade wheels in the design. This homemade generator needs a lot of space to be deployed, but it looks like a nice solution to airborne energy harvesting. [Rod] goes over the specifications for the project throughout the build logs on the Hackaday.io page and includes a couple of video describing how it was created and showing what happens when it is released into the air currents outside. Diagrams and models of the open source airborne wind energy generation device are also included.

Below are a few of his videos. Watch them over, and let us know what you think.


SpaceWrencherThis project is an official entry to The Hackaday Prize that sadly didn’t make the quarterfinal selection. It’s still a great project, and worthy of a Hackaday post on its own.
Continue reading “Extrinsic Motivation: Daisy Kite Airborne Wind Turbine”

The Pac-Man Bus Stop For Gamers At Heart

DSCF3537Combined

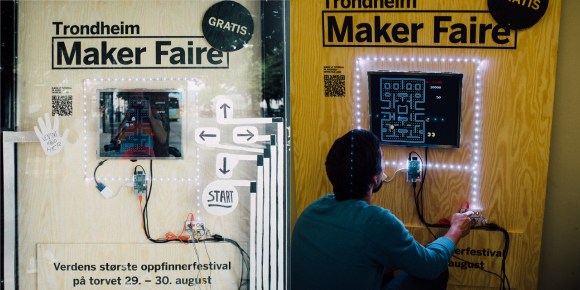
Waiting for the bus can be drag. You never know exactly when it will come, always looking down the road hoping to spot the vehicle as it turns a corner. When it doesn’t show up right away, the result is usually staring down at a ‘smart’ phone checking it for any incoming messages. Directing the attention up might produce a list of estimated arrival times and maybe even a map showing the routes that are taken throughout the day. But there is only one bus stop in the entire world, that we know of, where people can play Pac-Man while they watch for the bus to arrive.

It was created by the combining efforts of two maker communities in town. Norwegian Creations and Trondheim Makers teamed up to build an interactive gaming display that gave individuals the ability to pass the time by directing the famous video gaming character around a blue maze, eating yellow pellets and avoiding colorful ghosts along the way. This display was also made to raise awareness for the upcoming Trondheim Maker Faire that year. They choose Pac-Man as the foundation and integrated a slightly modified invention kit called Makey Makey with a Raspberry Pi running RetroPie into the actual frame of the bus stop. The people involved must have had some serious business connections in order to get approval for that. They figuratively hacked into the bus stop’s power grid gaining the necessary 230 volts required to energize the custom gaming unit. Once hooked up, anyone standing by could play Pac-Man until the bus came. [Ragnar] at Norwegian Creations told us in an email that future ideas of theirs include syncing up several stops that can communicate with each other, which could lead to some great multiplayer interactions. They also have a fantastic video that they uploaded that shows the building process of their current design. Check that out below, and let us know what other types of games you would like to see at a bus stop near you.

Continue reading “The Pac-Man Bus Stop For Gamers At Heart”

LED Light Staffs For The Ultimate Portable Rave

3531621392887203462

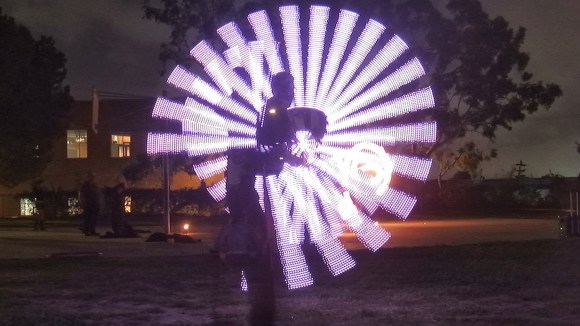
[risknc] and [mpinner] have been working on a couple of LED light staff designs for a while now and have come up with a prototype that can light up the night with an array of streaming colors. There is even a dial that can turn up and down the brightness.

Originally, [risknc] began developing his own project at SpaceX and dove further into the idea right before Burning Man. The visual effects, when twirled through the air, produced an extremely bright flow of energy that can be seen circling around the user.

The 8ft long carbon fiber staff was stuffed to the edges with RGB LEDs. Neopixel strips at 60 LED per meter were used to alternate between colors, and a whole bunch of white capable LEDs were embedded into the staff as well. One of early designs was purposefully left at a local hackerspace called Crashspace in Culver City, California. Photos of community members trying it out surfaced on the hackerspace’s website. In addition, a description of the staff and a few high-quality photos of the ‘Sparkle Stick’ were uploaded on to the Suprmasv projects page. Searching through the pictures reveal an instance that shows the LED light staff being used during a flow session with a fire poi spinner in the background. Perhaps there is a way to combine LEDs and fire? Anyways, a later version of the staff was tested out at the 2014 Maker Faire in San Francisco.

Full specs and logs of the project can be found on Hackaday.io. A quick video of [mpinner]’s light staff being spun around comes up after the break. In the video, it looks like they are testing it out outside of Crashspace as they run through the darkness of the alleyway in the back, lighting up the area with a nice LED glow. Plans for the future include building a bunch of them and wirelessly syncing them up. CAD models will be uploaded soon as well.

Continue reading “LED Light Staffs For The Ultimate Portable Rave”

Make Your Own Mac Pi For Some Desktop Nostalgia

Mac Pi

Do you miss your Mac Classic? Well if you’re looking for a fun little project, why not build yourself a Mini Mac Pi that emulates Mac OS 7?

It’s a fairly simple project that makes use of the Raspberry Pi B, a 320×240 2.8″ touchscreen LCD (the PiTFT), a lithium-ion battery, a buck-boost circuit and of course, a power switch. The cute enclosure is made by 3D printing, and all the files are available on Thingiverse — they’ve been sliced up in a way that they will be printable on most consumer printer bed sizes.

Once everything is assembled, you’ll need to run Mini vMac alongside Raspbian in order to run Mac OS 7. There are a few caveats though — The original resolution is 512×342, so there’s a bit of screen clipping that occurs. There’s also minor application support, but for the purpose of nostalgia, we think the included selection is more than enough to satisfy most memories.

Continue reading “Make Your Own Mac Pi For Some Desktop Nostalgia”

THP Semifinalist: Theta Printer

thetaThe early 3D printers of the 80s and 90s started off as cartesian bots, and this is what the RepRap project took a cue from for the earliest open source 3D printer designs. A bit later, the delta bot came on the scene, but this was merely a different way to move a toolhead around build plate. We haven’t really seen a true polar coordinate 3D printer, except for [Tyler Anderson]’s incredible Theta printer.

[Tyler]’s theta printer is designed to print in as many different materials as possible, without the reduction in build volume that comes with multiple toolheads on more traditional printers. It will be able to lay down different colors of plastic in a huge build volume, and even some of the weirder filaments out there, all in a single print.

The theta printer is based on a polar coordinate system, meaning instead of moving a hot end around in the X and Y axes, the build plate rotates in a circle, and the extruders move along the radius of the circle. This spinning, polar coordinate printer is the best way we’ve seen to put multiple extruders on a printer, and has the added bonus of being a great platform for a 3D scanner as well.

With four extruders, four motors to control the position of each extruder, a rotation motor, and the Z axis (that’s 10 steppers if you’re counting), this is very likely the greatest number of motors ever put in a 3D printer. Most electronics boards don’t support that many stepper drivers, and the one that will won’t be ready for the end of The Hackaday Prize. Right now, [Tyler] is running a fairly standard RAMPS board, running two extruders and R axes in parallel. Still, it’s good enough for a proof of concept.

One interesting aspect of [Tyler]’s design is something even he might not have realized yet: with a single bed and four extruders, he’s effectively made a 3D printer geared for high-volume production; simply by printing the same part with all the extruders, he’s able to quadruple the output of a 3D printer with the same floor space as a normal one. This may not sound like much, but when you realize Lulzbot has a bot farm producing all their parts, the Theta printer starts to look like a very, very good idea.

Videos of [Tyler]’s Theta below.


SpaceWrencherThe project featured in this post is a semifinalist in The Hackaday Prize.

Continue reading “THP Semifinalist: Theta Printer”

Stupid Security In A Security System

alarm

[Yaehob]’s parents have a security system in their house, and when they wanted to make a few changes to their alarm rules – not arming the bathroom at night – an installer would come out, plug a box into the main panel, press a few buttons, and charge 150 €. Horrified at the aspect of spending that much money to flip a few bits, [yaehob] set out to get around the homeowner lockout on the alarm system, and found security where he wasn’t expecting.

Opening the main panel for the alarm system, [yaehob] was greeted with a screeching noise. This was the obvious in retrospect tamper-evident seal on the alarm box, easily silenced by entering a code on the keypad. The alarm, however, would not arm anymore, making the task of getting ‘installer-level’ access on the alarm system a top priority.

After finding a DE-9 serial port on the main board, [yaehob] went to the manufacturer’s website thinking he could download some software. The website does have the software available, but only for authorized distributors, installers, and resellers. You can register as one, though, and no, there is no verification the person filling out a web form is actually a distributor, installer, or reseller.dist

Looking at the installer and accompanying documentation, [yaehob] could see everything, but could not modify anything. To do that would require the installer password, which, according to the documentation was between four and six characters. The system also responded quickly, so brute force was obviously the answer here.

After writing up a quick script to go through all the possible passwords, [yaehob] started plugging numbers into the controller board. Coming back a bit later, he noticed something familiar about what was returned when the system finally let him in. A quick peek at where his brute force app confirmed his suspicions; the installer’s code was his postal code.

From the installer’s point of view, this somewhat makes sense. Any tech driving out to punch a few numbers into a computer and charge $200 will always know the postal code of where he’s driving to. From a security standpoint, holy crap this is bad.

Now that [yaehob]’s parents are out from under the thumb of the alarm installer, he’s also tacked on a little bit of security of his own; the installer’s code won’t work anymore. It’s now changed to the house number.