DEFCON 22: Badge Talk

I got a great seat on the main floor for the first big DEFCON 22 talk which is a welcome to the con and discussion of the badge hardware. [LosT], the creator of this year’s badge, started the discussion with a teaser about the badge… there’s a phone number hidden as part of the challenge. [LosT] took a call from someone chasing the puzzles. The guy was in the audience which was pretty fun.

The process of building a puzzle that can be solved at DEFCON is really tough. How do you make it just hard enough that it won’t get pwned right away but easy enough that a large number of attendees will be able to figure it out during the weekend? The answer is to build a secure system and introduce strategic flaws which will be the attack vectors for the attendees solving the badge challenge.

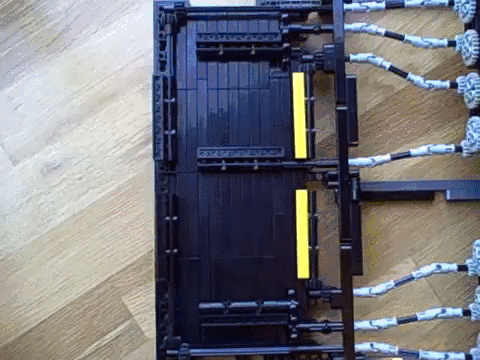
Of course the badge can be used as a development platform. The populated electronics on the board all have these nice little footprints which can be cut to disconnect them from the chip. The breakout headers on either side of the board allow you to connect headers for your own uses. Great idea!

The back of the lanyards have special characters on them too. This encourages community at the conference. To solve the puzzle you need to find others with different lanyards. Compare the glyphs and crack the code (so far I have no clue!!).

Know what I’m doing wrong? Have suggestions on where to go from here? I’ll be checking the comments!

Thumbnail that say The Hacklet

Hacklet #10 Cryptography And Reverse Engineering

10 In honor of DEFCON, this week we’re looking at some cryptography and reverse engineering projects over at Hackaday.io hardware reverse engineeringEvery hacker loves a hardware puzzle, and [Tom] has created a tool to make those puzzles. His Hardware Reverse Engineering Learning Platform consists of a shield with two ATmega328 chips and an I2C EEPROM. The two Atmel chips share a data bus and I2C lines. Right in the middle of all this is an ST Morpho connector, which allows an ST Nucleo board to act as a sniffer. The platform allows anyone to create a reverse engineering challenge! To successfully reversechip whisper engineer a board, it sure helps to have good tools. [coflynn] is giving that to us in spaces with The ChipWhisperer. ChipWhisperer is an open source security research platform. The heart of the system is a Xilinx Spartan 6 FPGA. The FPGA allows very high speed operations for things like VCC and clock glitching. ChipWhisperer is an entire ecosystem of boards – from LNA blocks to field probes. The entire system is controlled from an easy to use GUI. The end result is a powerful tool for hardware attacks. nsa-awayOn the Encryption side of the house, we start by keeping the Feds at bay. The [Sector67] hackerspace has collectively created NSA AWAY. NSA AWAY is a simple method of sending secure messages over an insecure medium – such as email. A one-time use pad is stored on two SD cards, which are used by two Android devices. The message sender uses an Android device to encrypt the message. On the receive side, the message can be decoded simply by pointing an android device’s camera at the encrypted data. So easy, even a grandparent could do it! buryitNext up is [Josh’s] Bury it under the noise floor. “Bury it” is an education for cryptography in general, and steganographic software in particular. [Josh] explains how to use AES-256 encryption, password hashing, and other common techniques. He then introduces steganography  by showing how to hide an encrypted message inside an image. Anyone who participated in Hackaday’s ARG build up to The Hackaday Prize will recognize this technique. zrtphardphone[yago] gives us encrypted voice communications with his ZRTP Hardphone. The hardphone implements the ZRTP, a protocol for encrypted voice over IP communications. The protocol is implemented by a Raspberry Pi using a couple of USB sound cards. User interface is a 16×2 Line character LCD, a membrane keypad, and of course a phone handset. Don’t forget that you need to build two units,or  whoever you’re trying to call will  be rather confused! moolti-3

Finally we have the Mooltipass. Developed right here on Hackaday by [Mathieu Stephan] and the community at large, Mooltipass is a secure password storage system. All your passwords can be stored fully AES-256 encrypted, with a Smart Card key. Under the hood, Mooltipass uses an Arduino compatible ATmega32U4 microcontroller. UI is through a OLED screen and touch controls.     That’s it for this week! Be sure to check out next week’s Hacklet, when we bring you more of the best from Hackaday.io!

Astronaut Or Astronot: Don’t Try To Record SQL Queries At DEFCON

It’s Friday morning and time for another round of Astronaut Or Astronot, the little lottery thing where we’re giving away lots of dev boards, programmers, and an awesome meter to someone on hackaday.io if they have voted in the latest round of voting.

There’s no video this week because, you know, DEFCON, but the person randomly chosen did not vote. Too bad.

This means the voting will continue next week, same time. If you want a chance to get your grubby mitts on a bunch of awesome gear, vote. Do it now.

IPad Finds New Home In Mac Classic

Who of us out there don’t have a spare iPad and Mac Classic kicking around? If you are one of those lucky folks then this project is for you. [site hirac] has made a pretty neat stand for an iPad made out of a Mac Classic case (translated). It just happens that the screens of the Mac Classic and iPad are pretty darn close in size. Although the screen size is similar, the resolution is not. The original Macintosh Classic had a black and white screen with a resolution of 512 × 342 pixels. The iPad’s resolution of 1024 x 768 pixels has 450% more pixels than the original Mac.

To get the iPad to fit correctly, the case had to be significantly modified. First, all of the internals of the Mac were removed, leaving just an empty case. The front panel of the case was removed and a slot on the left side is made. This slot helps to allow the iPad to slide into the Mac. On the inside of the front panel quite a few of injection molded supports were trimmed away for clearance. A slot was also cut in the left side of the rear case half. When the case is re-assembled, the slots in the front and rear halves provide a large enough hole for the iPad to fit through. Oddly, there are some plastic features on the front panel that are at just the right height to hold the iPad in the ideal location to line up with the screen cutout in the case.

Continue reading “IPad Finds New Home In Mac Classic”

A Do-It-Yourself Air Conditioner With Evaporative Cooling 5 Gallon Bucket

image42-300x225The people over at Gray Wolf Survival have this amazing little air conditioning project that is a perfect addition to any household that doesn’t have flowing air wafting through. It was created by [Figjam] for a trip to Burning Man, where all kinds of crazy ideas are bred in the hot dry heat of The Playa sun.

The design uses no ice, which is the cooling agent typical found in other DIY air conditioners. Those generally cut holes in the top of a cooler, put a fan on top to blow the air down across the ice. This is similar, but acts more like an evaporative cooler (not really a traditional air conditioner but it does the job).

397648283-300x225
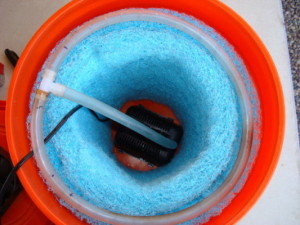
It uses a LOT less energy than an air conditioner unit so there won’t be a need to increase the power capabilities of a simple system to work it, and it can reduce the temperature by up to 30 degrees as well as alleviate the dryness associated with living through a Burn. It runs off 12V DC so it can either use the solar panel or connect to a battery. It has a 12V power plug for this, and draws as little power as absolutely possible. Plus, it has the ability to easily connect to a larger water source so it won’t have to be continually refilled. These considerations make it very portable and perhaps backpackable as well.

[Figjam] took a 5 gallon bucket, wrapped the inside with two layers of swamp cooler matting, made a loop of hose above it connected to a submersible pump and ran a fan out the top with piping. Connecting it to a shelter is done with a vent hose.

Turning Street Sweeper Bristles Into Lock Picking Tools…For Science!

In between writing for Hackaday, most of us (if not all of us) like to design projects on our own, creating whatever might come to mind. I, for instance, enjoy experimenting with lock picking techniques at industrial, gritty, and real warehouses in Southern California learning how to utilize the resources there, turning spare parts into something completely different.

One such skill I learned is how easy it is to make lock picking sets from discarded scraps of metal. The documentation is found on a personal blog of mine called HackerTrips (we cover our own stuff sometimes). It contains several photos and descriptions of the process involved which I picked up thanks to a hackerspace in Fullerton where local makers dream up all kinds of interesting projects.

The project starts out by walking on the streets, which is a rarity these days. This is because the general modes of transportation now are either a car, a bus, a subway, a train, a bike, or a plane, which puts the attention on the destination at hand rather than peering into the fractures of the road. This means that a lot of the time, people don’t notice the hidden treasures found on the side of the street, including the street sweeper bristles that have been knocked off their edges.

Continue reading “Turning Street Sweeper Bristles Into Lock Picking Tools…For Science!”

Lego Technic Mechanical Seven Segment Display

TeemingColdDiplodocus

Here’s a rather mesmerizing piece of Lego genius, displayed as a .GIF for your enjoyment. It’s a 7-segment display that is completely mechanical!

Built by [aeh5040], this beauty features 7 separate linkages that control each display segment. It’s powered off of a single motor which rotates a cylinder covered in small protrusions, similar to how music boxes work. As the cylinder rotates, the protrusions knock the main drive gears back and forth, flipping each segment between the ON and OFF states through a series of axle joints and bevel gears.

It makes rather satisfying sounds too!

Continue reading “Lego Technic Mechanical Seven Segment Display”