More Power For Raspberry Pi USB Ports

Since the Raspberry Pi 2 was released, everyone building RetroPi emulators has been graced with four USB ports. For those of us doing useful stuff with the Pi, those ports are a little anemic: you can’t plug in a webcam and a WiFi module at the same time without suffering CPU brownouts. The maximum current all USB peripherals can draw from the USB port is 600mA. By changing a value in the /boot/config.txt file, this current limit can be increased to 1.2A for all four ports.

Pisquare
The yellow line traces the signal from the GPIO to the USB power switch.

Because the USB current limit is set in software, there must be a few bits of hardware that do the actual work. Tucked away below the right hand of the GPIO header is the hardware that does exactly that. It’s an AP2253 current-limited power switch (PDF), and the current is adjustable by tying a resistor to pin 5 on the chip.

Pin 5 on the AP2253 is connected to two resistors. One resistor goes directly to a ground plane, while the other is switched through a FET. The gate of this FET goes to another resistor, and when a GPIO pin is high, these resistors are wired in parallel. This means the resistance is halved when the GPIO pin is high, doubling the current limiting circuit in the AP2253.

This setup provides a relatively easy mod to increase the current limiting of the USB ports so they can provide 4x500mA, meeting the USB spec. The AP2253 power switch’s current limiting can be set by a single resistor, anywhere from 10kΩ to 232kΩ. By removing R50 and R4, and replacing R50 with a 10kΩ resistor, the current limiting of the AP2253 switch will be set to its maximum, 2.1A. Divide that by four, and you have 500mA per port, just like every other computer on the planet.

There is a reason the Raspberry Pi foundation set the current limiting of the USB ports so low. The Pi was originally intended to run off of a micro USB phone charger. There aren’t many phone chargers out there that will supply more than 1A, and the CPU and related peripherals will take half of that. If you’re going to change the /boot/config.txt file, you’re going to need a beefy power supply. Increasing the current limiting of the USB ports to 2A will require an even bigger, beefier supply.


Internet Of Cowbell

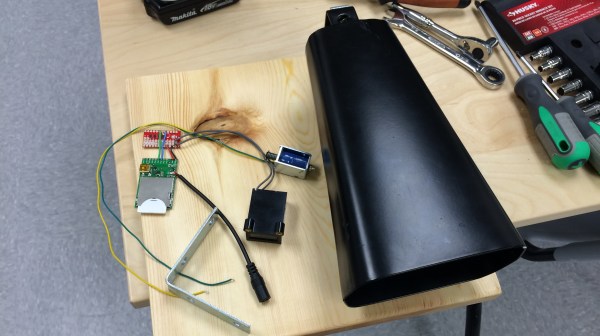
If this is a sign of the times, the Internet of Things promises a lot of entertainment for hackers who can come up with wacky ideas and interactive projects. [Brandon] built a cowbell that rings when you tweet #morecowbell. Why? Because!

On the hardware side it is quite simple, and can be built in a number of different ways depending on the parts you have lying around. [Brandon] used an Electric Imp and its corresponding breakout board. A Sparkfun mini FET shield helps drive the solenoid that hits the cowbell. And because he had one lying around, he added a counter across the solenoid to count the number of times the Twitterati have rung the Cowbell.

The code for the Electric Imp consists of two parts – the “agent code” that runs on a server in the Electric Imp Cloud and the “device code” that runs on the imp itself – and is available at this Git link. Once you tweet with the hashtag, the Cowbell replies back, randomly selecting one from a list of stored responses. Would be nice to see a video of the Cowbell in action. And if it can be made to play the Salsa beat.

Robot Chicken

T-1000C: This Time The Chickens Will Be Back

For whatever reason the city [Jenslabs] lives in decided it was a good use of taxpayer money to make some giant twig chickens and put them on the boulevard in front of his house. So he decided to spruce them up a bit with some electronics.

We’re still unsure why they did this, but [Jens] recognized them for what they truly are. T-1000C — the chicken edition. Giant robot chickens sent from the future to keep an eye on [Jens] to make sure he doesn’t stop ChickenNet. Naturally they needed glowing red eyes.

Fully expecting all his hard work to be thrown out eventually, [Jens] built the upgrades out of cheap components. A few LEDs, some transistors, resistors and a LDR (light dependent resistor). That way the eyes only glow at night.  And to waterproof it all, he wrapped it in good ‘ol duct tape.

For more fun Easter hacks, why not add some LEDs to your decorated eggs?

Hackaday Links Column Banner

Hackaday Links: April 5, 2015

[Dino] found something pretty cool at Walmart. It’s a USB Lighter; basically a car cigarette lighter that’s powered by a battery and charged via USB. A few bucks will buy you a battery, charge controller, and USB plug that will deliver over 2 amps at 3.7 Volts.

Speaking of battery chargers, here’s something from [Thomas]. He works in a hospital, and the IV pumps have a terrible charging circuit. After a few dozen chargers, they’ll give a battery error on the screen. They’re not bad, only unbalanced. [Thomas] made a simple rig with a Tenergy battery charger to rebalance the packs. No link, but here’s a pic. It beats paying $34 for a new battery pack.

Those Silhouette Cameo blade cutters don’t get enough respect. You can make vinyl stickers or an Arduino-themed pop up card.

Retroreflective spraypaint. Volvo has developed something called Lifepaint. It’s for bicycles and bicycle riders. Apparently, it’s clear when you spray it on, but if you shine a light on it – from a car’s headlight – it will reflect back. Any cool ideas here?

The Art of Electronics, 3rd edition, is finally out. Didn’t we hear about this a few months ago? Yes, we did. It’s shipping now, though, and there’s a sample. It’s chapter nine, voltage regulation and power conversion.

Ah, April Fool’s. I’m still proud of the Prince post, but there were some great ones this year. RS Components had Henry the Hover Drone, but we really like the protoboard with ground planes.

The market wasn’t always flooded with ARM dev boards. For a while the LeafLabs Maple was the big kid on the block. Now it’s reached end of life. If only there were a tree whose name ended in ~ino…

Ask Hackaday: The Latest Advances In Perfboard

It’s no secret the Hackaday tip line gets a lot of email from Kickstarter campaigns and PR firms managing Kickstarter campaigns. Most of these are terrible products. Want a five-pound battery that can’t be recharged? Yeah, stuff like that.

Every once in a while, we come across a tip that’s a completely original idea. There’s a balance between ingenuity and practicality with these ideas, and I can’t figure out where this one sits. It’s a Kickstarter for perfboard, yes, but not like any perfboard you’ve ever seen.

Busboard, or solderable breadboard

Before we dig into this, let’s get some definitions straight. Perfboard is a sheet with holes drilled on a 0.1″ grid. The holes are plated on both sides, and each hole is an individual electrical node. Veroboard, or stripboard is a bunch of holes on a 0.1″ grid. These holes are also plated, but all the holes in a column are a single electrical node. You can cut the tracks between holes, but the basic idea here is to reduce the number of wires needed to connect components. Busboard, seen left, is a continuation of Veroboard, and is laid out like a solderless breadboard.

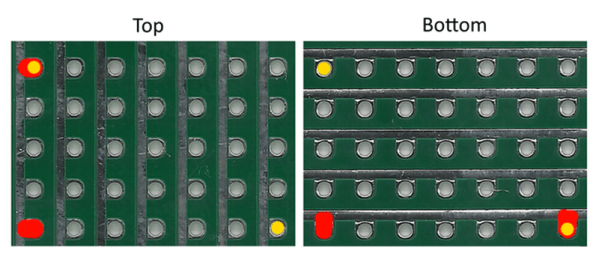
And so we come to the new invention, Perf+, the perfboard reinvented. This perfboard again is a series of plated holes on a 0.1″ grid. Alongside these holes is a plated bus. This bus does not connect to any hole; instead, a little bit of solder is used to connect it to holes on the same row or column. “Selective Veroboard,” you could call it.

Now for the real trick: on one side of the board, the plated busses run vertically. On the other side of the board, the plated busses run horizontally. This means any two holes on the protoboard can be connected as one electrical node simply with a bit of solder.

If ever there was an idea you could point to and simultaneously say, “that’s clever” and “I have no idea how to use this,” there you go. I’m pretty sure this idea isn’t better than a piece of stripboard, but it is different. If you have any idea of how to used this new, strange, and otherworldly protoboard for something useful, put a note in the comments.

CastAR Teardown

A little more than a year ago, castAR, the augmented reality glasses with projectors and retro-reflective surfaces made it to Kickstarter. Since then we’ve seen it at Maker Faire, seen it used for visualizing 3D prints, and sat down with the latest version of the hardware. Now, one of the two people we trust to do a proper teardown finally got his developer version of the castAR.

Before [Mike] digs into the hardware, a quick refresher of how the castAR works: inside the glasses are two 720p projectors that shine an image on a piece of retroreflective fabric. This image reflects directly back to the glasses, where a pair of polarized glasses (like the kind you’ll find from a 3D TV), separate the image into left and right for each eye. Add some head tracking capabilities to the glasses, and you have a castAR.

The glasses come with a small bodypack that powers the glasses, adds two jacks for the accessory sockets, and switches the HDMI signal coming from the computer. The glasses are where the real fun starts with two cameras, two projectors, and a few very big chips. The projector itself is a huge innovation; [Jeri] is on record as saying the lens manufacturers told her the optical setup shouldn’t work.

As far as chips go, there’s an HDMI receiver and an Altera Cyclone FPGA. There’s also a neat little graphic from Asteroids on the board. Video below.

Continue reading “CastAR Teardown”

Fail Of The Week: Re-addressing Your RAM DIMM

It doesn’t work and we’re not surprised considering the can of worms that comes with RAM addressing. Right off the bat we assume timing problems due to variance in the trace lengths and EM issues. But you have to hand it to [cyandyedeyecandy] for even trying. The self-proclaimed upgrade seeks to readjust how the DIMM works without changing the edge pinout.

The stick shown here is a 512 MB module that, because of the computer using it (unspecified in the post), is only allowing access to 256 MB. The added chips and free-form circuit make up an AND for the chip-select line, and flip-flop for the bank address.

The post is a gorgeous cry for help. We already weighed in from the peanut gallery at the top (seriously, that’s somewhat baseless guessing) so step up to the computer-engineering plate and let us know what needs to be done to make this most-awesome-of-non-working hacks actually work.

Once you’ve figured this out, here’s another one to scratch at your brain with.