Recently we started a series on the components used to assemble a circuit board. The first issue was on dispensing solder paste. Moving down the assembly line, with the paste already on the board, the next step is getting the components onto the PCB. We’re just going to address SMT components in this issue, because the through hole assembly doesn’t take place until after the SMT components have gone through the process to affix them to the board.
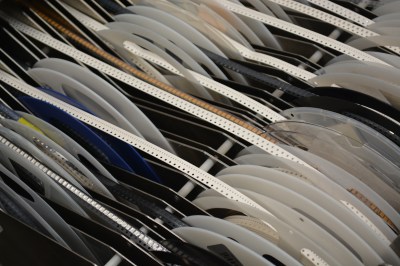
SMT components will come in reels. These reels are paper or plastic with a clear plastic strip on top, and a reel typically has a few thousand components on it. Economies of scale really kick in with reels, especially passives. If you order SMT resistors in quantities of 1-10, they’re usually $.10 each. If you order a reel of 5000, it’s usually about $5 for the reel. It is cheaper to purchase a reel of 10 kOhm 0603 resistors and never have to order them again in your life than it is to order a few at a time. Plus the reel can be used on many pick-and-place machines, but the cut tape is often too short to use in automated processes.
The point of the reel is that it will go through a pick-and-place machine, which is a machine that uses a vacuum syringe to pick up the part and place it in the right spot, then advance the reel and repeat. In theory this is straightforward. In practice, there are a billion little details that make a huge difference in reliability. Things like the tension of the clear strip, which must be just right so that it doesn’t leave slack but doesn’t pull the reel out. Or the adhesiveness of the strip can be a problem, too. We had one reel that started off jumpy; the adhesive was too strong, so the tape tensioner struggled to pull the tap off the reel, and it would do it in such a manner that the newly exposed component would twitch and sometimes jump out of the reel, leading the vacuum to try to pick up a missing part and stall. After a while the humidity made the tape adhesive looser and the problem went away. Every day running the line can be different for each reel, so keeping everything tuned is a constant battle. Most of the time the reels will come in sealed packages because humidity has a huge effect on the reels and the components in them (especially their connections).
Some components come in tubes because they are inconvenient for reels. This is surprisingly not a problem, as many pick-and-place machines have attachments that hold the tube at an angle and have mechanical shakers that make the parts slide out one at a time. But we’ll ignore that for now.
So you have a box of reels and cut tape (the term used for a cut strip off of a reel, if you don’t order the full reel), and you have a PCB with solder paste on it, slowly warming up. How do you get the components onto the PCB?
Tweezers
In small volumes, usually with good old tweezers. You do not want to use the ones in the bathroom vanity, as solder paste usually has lead in it and you don’t want to make anyone angry or poisoned. Get a nice set of very fine tipped tweezers.
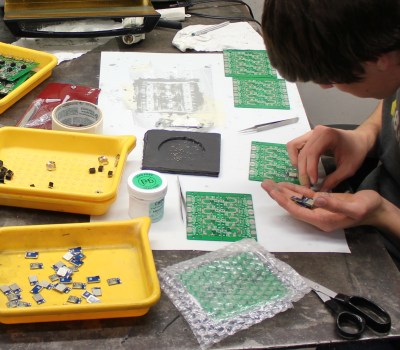
It turns out it’s possible to go with tweezers for medium volumes as well. In the first year of production, 3,000 units of a product that I developed were assembled by hand, each with roughly five SMT components. It turned out that at that volume, hiring high school kids at slightly higher than the local burger joint rate gave us lots of manufacturing flexibility, and gave the kids a decent wage at whatever hours they wanted, in a relevant field to their interests, and ended up being cheaper than the quotes we got from China.
The good news is that manual placement can get away with being pretty sloppy. When the PCB goes through the process of reflow, there are some neat chemical and mechanical processes that take place that align everything just right, so that the exact placement of the components isn’t critical. Essentially, the solder will melt and flow onto the pads and off of the solder mask, and any component will float on this and the flux and self-align. Still, all the connections of a component must be touching the solder paste, or else they won’t align properly.
Vacuum
 When you are doing a bunch of boards that have a lot of components, it can quickly get tiring to place all the components by hand. One method of making it easier is the vacuum tip instead of tweezers. The idea here is to get an aquarium pump and set its direction so it is sucking. Then put a syringe on the end of a tube and put a small hole where the thumb will be. Now when you put the finger over the hole, the syringe needle will suck up a part. Move the part to your destination and release your thumb and the vacuum seal will be broken, releasing the part onto the PCB. This is good for pulling the part directly out of the tape where tweezers can’t reach. We’ve covered a few of these aquarium pump pick-and-place builds over the years.
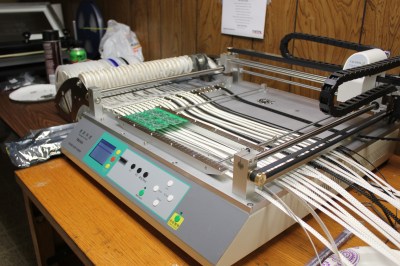
Semi-Automatic Pick and Place
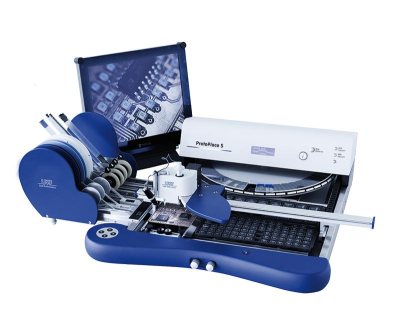 The next step is a strange hybrid between man and machine. It’s a contraption that holds the PCB in place and has a hand rest that moves on linear rail in the X and Y directions, and sometimes has a vacuum needle as well, and trays for reels or loose components. It doesn’t have any brains; those are provided by the operator. The operator can rest their hand on the moving pad as they direct it to go pick up a part, then move to place it. It just alleviates the physical burden on the person doing the component placement, but doesn’t really save much time. It’s hard to think of a good use case for this level of machine, though. Maybe a shop where they have to assemble small batches of different boards? Definitely not for high volume production of one board.
Automated Pick and Place
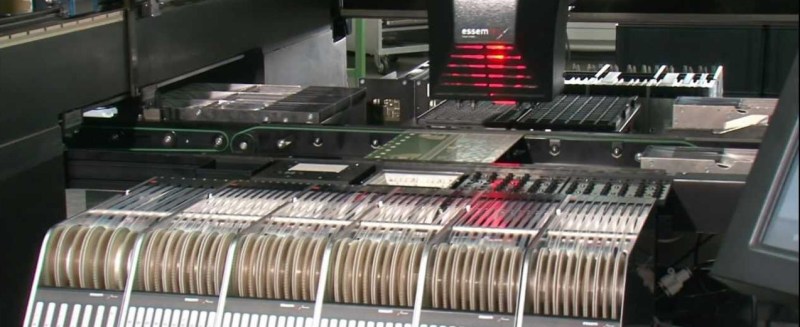
Unless your budget is in the $3,000+ range, you may never get to use one of these. This is a device with an automated gantry and a vacuum needle as well as a tray of reels. It reads a special file which details which components are on which reel, and which XY and rotation coordinates to place them. There are a lot of features to look out for. First is CPH, which is how many components it can place in an hour. Usually you’ll see numbers in the thousands, with the more expensive ones getting into the tens of thousands. They accomplish this with multiple nozzles, so the head will move over to the reels and pick up more than one component, then move over to the board and place a few components at a time.
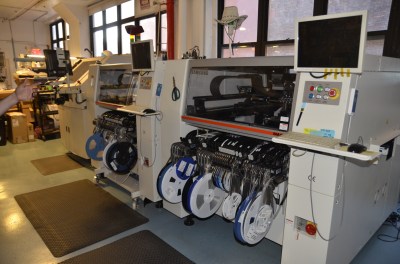
Another important number is how many reels the machine can support. If you are developing a product that requires 30 unique components but the pick-and-place can only do 25, then you’re looking at either needing two machines, or doing a few runs of boards with 25, then changing out the reels and putting those boards through again for the other 5 reels, then hopefully getting them through the oven intact. It’s much better to design your board to use as few unique components as possible (if you have a 10k resistor elsewhere, do you REALLY need the 4.7k, or can you get away with a 10k there instead?), or make sure you get a pick-and-place that can handle the number of reels needed. On the big fancy assembly lines, each machine has a hole in either side with conveyors, so that a PCB goes in one machine on the left, processed, then out on the right. This allows for a completely automated line, and the possibility of having two pick-and-place machines stacked together so the number of reels is not a limitation.
Some have machine vision, too. That allows the machine to automatically correct for slight deviations either in the PCB (if there is any slop in the alignment holes) or in the picking of the part (sometimes if a heavy part is rotated 270 degrees, the momentum of the rotation will cause it to over rotate, or the movement of the head will cause the part to shift slightly). This is especially good for BGA or fine pitch components, where perfect placement is crucial.
There is a company called VisionBot making a pick-and-place and launching soon on Kickstarter. They may be worth watching.
Open Source Pick and Place
This has been attempted, but there are so many challenges in these machines, and such small demand from the community, that progress is slow. OpenPnP is the community around this. There’s also a fine Hackaday.io project building a DIY pick-and-place, and another one was a semifinalist in the 2015 Hackaday Prize that converted a CNC gantry.
3D Printer Gantries
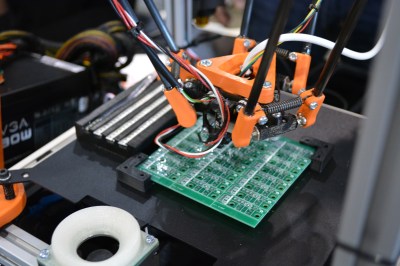
The idea here was to use the same technology that has been used with 3D printers to pick up and place components on the PCB. A camera is used to identify where the cut tape is and where the PCB is, and a process aligns the cut tape with the appropriate component designation, and then the machine is off on its own using the computer vision to identify where it needs to pick up and place each component. This is particularly suited for one-off or really low numbers of boards. They can’t advance reels, and everything must fit within the reach of the head, so board size is limited and number of components is limited. FirePick Delta is one such example.
Placing components should not be a thing that prevents you from diving into SMT PCBs. Tweezers are perfectly fine for 0402 components even for novices, but there are also machines to aid in placement from the cheap-and-rough up to the high volume super fancy mass production, and some options in between for small and medium volumes of startup-type basement production.


The delta bots used in 3D printing were derived from delta bot pick and place machines. Funny how this comes full circle.
I think that http://www.liteplacer.com/ needs to be added to this list. We bought one of the first units for our hackerspace a while back and the creator of this machine Juha is super friendly and will do his best to support your build process. The development is quite active but afaik it’s windows only.
Did it work reasonably well?
A $1400+ kit is not something most people can gamble on.
Keep in mind that it’s a kit, if you’re expecting something to work out of the box- this is not for you. If you like tweaking stuff and contributing to an open source project – this is for you. Some assembly may be required, for us it took almost half a year of super lazy assembly to somewhat finish it. A dedicated hacker could be up and running in less than a week if doing it daily after working hours.
Thanks,
We did spot it last year, but there were no 3rd party clips showing it in regular production.
A photo-blog about your experience would be welcome. ;-)
The neodens are getting pricey these days, and it would be nice to have a long-term GPL option.
As far as I understood from Ian- you can get 10 or 15 % off of the base price for the new neoden if you mention dangerousprototypes. They have one in their office in hqb.
Search LitePlacer on Youtube, you’ll find 3rd party videos. You don’t find the Elektor time lapse assembly, so here is that link: https://www.youtube.com/watch?v=UKRzOaB4xNw
And yes, for the total cost it’s an incredibly precise machine.
As for the prototype/ small volume production P&P machines, Mechatronic Systems has some nice ones for a very decent price (www.mechatronic-systems.com). They have a lot of vids of the machines on youtube: https://www.youtube.com/channel/UCv5aZMFXulh9B8GYQ4-zmyA
If you’ve got $6k – $10k and want to be producing boards within a few days, we’ve been reasonably content owners of a VP-2500D since January. Dual nozzles are nice and vision feedback is lovely. http://www.smallsmt.biz/home/vision-placer-vp-2x00d/ Our typical batch size is 20-50 boards with BOMs 10-20 parts deep. No affiliation, just happy.
…Or you can buy two Neoden machines for $6k.
=/
Not with vision, which is invaluable for some parts. But tvm-802a seems like the best value right now.
Indeed, the tvm802b series has 46 feeders with tray picking too.
Very tempting price for a ready made unit. =)
Karma +1
The “Aquarium pump” here above points to an Hackaday entry, which then refers to dead links.
try this one:
http://hackaday.com/2013/01/25/20-vacuum-pen-build-on-of-the-best-weve-seen/
Quick question; what is the difference between SMT and SMD? I have seen both terms used here, and they seem to be interchangeable. Are they or is there a difference?
Smt stands for surface mount technology, smd for device. So a chip is smd, made in smt.
My understanding is SMT = Surface Mount Technology, SMD = Surface Mount Device. I am not aware of any implied differences between them, although someone will doubtless prove me wrong ;-)
Sadly not. Technology vs Device. Arguably the way SMT is used is often grammatically incorrect.
Should also include some information on REALLY high end places, or ‘chip shooters’.
These suckers are amazing !!!
https://www.youtube.com/watch?v=SRu02F6AOmg
Those ARE really cool. I hope some day in my life I’ll have a product made in high enough volumes to justify the use of such an amazing machine.
Been to hackercamp Shenzhen, organized by dangerousprototypes last year. We went to a pcb assembly factory where there was a similar machine. That factory was handling typical runs between 10 and several 100s of board. This ‘gattling guns’ are used to place passives and a normal pick and place for chips and larger components.
This is quite an impressive machine but on second sight I’m really supprised it’s doing almost nothing for the first 49 seconds of the video. The board is finished @ 1m35s.
So with a little bit of extra effort (put the measuring camera’s somewhere else) the total throughput of this machine coud have been doubled.
I’m pretty sure that the “idle time” is the machine calibrating itself to the actual position of the board relative to the placement heads, so that all the parts are placed correctly. Possibly also to ensure the correct board is present. It looks as though the camera is looking at specific board features to determine alignment. Perhaps that can be sped up, but I wouldn’t want to skip it.
This is a very old CP style rotary style with a moving table. I haven’t worked with one of these machines in about 15 years. The newer machines have a much faster cycle time and the tach times are almost nonexistent.
https://www.youtube.com/watch?v=ymyhtCIoQ0Q
Please add a “continue reading” break
hear, hear!!
Why clutter up the page?
Your thumbs arn’t that tired, are they?
I’m Jason von Nieda, from OpenPnP. Thanks for the mention!
I just wanted to add that while progress has indeed been slow (5 years and counting since I started this project) we have now reached the point where you can build an OpenPnP based machine from commonly available components and start placing immediately. We’ve published several open source hardware designs at http://openpnp.org/hardware and the software is well tested, stable and used around the world for production jobs.
If you are interested in DIY pick and place, please check out the website, and come visit us at Maker Faire Bay Area later this month!
The manual pick-and-place is more valuable than you think. Keeping the vacuum needle steady and level, providing a simple way to rotate the part without twisting your wrist or rotating the PCB, organizing and feeding (manually) part tape…all good stuff. It also stabilizes the hand, and setup requires no arcane files and endless tests ;) The brain is a pretty good computer and motion controller, especially for low quantity runs.
It’s even more than that. Most “semi-automatic” pick and places have adjustable X/Y stops, and some even have stops that can move a specific distance with a command (so there are like, half-brains in them).
That means that you can align the nozzle to a spot, set the stop, go pick up the part, and put it back in the exact spot it was. Then if you increment the stop, you can quickly place arrays with precision.
They’re really, really useful for prototyping, since the setup time on a full pick and place just vastly exceeds the benefit in a lot of cases.
A link missing from this article:
Mike’s (electric stuff) sticks a bunch of of pieces of cut tape to a piece of mdf (or his desk) with double sided tape for small series before he peels of the “clear strip”. This saves some time because the tape is held very sturdy by the double sided tape so you don’t have to be careful when tearing of the top strip.
Also:
Davey Jones suggests in one of his video’s to use parallel and series combinations to save on reel costs.
Third:
I remember a Hackaday link to a very simple manual pick and place made from mdf, a few aluminimum angle profiles and a few ball bearings.
When searching for a PBC mining machine in Europe I found Cirqoid. It might be worth to open http://www.cirqoid.com and check what hey offer.