We’ve all have projects that are done, but not complete. They work, but they’re just a few PCBs wired together precariously on our desks. But fear not! A true maker’s blog has gifted us with a detailed step-by-step guide on how to make a project enclosure.
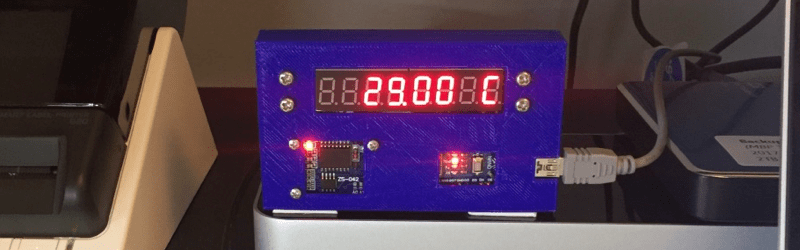
Having purchased an MP Select Mini 3D Printer, there was little to do but find something practical to print. What better than an enclosure for a recently finished Time/Date/Temperature display Arduino based device?
The enclosure in this guide, while quite nice, isn’t the main attraction here. The real feature is the incredibly detailed instructions for how to design, model and print an enclosure for any project. For the veterans out there, it seems simple. Sketch something on the back of a napkin and take a nap on your keyboard with OpenSCAD open. When you wake, BAM: perfect 3D model. However, for newcomers, the process can seem daunting. With incredibly specific instructions (an example is “Open up a new workspace by clicking CREATE NEW DESIGN,” notice the accurate capitalization!), it should ease the barrier of the first enclosure, turning the inexperienced into the kind-of-experienced.
If you’ve been printing enclosures since the dawn of time or plastic simply isn’t your style, boy, do we have you covered. Why not check out FR4 (aka PCB) enclosures? Or what about laser cut enclosures from eagle files? Maybe two-piece boxes are more your thing.


I have never tried a 3d printer before, but they look so cool.
had mine for a a couple years, they call them ‘disappointment machines’ for a reason :(
Oh no!
Don’t let him scare you. 3D printers aren’t miracle machines, have limitations, and can be finicky, but after I developed the proper expectations, experimented, and learned how to use them, it’s incredible fun.
The particular printer model and how recent it is makes a big difference. The field has refined quite a bit and today’s models are much better and easier to use than those just a few years ago. Although I saw the potential, I wasn’t so impressed when I tried my friend’s Makerbot years ago. Today I can’t be happier with my Prusa i3 Mk2 and how it enables me to make things I couldn’t before.
You made a good choice.
If you make a good choice you can have an incredibly useful tool. If you make a bad choice you end up spending hours fiddling with settings and continual adjustments caused by poor design.
I am very intrigued by the medical applications. My son and I use joint braces because of our disability. Since he is still growing like a weed I thought it would be cool to print custom ones with a 3d printer.
Askagimp, my daughter uses joint braces too. I tried 3D printing early on owning my printer. The results were rubbish, I had better luck using polymorph low temp plastic(boiling water is all you need) made modifying the brace easy even on vacation. The quality is similar to what the shop gets using hot air gunned plastic sheet. Add a cushion layer and she is set, polymorph is also as strong as injection molded nylon vs FDM which requires high temperatures and slow thin layering to get a fraction of the strength.
Polymorph plastic is a great way to have 3D printing using the feedstock pellets, hot water, and your hands or art tools; I use it as an adjunct and especially for repairs when out in the field.
If 3D printing is rapid prototyping low temp plastic makes a cruder looking(melted wax appearance) bur nearly instant plastic prototype or spare part.
https://en.wikipedia.org/wiki/Polycaprolactone
If you can figure out the simplest software coding, think old Basic level, then go OpenSCAD, I love it as it is all parametric. If you are a pro working on a group project and have a fat wallet and ready for the learning curve go SolidWorks. But if you are not making your own stuff and just want to beam something down from Thingiverse.com a 3D printer will disappoint you as it does most noob users
Anyways if you can make your own models and understand how to make a printable part or design the printable parts to assemble a complete object then 3D printing for rapid prototyping is the bees knees, it is even better than having a sheet metal shop where you can bend and punch a custom box.
The story presents for me one of my main uses of the 3D printer, nice professional enclosures for custom electronics. This really pays off on an ultra fast job where I might just hide an Arduino or R-pi from my supply boxes and some dead bug or perf board ‘reduce to practice’ two hour window of opportunity type prototypes.
Bah. I’ve had 3 now. They’re at the point where it’s not quite click-and-print, but close enough that a week or two of printing will get you 90% of the way to where ya need to be.
Just remember what they were designed for: rapid prototyping. If you don’t go in expecting to 3D print machinist-grade parts, you’ll be fine. The parts you’ll make – for the most part – are plastic, and should be treated as such.
Was really hoping this would be a detailed guide on making an enclosure for a 3D printer.
+1
I, too, was a little disappointed after the first few lines.
Another crappy, ugly box, where perfectly standard of the shelfs products exists.
Nearly all things of plastic are better purchased from mass production.
Adapt your project to what quality parts are available stock unless you have the numbers to make or have made a profitable quantity of your bespoke thing.
3D printing is an amazing resource when the supply chain is cut off or too long to be reliable or you need your part in around an hour or so.
buy enclosure from shop, printing it is waste of time
Dremelling, cutting, filing and sanding openings only to get something that looks like a piece of crap is a waste of time. I’m in the boat the article mentions, a bench full of finished working projects that are electronically finished but a pile of loose boards. I’ve tried using premade boxes and always get something horrible looking.
Not sure how you think printing is a waste of time. I can design something in fusion360 in 1/10th the time it would take to mutilate a premade box, 2 minutes to define a square hole rather than 45 minutes of measuring, marking, cutting, filing, sanding. And if I leave a printer running 10 hours while peeking at it every hour, it’s hardly taking up much of my time.
I’ve been wanting to try my hand at printing enclosures for a while. I just found out the local library does 3D printing, but the technician hates the machines, prints PLA at 350 degrees and deforms everything while blaming it on the window next to the printers.
Thank you, Soc Rat, for seeing my point of view. I found 3D design very fun, and even watching the printer print is still hypnotizing for me.
If all you want is a rectangular box with holes. a $5 hammond box will look way better than a crappy 3D print.
3D printing has its place, but that place is not making simple boxes that look nasty.
Any good suggestion on an accessible way to create non-round holes on said box ? Say for a square display, usb connector. I’m familiar with a nibbler, but not very happy with it. Cutting through plastic is a messy affair. Don’t have access to a milling, cnc machine either.
If you can drill holes, use fretsaw and some files. Or use die grinder with cutting wheel and files.
I’ve gotten better at that, but my “square” holes still come out wonky looking.
3D printing is a good way to make a bezel or insert to customize a larger circular saw hole. Punch the hole, design & print the insert with all of your ports, button holes, and LEDs or display windows.
Great for DIY designs which often get upgrades.
Use the CNC laser you keep in the kitchen for chopping vegetables. It works just as well on wooden boxes as food.
+1 yes, printing box with holes rather than drilling it? rly?
Yeah… but on the other hand, with some CAD knowledge you can make your projects look quite pretty.
A couple I’m quite happy with my self:
http://slashhome.se/p/gallery/?d=gallery/Electronics/mcu/esp8266/rev_a/case/ (Got bad readings thou, probably from sensor too close to ESP8266.)
http://slashhome.se/p/gallery/?d=gallery/3D-printing/my-creations/solder%20smoke%20sucker/ (The filtering is far from perfect but it at least keep the smoke out of my face.)
Terrible. Tinkercad is an abomination for 3d printing – manipulating wall thicknesses (important, but completely unmentioned in the article) is a nightmare. Also the advice on how to remove pins (heat with a 400C iron and whack the PCB on the table) is dire advice. Pliers exist for a reason, as do temperature controls.
Wow. Usually people get mad at me when I trash yet another 3D printed garbage box. Looks like more people are in agreement with me this time.
If you want to make nice boxes, why wouldn’t you just buy a laser cutter and maoe them out of craft wood? It’s cheaper in the long run and they’ll look wayyy better than plastic.
I have to agree somewhat with all the bashing in the comments.
The quality of the print in the photo looks terrible. If you print an enclosure with front face down on the bed, and you have your first layer settings correct, you should end up with a mirror smooth surface as good as a comercial box.
And the whole idea behind custom printing enclosures is that you can make custom mounting points for your boards and displays and hide all the mounting screws, so, again, your projects can have a comercial look.
Or maybe I’m just too pedantic.
Oh dude, please do. I’m currently in the sorta disillusionment stage of my Monoprice Maker Ultimate. Me and surface finishes are enemies….. I need to spend some serious time working on the details, and just don’t have it to spend right now.
Dang. Replied to the wrong message. Mea culpa. Meant to reply to Derek Tombrello….
Yes, As you can see, we have some surface-quality issues to work out. Mike and I are working on that. Maybe the plate temperature or the nozzle temperature isn’t optimal. Or the room humidity (greater than 90%) is too high. Or the adhesion to the print bed isn’t perfect. We are working on this, with guidance from sites such as https://all3dp.com/1/common-3d-printing-problems-troubleshooting-3d-printer-issues/.
A lot of the debate of build or buy depends on where your comfort zone is. I am trying to design a box, I have to admit that any CAD type of program is not my strong point, so for me, it would be way faster to either buy an off the shelf box or make one out of wood or sheet metal. However I have done that many times before and at this point in time it is not expanding my skill set. The other thing is that with 3D printed enclosures you can make things with irregular shapes that would not be possible with off the shelf enclosures and very hard to fabricate by hand.
As someone who had to self-learn practically everything about CAD and 3D printers for a custom case – https://www.thingiverse.com/thing:2285617 – that I designed for my first 3d printer – a Tevo Tarantula – I have to say that the article linked to here is a far cry from “a DETAILED guide.” OK, he tells you to leave a little breathing room between the boards, but where is the discussion on important topics like:
* Make your screw holes 0.3 to 0.5mm smaller than your screw to allow the screw “bite”. Then depending on how tight you make the hole, thread the screw in or tap the hole first.
* When making round, external holes, you can get a better look if you drop the hole slightly below the top surface in the CAD program so that the top layer is solid, and then, once it’s printed, drill through the remainder of the material with a sharp drill bit. You can do the same for non-circular holes using an Xacto knife if you’re good and careful.
* For a loose fit between pieces, allow 0.3 to 0.5mm of clearance. For a snug, almost snap tight fit, go with about 0.2mm clearance.
* Allow 0.5mm to 1mm clearance around bezels for proper fit.
* All of this is variable depending on your printer’s tolerances, stability and how well built it is.
* When slicing, enable z-hop to avoid dragging the nozzle across the finished top surface – learned this one the hard way :)
Hell… maybe I ought to write a “detailed” guide.
Thank you for these notes, Derek. Micheal U. described my post as a detailed guide. Actually, this is my very first 3D print, and I know I have a lot to learn.
We are so proud of you G & G. Although we don’t understand 60 percent of what you are printing
I dont get it. Why printing case with windows for all modules? Why not make only one hole for display? Box is used mostly for protection of what is inside, so this looks pointless for me at least.
I had designed a window over the Arduino Nano to see the status LEDs and be able to press the reset button. I designed a window over the temperature sensor chip so room temperature can be monitored. I now see these holes are much larger than necessary, and I intend to redesign, and reprint the front of the case.
I made a power supply for a sticher. It came out great. Rectangular holes, vents for heat. Slots to hold fans. A snap to hold an Ethernet connect. Dams to protect
rocker switches. Slide fit top and bottom cover. Thumb screw heads for the fasteners (no tools required)
It is a versatile way to make a no compromise solution.
I really like using these 3d printing enclosures for the printing of my customized product boxes. These printers are amazing for this kind of purposes. And thanks for sharing this informative post and wish you luck for more amazing work.