When you move from one-off builds to production scale, perhaps to meet that Kickstarter commitment or to keep your Tindie store stocked, you’re going to need to tool up. Jobs like building wiring harnesses can be tedious and time-consuming, so outsourcing them to this robot wire cutter might be a good idea.
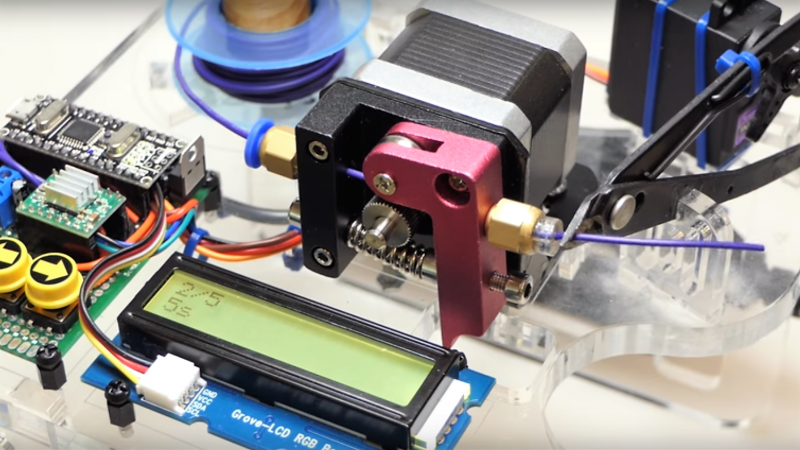
The video below tells the whole tale of this build, which despite the fact that [Maclsk] seems to have put it together quickly from scrap bin parts still looks pretty professional. The business end of the machine is a 3D printer extruder, minus the hot end, of course. A Nano controls the extruder’s stepper to shoot out the right length of wire, as well as the servo that squeezes the snippers. An LCD display and some pushbuttons provide the UI that rounds out the build. Tell it how long and how many, and you’ll be ready to build. We can see how this might be upgraded to strip the wires as well, although getting both ends stripped might be tricky.
Might this component tape-cutting robot from a few weeks back have inspired [Maclsk]’s build? Perhaps, but in any case, both are fun to watch.
[via r/Arduino]


Cool. Now I have a use for those cheap extruders that I have in my parts bin.
is there code available ???
https://pastebin.com/TLRUQ4yK
Dan – I was just brainstorming a gadget that takes a roll over insulted wire feeds x.0 inches, and strips off xx.00″ of insulation and then dips in in a wave soldering bath to “tin” the bare end. And then it could feed x.0 inches and cut it and or feed that end back in a redo the other side. Automated wire jumper generator. I wonder if that was invented yet.
“…over insulted…” ? I meant “…of insulated…”… :(
A hot wire cutter may be able to do a larger variety of thickness, without having to adjust it. But, if the cut and the closing of the stripper might be done with one actuator, then you have the economy of having only one acdtuator, and a simpler schematic. Though, you cutter has to be a type that as a scissor-type action,rather than how a typical pliers works. I suppose you would also need some sort of system to flux the bare metal first.
Tunning the ends would make the soldering work a very easy task.
Joe D – I’ve seen wave solder tanks in a high-tech electronics factory once back in the late 1970’s in USA. It is just a bath of molten solder that the component-populated pcb is lowered into. I have no idea how it works. However, I saw mass production soldering occurring. I don’t think flux is needed to “tin” cable ends. I’ve never heard of “tunning”. Is that a British word or just a typo? How about making this idea into a manual pencil-sharpener style gadget in where you poke one end of your cable into the hole marked BARING and another hole labeled TINNING? The Baring hole bares a set or adjustable amount of single strand wire (scraping or sanding off the insulation). The tinning would be a solder bath like I described above. You’d have to cut the cable wire length you needed manually. My idea only makes-ready-to-install jumper wires of any length. Would not work for RJ-xx nor RG-xx coax cable. Or maybe with a lot of engineering put into the R&D?
WAVE SOLDERING explained: https://en.wikipedia.org/wiki/Wave_soldering
Brilliant use of a cheap 3D printer extruder, love it.
Variable pressure and retraction should be able to strip at least the one end, though perhaps easier said than done.
I think the trick would be to have two extruders and cutters in series if you wanted to strip both ends. Side cutters aren’t that great at reliably stripping wires, but you can get cheap adjustable wire strippers with a big V-shaped groove that should be able to cut the wire as well if you simply remove the adjustment screw.
Like these: https://teachergeek.com/products/adjustable-wire-stripper
nice application
Ages ago I did production floor maintenance on wiring harness for Fords including the famous backseat barbecue ’78 Pinto, and the largest production wiring harness in the world the Lincoln mark IV fatter than your wrist. The machines were all mechanical incl air powered. There was one stepper wheel electronic cutter with a single digital display in the whole plant. Grasp wire, pull till hits stop, triggers grippers at both ends, advance gripper chain one step, kha-poomp-kha-chink four step down with opposing vees-pull-raise vees-retract all done with screw set stops on penumatics, advance wire, chungk terminal crimped, advance to bin. Oh, it did both ends at once. With all the penumatics with no mufflers on exhaust ports they played a rhythm that permeated the whole factory.
Now add stripping on both ends for the win!
Strip both ends and add wire labels, then the ability to import the whole loom of variable lengths from a database.
.. then wrap the loom and crimp the connectors on.
thks tom is there an original version / wiring info too ?? and the stepper motor, is there an info of it ???
I dont have an i2c display and an uno, i do have normal 16 pins lcds and an duemilanove and a mega, never played with servos.
thks
At bare minimum you’re just going to need Arduino, and servo/stepper (plus appropriate drivers for them). The screen and buttons are a nice touch, but really only necessary if you have different sizes you’ll regularly need to cut.
oh just saw the youtube links and some infos about the mmPerStep = 0.180960, will try to source thoses parts, AliExpress has been a nightmare for me recently, waited 90 days to have 3 different items bought in the same day ???
just need a schematics to begin my experiments, checked HAD for previous projects, found nothing of previous versions ?
had a friend who had a german wire cutter, a 45 k $$$ beauty, with huge spools supports and diffrent heads … could go up to 4 awg wires, drool loll
“We can see how this might be upgraded to strip the wires as well, although getting both ends stripped might be tricky.”
I wish I would have taken a video of mine before I decided to improve it… I used a t-stripper for cutting and stripping. The kind that has maybe 6 different wire gauges that it can strip and a cutter near the pivot point. I used a pneumatic cylinder to move between cut and strip, one to close the t-stripper, and a stepper to move the wire in and out. I would cut the wire, move stripper to strip position, advance enough for the strip length, close the stripper, retract the wire, open the stripper, advance the wire length, close the stripper, push and pull the wire just a bit, open the stripper, move stripper to cut position, advance the length that needed to be stripped, and cut. You would then manually pull off the insulation from the other end just before using the jumper to keep the strands from fraying. It kind of sounded like Chitty Chitty Bang Bang. When I tried to upgrade it for 18 gauge wire the wire didn’t feed straight anymore and missed the slot where it needed to be aligned for the stripper. For rollers I used rubber tubing over brass cylinders. That actually didn’t work too well, due to the thickness of the rubber.
– Steve
https://hackaday.com/2012/04/25/homebrew-solder-pot-is-too-dangerous-even-for-us/
I WAS using it for bulk tinning wires, the bulb never did explode, and it didn’t break when the solder froze around it.
halogen, meh.
i need wiring diagram of this thanks