With the proliferation of digital fabrication tools, many feel the future of manufacturing is distributed. It would certainly be welcome after the pandemic-induced supply chain kerfuffles from toilet paper to Raspberry Pis. The Internet of Production Alliance (IoP) is designing standards to smooth this transition. [via Solarpunk Presents]
IoP was founded in 2016 to build the infrastructure necessary to move toward a global supply chain based on local production of goods from a global database of designs instead of the current centralized model of production with closed designs. Some might identify this decentralization as part of the Fourth Industrial Revolution. They currently have developed two standards, Open Know-Where [PDF] and Open Know-How.
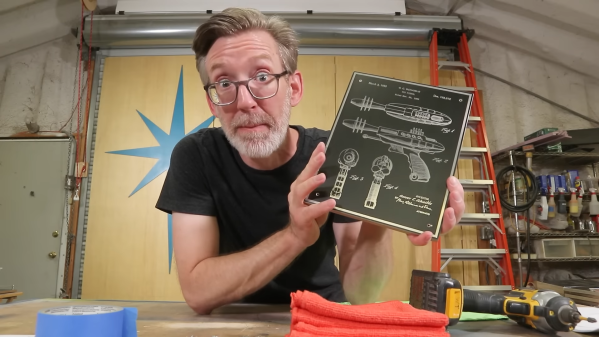
Art is a funny thing. Sometimes, it’s best done in a one-off fashion and sold for a hugely inflated price. Othertimes, it’s more accessible, and it becomes desirable to sell it in great quantity. [Wesley Treat] has been doing just that, and he’s shared some of his tricks of the trade on YouTube.
The video concerns some retro-futuristic raygun artwork panels that [Wesley] made in a recent video. The panels proved mighty popular, which meant he had a new problem to contend with: how to make them in quantity. His initial process largely involved making them in a one-off fashion, and that simply wouldn’t scale.
[Wesley] starts right at the beginning, demonstrating first how he produces stacks of blanks for his art panels. For production scale, he used pre-painted matte aluminium panels to speed the process. It’s followed by a sanding step, before the panels go into a laser etching jig to get imprinted with [Wesley’s] maker’s mark. Panels are then drilled via CNC, etched with their front artwork, and then fitted with a front acrylic panel, similarly cut out on the laser cutter. Then it’s just a matter of packing and shipping, a logistical hurdle that many small businesses have had to overcome.
[Wesley] does a great job of examining what it takes to scale from building one of something to many. It’s a topic we’ve looked at a few times in the past. Video after the break.
The problem with building automated systems is that it’s hard to look at any problem and not see it in terms of possible automation solutions. Come to think of it, that’s probably less of a bug and more of a feature, but it’s easy to go overboard and automate all the things, which quickly becomes counterproductive in terms of time and money.
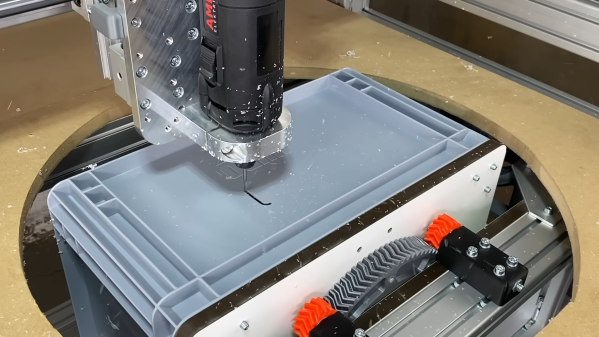
If you’re clever, though, a tactical automation solution can increase your process efficiency without breaking the budget. That’s where [Christopher Helmke] seems to have landed with this two-axis add-on fixture for his CNC router. The rig is designed to solve the problem of the manual modification needed to turn off-the-shelf plastic crates into enclosures for his line of modular automation components, aspects of which we’ve featured before. The crates need holes drilled in them and cutouts created in their sides for displays and controls. It’s a job [Christopher] tackled before with a drill and a jigsaw, with predictable results.
To automate the job without going overboard, [Christopher] came up with a tilting turntable that fits under the bed of the CNC router and sticks through a hole in the spoil board. The turntable is a large, 3D printed herringbone gear driven by a stepper and pinion gear. A cheap bearing keeps costs down, while a quartet of planetary gears constrain the otherwise wobbly platform. The turntable also swivels 90 degrees on a herringbone sector gear; together, the setup adds pitch and roll axes to the machine that allow the spindle access to all five sides of the crates.
Was it worth the effort? Judging by the results in the video below, we’d say so, especially given the number of workpieces that [Christopher] has to process. Add in the budget-conscious construction that doesn’t sacrifice precision too much, and this one seems like a real automation win.
Before it was transformed into an ephemeral stream of ones and zeroes, music used to have a physical form of some kind. From wax cylinders to vinyl discs to tapes of various sizes in different housings and eventually to compact discs, each new medium was marketed as a technological leap over the previous formats, each of which justified incrementally more money to acquire.
The video was produced as sort of a love letter to Michael from the staff and management of the Sony Music disc manufacturing plant in Pittman, New Jersey. The process is shown starting with the arrival of masters to the plant, strangely in the form of U-matic videocassettes; the 3/4″ continuous loop tape was normally used for analog video, but could also be used for recording digital audio. The digital audio is then sent for glass mastering, which is where the actual pits are created on a large glass disc under cleanroom conditions. In fact, much of the production process bears a strong similarity to semiconductor manufacturing, from the need for cleanrooms — although under less stringent conditions than in a fab — to the use of plasma etching, vapor deposition, and metal plating operations.
Once the master stampers are made, things really ramp up in replication. There the stamper discs go into injection molding machines, where hot polycarbonate is forced against the surface under pressure. The copies are aluminized, spin-coated with UV-cure lacquer, and sent on down the line to testing, screen printing, and packaging. Sony hired 40 extra full-time workers, who appear to have handled all the tedious manual tasks like assembling the jewel cases, to handle the extra load of this release.
As cheesy as this thank-you video may be, it was likely produced with good reason. This was a time when a Michael Jackson release was essentially a guarantee of full employment for a large team of workers. The team was able to produce something like 50,000 copies a day, and given that HIStory sold over 20 million copies, that’s a lot of workdays for the good folks at Pittman.
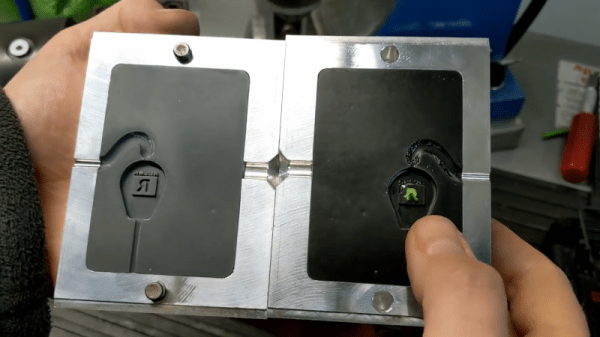
[JohnSL] and his friend both have injection molding machines. They decided to compare the aluminum molds they usually use with some 3D printed molds created with a resin printer. They used two different resins, one on each side of the mold. You can see a video of the results below.
One half of the mold used ordinary resin while the other side used a resin that is made to hold up to higher temperatures. As you might expect, the lower-temperature resin didn’t stand up well to molten plastic. However, the higher temperature resin did somewhat better. It makes sense, though, that an aluminum mold draws more heat out of the plastic which is helpful in the molding process.
The higher temperature — and more expensive — resin did seem to hold up rather well, though. Of course, this was just to test. In real life, you’d want to use the better resin throughout.
No surprise, the resin molds didn’t last nearly as long as a proper mold. After 70 shots, the mold was worn beyond what you’d want to use. So not necessarily something you’d want to use for a real production run, but it should be enough for a quick prototype before you go to the expense of creating a proper mold.
We wonder if there are some other tricks to get better results. A comment from [TheCrafsMan] suggests that clear resin UV cures better, and that might produce better results. In fact, there are a lot of interesting comments on the video from people who have varied experiences trying to do the same thing.
If nothing else, watching the mill cut through the aluminum around the 15-minute mark is always interesting to watch. If you don’t already have an injection molding setup, you can always build one. We’ve seen more than one design.
To the extent that we think of 3D printers as production machines, we tend to imagine huge banks of FDM machines slowly but surely cranking out parts. These printer farms are a sensible way to turn a slow process into a high-volume operation, but it turns out there’s a way to do the same thing with only one printer — as long as you think small.
This one comes to us by way of [Andrew Sink], who recently showed us a neat trick for adding a dash of color to resin printed parts. As with that tip, this one centers around his Elegoo resin printer, which is capable of intricately detailed prints but like any additive process, takes quite a bit of time to finish a print. Luckily, though, the printer uses the MSLA, or masked stereolithography, process, which exposes the entire resin tank to ultraviolet light in one exposure. That means that, unlike FDM printers, it takes no more time to print a dozen models than it does to print one. The upshot of this is that however many models can fit on the MSLA print platform can be printed in the same amount of time it takes to print the part with the most layers. In [Andrew]’s case, 22 identical figurine models were printed in the same three hours it took to print just one copy.
It seems obvious, but sometimes the simplest tips are the best. And the next step is obvious, especially as MSLA printer prices fall: a resin printer farm, with each printer working on dozens of small parts at a time. Such a setup might rival injection molding in terms of throughput, and would likely be far cheaper as far as tooling goes. Continue reading “Making The Most Of Your Resin Printer Investment”→
Since the very beginning, the prevailing wisdom regarding consumer desktop 3D printers was that they were excellent tools for producing prototypes or one-off creations, but anything more than that was simply asking too much. After all, they were too slow, expensive, and finicky to be useful in a production setting. Once you needed more than a few copies of a plastic part, you were better off biting the bullet and moving over to injection molding.
But of course, things have changed a lot since then. Who could have imagined that one day you’d be able to buy five 3D printers for the cost of the crappiest Harbor Freight mini lathe? Modern 3D printers aren’t just cheaper either, they’re also more reliable and produce higher quality parts. Plus with software like OctoPrint, managing them is a breeze. Today, setting up a small print farm and affordably producing parts in mass quantities is well within the means of the average hobbyist.
Flickering LEDs provide a sense of motion
So perhaps I shouldn’t have been so surprised when I started seeing listings for these 3D printed rocket lamps popping up on eBay. Available from various sellers at a wide array of price points depending on how long you’re willing to wait for shipping, the lamps come in several shapes and sizes, and usually feature either the Space Shuttle or mighty Saturn V perched atop a “exhaust plume” of white PLA plastic. With a few orange LEDs blinking away on the inside, the lamp promises to produce an impressive flame effect that will delight space enthusiasts both young and old.
As a space enthusiast that fits somewhere in between those extremes, I decided it was worth risking $30 USD to see what one of these things looked like in real life. After waiting a month, a crushed up box arrived at my door which I was positive would contain a tiny mangled version of the majestic lamp I was promised — like the sad excuse for a hamburger that McBurgerLand actually gives you compared to what they advertise on TV.
But in person, it really does look fantastic. Using internally lit 3D printed structures to simulate smoke and flame is something we’ve seen done in the DIY scene, but pulling it off in a comparatively cheap production piece is impressive enough that I thought it deserved a closer look.
Now it’s always been my opinion that the best way to see how something was built is to take it apart, so I’ll admit that the following deviates a bit from the rest of the teardowns in this series. There’s no great mystery around flickering a couple LEDs among Hackaday readers, so we already know the electronics will be simplistic in the extreme. This time around the interesting part isn’t what’s on the inside, but how the object itself was produced in the first place.