A Modern, Upgraded BASIC Stamp

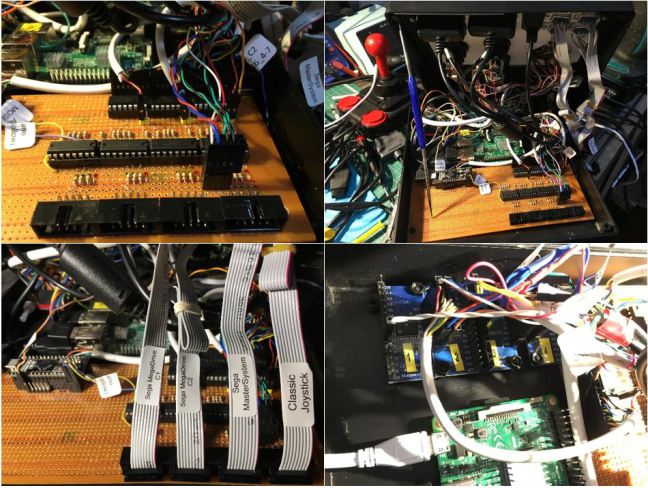
Back in the Before Times, when microcontroller development required ultraviolet light, building anything was a pain. You probably had to burn a ROM onto a chip with a parallel programmer, there was no in-circuit programming, and who knows what would happen if you needed a serial port.

This changed in the early 90s with the introduction of the BASIC Stamp from Parallax. This was a simple microcontroller development board using Microchip PIC. With a little bit of clever firmware developed by Parallax, you could write code in BASIC, upload your code over a serial or parallel port (which every computer had), and blink a LED with just a few lines of code. All microcontroller development boards — including the Arduino — owe a debt to the BASIC Stamp. It is the grandfather to the Arduino, and it is very, very old.

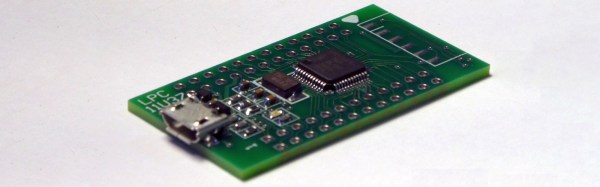
Microchip didn’t update the BASIC Stamp, but that doesn’t mean someone else can’t handle that. [Bruce Eisenhard] is crowdfunding an improved, updated version of the famous 24-pin BASIC Stamp. It’s got modern parts, runs seven hundred times faster than the original, and is still chock full of BASIC interpretation.

This upgraded Stamp is built around NXP’s LPC11U3 micrcontroller, an ARM Cortex-M0 part with about a hundred times more Flash than the chip in the original Stamp. Programming is done through modern IDEs, and yes, there’s a USB port. This project is pin-compatible with the original BASIC Stamp, so if your microcontroller project from twenty years ago is dying, this is the replacement for you.

The BASIC Stamp was an awesome device for its time, even though it cost more than two hundred dollars in today’s money. [Bruce]’s campaign is offering one of these for $25, which is pretty reasonable for what it is.


Automate Wire Prep With A Robot Wire Cutter

When you move from one-off builds to production scale, perhaps to meet that Kickstarter commitment or to keep your Tindie store stocked, you’re going to need to tool up. Jobs like building wiring harnesses can be tedious and time-consuming, so outsourcing them to this robot wire cutter might be a good idea.

The video below tells the whole tale of this build, which despite the fact that [Maclsk] seems to have put it together quickly from scrap bin parts still looks pretty professional. The business end of the machine is a 3D printer extruder, minus the hot end, of course. A Nano controls the extruder’s stepper to shoot out the right length of wire, as well as the servo that squeezes the snippers. An LCD display and some pushbuttons provide the UI that rounds out the build. Tell it how long and how many, and you’ll be ready to build. We can see how this might be upgraded to strip the wires as well, although getting both ends stripped might be tricky.

Might this component tape-cutting robot from a few weeks back have inspired [Maclsk]’s build? Perhaps, but in any case, both are fun to watch.

Continue reading “Automate Wire Prep With A Robot Wire Cutter”

Is It A MagLite Or A MagnaStat?

[David Schneider]’s love affair with Weller temperature controlled soldering irons began many years ago, but when he came to the point of needing a cordless iron he had problems finding one that replicated his trusty mains-powered soldering station. His solution was simple, to build his own, and in a stroke of genius he did so with an odd combination of a Weller MagnaStat element and bit, and a repurposed MagLite flashlight.

The Weller parts are all available off-the-shelf as spares, and the MagLite was easy to source. But its D cells would never give the required 24 V for the iron, so he had to incorporate a set of 14500 Li-ion cells with built-in electronic protection. The element protrudes from the front of the flashlight, giving an iron that seems to do the business but to our eyes looks rather unwieldy. Still, it does the job, and provides a far more sturdy and reliable iron than any cordless one we’ve yet seen, so we think that’s a result.

We’ve reviewed a Weller MagnaStat in the past,with a special look at availability of bits for older models.

This Mask Will Make You A Psycho

Videos games are a cornucopia of project ideas well-suited to the talents of makers and hackers, and Halloween is as good a time as any to show them off! Reddit user [Tavarin], a huge fan of the Boderlands video games, whipped up a plaster mask — replete with glowing eyes — of one of the game’s signature enemies: the Psycho.

[Tavarin]’s secret to forming comfortable plaster masks is to open his jaw while the wrap is setting  — that way he’ll be able to talk without breaking the mask off his face. Hot gluing in and modifying a 60mm PC fan and a pair of lenses meant that the only thing standing between him and a lot of sanding to shape the mask’s details was a few layers of thick plaster mix.

Continue reading “This Mask Will Make You A Psycho”

Instrument Packed Pedal Keeps Track Of Cyclist’s Power

Exactly how much work is required to pedal a bike? There are plenty of ways to measure the power generated by a cyclist, but a lot of them such as heavily instrumented bottom brackets and crank arms, can be far too expensive for casual use. But for $30 in parts you can build this power-measuring bike pedal. and find out just how hard you’re stoking.

Of course it’s not just the parts but knowing what to do with them, and [rabbitcreek] has put a lot of thought and engineering into this power pedal. The main business of measuring the force applied to the crank falls to a pair of micro load cells connected in parallel. A Wemos, an HX711 load-cell amp, a small LiPo pack and charging module, a Qi wireless charger, a Hall sensor, a ruggedized power switch, and some Neopixels round out the BOM. Everything is carefully stuffed into very little space in a modified mountain bike pedal and potted in epoxy for all-weather use. The Hall sensor keeps tracks of the RPMs while the strain gauges measure the force applied to the pedal, and the numbers from a ride can be downloaded later.

We recall a similar effort using a crank studded with strain gauges. But this one is impressive because everything fits in a tidy package. And the diamond plate is a nice touch.

Why Only Use One Controller When You Can Use ALL Of Them?

After booting up his RetroPie system, [jfrmilner] had the distinct feeling that something was off. Realizing that the modern Xbox 360 controller didn’t fit right when reliving the games of his youth, he rounded up all his old controllers to make sure he always had the right gamepad for the game.

Wanting to keep the controllers unmodified — so they could still be used on the original systems — he had to do a bit of reverse-engineering and source some controller sockets before building his controller hub. Using shift-in registers, shift-out registers, and some multiplexers, he designed a large circuit selector — which acts as a shield for an Arduino Micro — so all the controllers remain connected. A potentiometer allows him to select the desired controller and a few arcade buttons which access RetroPie shortcuts really round out the hub. Check out the demo after the break!

Continue reading “Why Only Use One Controller When You Can Use ALL Of Them?”

Haunting A Smart Mirror With Hue And Alexa

So, your smart mirror has been running for a while, but Halloween is coming up and you want to come up with some cool Halloween stuff to display on the mirror. If you’re looking for ideas, check out [Ben Eagan]’s cool Haunted Smart Mirror which connects the mirror via a Raspberry Pi with Amazon Alexa and Phillips Hue lighting.

[Ben] points to another of his blog pages for those readers interested in the nuances of setting up Alexa with a smart mirror, while concentrating on communication with the Hue bridge and creating the setup for a new Alexa command in this post. Dealing with the Phillips Hue API seems fairly straightforward: Get the IP address of your Hue bridge from your router and the ID of your lights from the Hue app and you’re set to send commands via HTTP. [Ben] includes a Python script to make the lights flicker, which you can modify for your own lights as you wish. Once that’s done, you’ll need to set up the intent that Alexa listens for, and then modify the AWS lambda function that sends commands to the Pi. When the command shows up in the queue on the Pi, any commands [Ben] wants to play are fired off – in this case, a video is played and the Hue lights start to flicker.

There’s no mention of security in the article, so that may be worth a little attention with Alexa and the Hue, but with Halloween coming up fast even if you haven’t built a magic mirror yet, if you’ve got Hue lights, this would be a great, quick, Halloween idea. Especially if you could combine it with your outside lights so that Trick-or-Treaters can join in on the fun. Maybe you’d prefer looking up passing planes using Alexa? Or how about getting your fish to talk?

Continue reading “Haunting A Smart Mirror With Hue And Alexa”