Why spend thousands on a laser cutter/engraver when you can spend as little as $350 shipped to your door? Sure it’s not as nice as those fancy domestic machines, but the plucky K40 is the little laser that can. Just head on down to Al’s Laser Emporium and pick one up. Yes, it sounds like a used car dealership ad, but how far is it from the truth? Read on to find out!
Laser cutting and engraving machines have been around for decades. Much like 3D printers, they were originally impossibly expensive for someone working at home. The closest you could get to a hobbyist laser was Epilog laser, which would still cost somewhere between $10,000 and $20,000 for a small laser system. A few companies made a go with the Epilog and did quite well – notably Adafruit used to offer laptop laser engraving services.
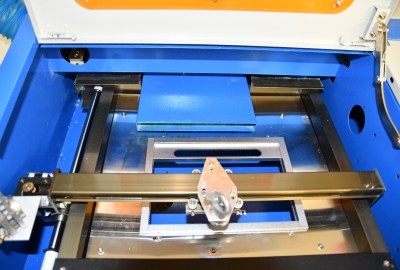
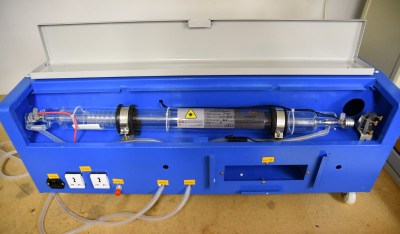
 Over the last decade or so things have changed. China got involved, and suddenly there were cheap lasers on the market. Currently, there are several low-cost laser models available in various power levels. The most popular is the smallest – a 40-watt model, dubbed the K40. There are numerous manufacturers and there have been many versions over the years. They all look about the same though: A blue sheet metal box with the laser tube mounted along the back. The cutting compartment is on the left and the electronics are on the right. Earlier versions came with Moshidraw software and a parallel interface.
The K40 mechanics haven’t changed very much, but the electronics have been updated to USB with modern stepper drivers. Make no mistake, these are not “quality” machines. They are built down to a cost. Interlock switches are non-existent. Overheat protection for the tube is your problem. Low cooling water flow alarm? Nope, better keep an eye on that yourself. The cutting bed looks like a mixture of an afterthought and parts someone found in the spares bin. The exhaust duct is routed 3 inches into the cutting area. In other words, these are the perfect machines for a hacker.
 I’ve been watching the K40 and similar machines on eBay for years. Originally these machines were shipped from China. It was a crapshoot if a large heavy gas filled glass tube would survive the trip halfway around the world. Now, many of the machines are shipping from California and other ports within the lower 48 states. I’m guessing the machines are shipped to a warehouse here in the USA, tested, then the good units are sent on to customers.
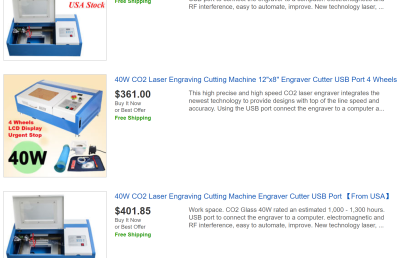
With all this in mind, I finally decided to jump in and get a K40 laser. My first problem was deciding which laser to buy. eBay and Alibaba are riddled with auctions from sellers with different versions of the K40. Everyone says they’re newer and better than the rest. Some boast different accessory packages, and things like air assist – but also cost more. There is enough information to throw even the most seasoned eBayer into analysis paralysis mode.
In the end, I decided to go with one of the cheaper (but not the cheapest) lasers with a digital front panel display. My model also came with a temperature readout for the cooling water, and wheels – for those who like to roll their benchtop lasers around.
I clicked the “buy it now” button and started waiting. The machine in its 62 lb crate would take about a week to ship from the west coast. That gave me plenty of time to order some safety equipment.
Laser Safety
While the K40 may be cheap, I didn’t want to skimp on safety equipment. There are many vendors for laser safe goggles online. There are plenty of them available from China, but I really didn’t want to risk my eyes to a company I had never heard of. I did some checking around and ended up ordering a pair manufactured by Honeywell. Amazon had them available on Prime, so they got to me before the K40 itself. Whichever pair you order, make sure they are rated for CO2 lasers. There are many types of lasers out there, and goggles meant to protect you from a UV medical laser won’t help much at all when it comes to an IR laser like the one in the K40. IR safe glasses will be clear, or nearly so. But don’t mistake them for bog standard safety glasses. These are specially made materials which will help keep you safe from the invisible blindness beam your K40 puts out when your other safety measures fail.
Lasers burn things, and it is unfortunately common for those things to catch fire inside the laser. I’m keeping a large ABC dry powder fire extinguisher near the printer. However, that’s only a stopgap. If you’ve ever had to use a powder extinguisher, you know how messy they are. To try to keep the K40 and the rest of my lab safe, I’m planning to invest in a gas extinguisher of some type. Either CO2 or Halotron, depending on which is safer for use in a basement room.
While I never plan to leave the laser running unattended, I also have smoke detectors in my lab. Finally, I added a carbon monoxide detector to make sure the K40 doesn’t fill the room with a silent killer.
Unboxing
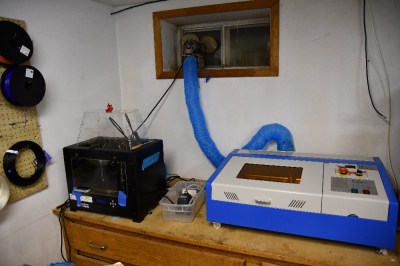
Hackaday doesn’t do unboxing videos, but the impression I got while unpacking the K40 was that it is big – bigger than one would imagine from the photos. My machine measured 32″ wide x 19.75″ deep x 10.25″ high. Thankfully I had workbench space right near a window that made a perfect home.
Cooling
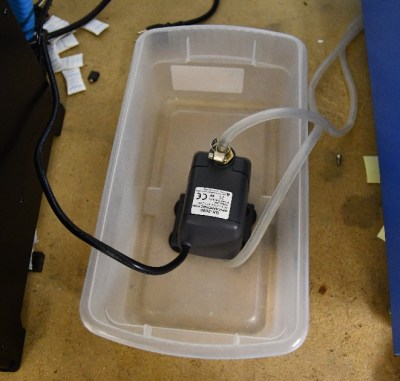 The K40 laser is water cooled. All the lasers include a coolant pump as one of the accessories. The pump I received is a wonder of cost reduction. It’s an aquarium or pond pump, with a magnetically coupled impeller. I was concerned when after use I saw water dripping out of the pump down the 120 V power cord. It turns out the back cover of the pump isn’t even sealed. It doesn’t need to be. The motor stator and coils are potted in black epoxy. As long as that potting compound is in place, nothing can get to the motor. It does seem to work well for keeping the cooling water flowing. However, I can’t say I completely trust it with the life of my laser tube. A mod may be in the future for this system.
For coolant, I’m using distilled water. My reservoir for these early tests is a simple shoebox-sized plastic container. It holds a gallon of water and keeps the pump submerged. If the laser isn’t going to be used for a few days, I dump the water and empty the tube by blowing into the inlet line.
Exhaust
Cutting things with a laser will produce smoke and fumes; that’s a given. The K40 comes with an exhaust fan which is rather anemic, to say the least. It’s literally a bathroom exhaust fan slapped on the back of the laser. Smoke is pulled through a slot cut in the back of the case and sent up the exhaust hose. I already have a large Dayton fan mounted in the window of my lab. While the unguarded blades are decidedly dangerous, it moves a crazy amount of air. This coupled with the stock exhaust fan was able to keep the smell of burning wood and plastic down to reasonable levels. However, I’ll definitely be upgrading the stock exhaust in the future.
Aligning The Optics
 The first step in setting up one of these lasers is arguably the most dangerous: aligning the mirrors. This is why I bought good laser goggles. Working on the laser with the doors off is something you generally don’t want to do since you can’t control where the beam goes.
Keep the laser safety glasses on at all times, close the door, and make sure no one else walks into the room. My tube was so far out of alignment that the beam exited the case through the open door and made a small scorch mark on the wall behind my workbench. It would not have been good if someone else was standing there.
There are plenty of video tutorials out there for aligning the mirrors on a K40. I found this one to be particularly helpful. The idea is to make sure that the laser dot hits the center of each of the three mirrors in the beam path. Two of the mirrors move on an X-Y table, so it’s important to make sure the beam hits the same spot no matter where they are positioned. I used Post-it notes rather than the painter’s tape many of the tutorials call for. It’s much easier to see the burn mark on the yellow Post-It than on the dark blue tape.
 You don’t need a computer for these steps, just keep the stepper motors off and move the table by hand. When it comes time to fire the laser, you just have to tap the test button on the front panel.
The first thing to align is the tube itself. My tube was so far out of alignment that the beam wasn’t even hitting the mirror. The tube is held in with two metal spring straps. Rubber rings keep the straps from breaking the glass tube. More rubber acts as shims to align the tube vertically. I removed one of the shims from the left side of the tube and added it to the right. It’s a fiddly procedure since tightening too hard on the screws will break the single most expensive part of the K40 – the laser tube.
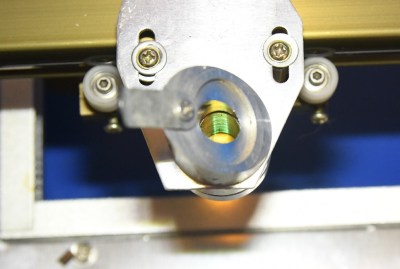 I found that even after an alignment, my K40 still wasn’t performing correctly. I cleaned the mirrors and the laser tube with alcohol, but it was no help. Finally, I disassembled the focusing head. That’s where I found my problem. There were bits of metal inside the head from when it was machined. These metal pieces were in the beam path, disrupting it. I took the 45-degree mirror and the focusing lens out, then carefully cleaned the tube. Once everything was re-assembled, my K40 was ready for action.
Software
The laser comes with an obviously burned CD and a USB stick. My laptop doesn’t have a CD drive, so I popped in the USB stick and found… nothing. It’s not really a drive, but a dongle to unlock the laser driver software. I had to go and find my USB cd drive before using the K40. Most of the filenames on the disc are in Chinese. Some digging eventually led me to a file for Corel Laser. It’s a copy of Corel Draw with a plugin to drive the K40. The copy of Corel Draw is almost certainly an illegal cracked copy. I got access to a legit base copy from a friend who switched over to Adobe.
In simple terms, CorelLaser gives you a toolbar and can cut or engrave any image loaded into Corel Draw. Cutting and engraving are very different processes though. Cutting is a vector operation. The laser will trace the path of every line in the image. Engraving is a raster affair. The laser will draw the image line by line, left to right and top to bottom. You can also perform both processes on the same design by creating a cut layer and an engraving layer in the software.
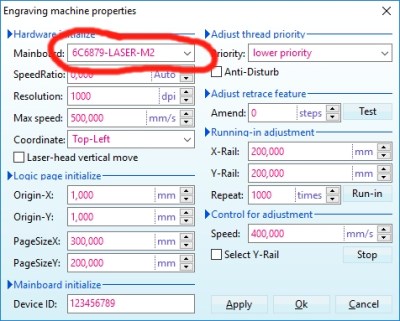 I ran into trouble with the software pretty quickly. Whenever I tried to cut, the laser head moved slowly. Changing the movement settings didn’t help. Some digging eventually pointed me to the settings page for CorelLaser. Here I found the “mainboard” setting was wrong. The value has to match the model number silk screened on the laser mainboard. Of course, the mainboard is mounted in such a way that you can’t read the model number, but a quick cell phone photo fixed that problem. My model is 6C6879-LASER-M2. The board firmware is dated 2018-01-08, so the board must have been built sometime after that.
I expected CorelLaser to be a hot mess. Honestly, it isn’t half bad. It definitely has some maddening quirks, but overall it does what it should – drive the steppers and switch the laser. The top quirk I’ve found is line width. Corel defaults to “hairline” as line width. This is larger than the laser kerf, so CorelLaser interprets it as two parallel paths. Tracing two close paths on with the K40 will make a wide burning mess of whatever you’re trying to cut. The solution is to select everything in your document <Ctrl-A> then hit F12, and change the line width to .001 mm. CorelLaser will then operate as you expect it to.
Which Materials to use (and which to avoid)
What to cut? As with any laser cutter, thought has to be given to the materials being cut. In general, wood is safe to cut, as is paper, cloth, melamine, pressboard, matte board, cork, some rubbers, natural leather, and Corian. Engraving can be performed on materials such as glass, stone, anodized aluminum, steel (with a laser engraving coating) and other materials.
Some plastics should never be cut in a laser cutter. Anything with chlorine – notably PVC and vinyl. Burning PVC results in chlorine gas, which will kill the user, and hydrochloric acid, which will rust your K40 out so bad that your next of kin won’t be able to enjoy it. A simple test for chlorine is the copper wire burnination test, which can be seen in this 10-year-old video from [Adam] and [Zach] at NYC Resistor. ABS plastic is another one to avoid. It tends to melt and is messy to cut. It also releases trace amounts of cyanide gas. If you’re ever unsure about a material, look up on the pages of hackerspaces who have lasers. If they won’t cut it on their laser, you probably shouldn’t either.
Cutting and Engraving
 Cutting and engraving are what we’re all here for, right? The fun part of learning the laser is figuring out how to set up the software for different materials. With a laser, you have three variables to play with. Laser power, speed, and the number of passes. Laser power is controlled by the front panel of the K40. It’s either a knob and an inaccurate milliampere meter or a digital control expressed in power percentage. Cutting with more than one pass is messier than just cutting the material once, so save that for when you really need to do it.
There are a few guides out there – I’ve found this page to be a good starting point for figuring out which speeds and power levels to run at for a given material. I generally will use the speed from that site, then start at a much lower laser power. Testing on scrap pieces, I’ll keep raising the power until I have a clean cut. If the power is below 50%, I’ll generally stick with it, and not adjust the speed.
 You should definitely keep notes of what you use. On my laser, I found a deep engrave on ⅛” acrylic at 50% and 320 mm/s. Cutting ⅛” birch plywood worked best at 25% power and 5 mm/s. Keep in mind that quality control on the K40 is non-existent, and beam focus will matter, so your device may be different from mine. Further, materials such as plywood and acrylic can change from batch to batch depending on moisture content and other variables. Always buy some extra material to use as scrap for dialing in your settings.
Performance
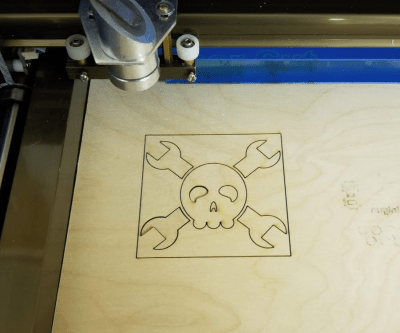
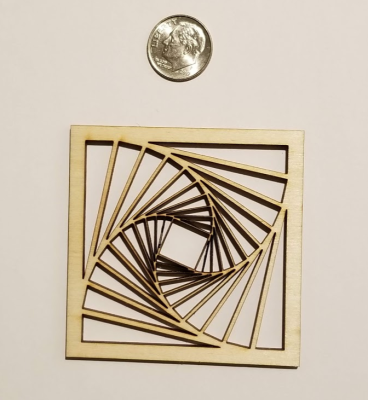
 So how good is the K40 in a “bone stock” condition? Pretty damn good actually. I was able to cut ⅛” birch plywood and ⅛” acrylic with one pass at less than 50% power. The parts would literally fall out as each cut complete. This is a laser, so of course, there is some charring of the wood on the edges, but nothing a bit of sandpaper can’t fix. As a torture test, I took the Hackaday logo .svg file loaded it up into CorelLaser, set the line width to .001 mm, and hit go. The K40 dutifully cut out the jolly wrencher, giving me a little puzzle of pieces to try to fit back together.
Engraving performance was good too – I was able to cut simple black and white images (and text) into wood and acrylic. I can see how this would be perfect for making control panels with labeled lights and switches.
Summary
The K40 is a cheap laser engraver/cutter. However, it is very capable, even when used unmodified. That said, the cutter is a great platform for modification. You can bet I’ll be spending some time adding things like air assist and a better bed to my K40 as well as cutting down that exhaust duct.


I love that thing. In fact I got one sitting right behind me right now. It’s a great machine once you add a little air assist (a cheap aquarium pump will do) and a laser pointer to show you where you’re aiming. It’s a great machine and I haven’t had many problems with it.
also check that the bed is square mine is out by over 1/4 inch and to fix I must take the entire thing apart. Also the mirrors are junk,top and bottom left side is fine now the far top and bottom is crap. And really take a hard look at the label on your tube mine says peak power is 37.5 watts and nomial power is 35.0 watts in other words I got a max 5 watt laser also the table or work holder is sold as 8.5X11.0 inches but it only holds max 3inch by 5 inch material. They would be better off selling a box of parts as a kit.
Automatic fire extinguishers for lasers and printers have been discussed here before:
https://hackaday.com/2016/04/12/ask-hackaday-open-fire-suppression-and-safety-standards/
I bought my K40 September 2016. I have since upgraded the controller to a Cohesion3d mini running smoothieware and LightBurn software. Better exhaust fan, water pump, flow sensor and air blower. With upgrades, still under $650. Cuts 3mm Baltic birch single pass like butter and great looking greyscale images. I even have cut 8mm mdf with two passes. I even have a rotary. Limited in cutting area but so much better than waiting around at the local makerspace for your turn on their laser.
Do you have any pictures of your rig/projects? Any links to your resources? I’m kinda getting bored with 3D printing and looking at either doing a mill/router or laser next.
https://plus.google.com/communities/118113483589382049502?iem=1
This forum has lots of info with users posting some projects. I posted some of my early projects. The k40 has been such a great addition to my workshop. I do a lot of woodwork projects and one of the “small” things I do is to laser out my name, logo, date on a piece of matching wood and glue it to the inside somewhere before I give it away. It’s just nice to have a laser, in addition to cnc router and 3D printer to use anytime.
Thanks!
https://imgur.com/a/AhgMIwj
I did this one for a friend recently 160mm diameter Cherry wood. Stuff like this easily fits within the k40 size limits. Took about 30 minutes to image raster and then through cut the outside outline. Simple and easy.
https://imgur.com/a/oKb0dVb
I did a series a coasters like this.
Good work! You are increasing my urge to tackle this project….
One of the first things we added to our laser cutters was the adjustable bed. It means not re-focusing all the time.
The other is the air assist, which blows compressed air out from around the focusing head which rather dramatically cuts down on the ‘fogging’ of the mirror from smoke. Has anyone tried using argon, co2, or nitrogen to cut down on actual burning?
Which adjustable bed option did you go with? I have a K40 and I’m looking into this right now actually.
I’m looking into both of these as my first real mod. The air assist should help cutting quite a bit
Chlorine isn’t the worst, what burned PVC releases. Vinyl chloride is. “It is highly toxic, flammable, and carcinogenic.” *
Some various notes from setting up higher end laser cutters:
1. Ordinary polycarbonate goggles are adequate safety even on lasers with orders of magnitude more power – as long as you’re dealing with a diffuse reflection. (It might be amusing to put a set in a vice and see how long a direct hit from a K40 takes to burn through the goggles. A thick pair of cheap goggles might last a good five seconds.)
2. Flat panels of acrylic are great for beam alignments.
3. For the first mirror, tape that sheet of acrylic to a piece of plywood. You want a big backstop in case the beam isn’t going where you expected.
4. Level the unit before you try doing a mirror alignment.
I would say that for a 10um laser, ordinary polycarbonate safety glasses are completely fine as laser safety glasses.
Of course the glasses only protect your cornea from diffuse reflections. A direct beam will of course burn a hole straight through the glasses, and it will do exactly the same thing to your $300 ThorLabs “proper” safety glasses. Those laser safety glasses don’t have some special property that can break the laws of thermodynamics and make all that power disappear.
At 10.6um basically any plastic is going to absorb all the light, whether it’s any acrylic or polycarbonate, $5 glasses or $300 glasses. They’re all completely opaque.
If you need any *transparency* at 10um you need to reach for exotic materials to get anything that *doesn’t* absorb it all – germanium or zinc selenide, GaAs etc.
And remember that not all “infrared” is the same. A diode laser at 800nm or a fibre telecoms laser at 1550nm or a neodymium laser at 1064nm are all going to have different safety glasses from a CO2 10.6um laser in the mid infrared – ordinary polycarbonate glasses are *not* appropriate here.
Also ordinary glass is not transparent at 10µm. But I do not know, how long a sheet of glass will withstand the beam.
The viewing window (glass, plastic, whatever) is not supposed to tolerate the beam. It should never be directly in the beam path, its only purpose is to let you see inside and block diffuse, scattered reflected light at 10um, which it will tolerate without destructive heating.
My son has been working on getting my K40 running since life events have kept me from having time and workspace to do it myself. He was about to replace all of the motion control electronics so it could work with something other than corel when he discovered http://www.scorchworks.com/K40whisperer/k40whisperer.html that will work with the original USB hardware. (I don’t know if it will work with the parallel port version.
I looked it up, it works only with the USB version.
Good write-up. I skimped on the air assist head so far, and just attached a nice, big VenTech IF6 6″ Inline Duct Fan. 440 cubic feet/minute. It helps keep the fumes under control, and any smoke or gas is sucked away from the cutting area so fast, I don’t think it’s hitting the lens or mirrors at all. I took the stock fan out and just used the whole piece as an adapter of sorts to the new fan.
He mentioned the spare parts-quality cutting bed. That’s pretty accurate. Everyone I’ve seen on youtube or talked to in person about theirs has removed it. It pretty much doubles the area you can cut. Same with removing the “slotted” vent. It gets in the way and you’ll need a dremel, at least, to remove it.
Says laser may not give as good results on glass.
http://www.engraversjournal.com/article.php/2360/index.html
I have never had a problem etching glass with my CO2 laser
A very dubious article. It writes about “air and water included in the glass” – that would be visible bubbles and water will evaporate at glassworking temperatures. Also the distinction between “natural” and other materials is very questionable for the ability to cut or mark it with the laser.
There are many different natural and synthetic materials, some of them easily affected by the laser energy, some are not.
Can I use this K40 with Linux ? What software would you recommend ?
Some boards do have driver apps:
http://www.scorchworks.com/K40whisperer/k40whisperer.html
I run it on Raspberry Pi3:
https://sourceforge.net/projects/micrometer-cnc-on-raspberry-pi/
Cheers,
J
The DIY3DTECH.com youtube channel has all kinds of mod videos for this laser, one of which is increasing the bed size significantly. Also, this laser is known for having bad grounding issues which can lead to injury, so they have videos on how to check all the wiring and upgrades you can perform to make it much safer.
I may have lucked out that the wiring on my particular laser was run well. I did connect the chassis ground of course. I should cover grounding though – as it’s always possible to have the water bath go electrically hot. Something you don’t want to find out when you stick your hand in it to check the temperature.
Here is my two minute explanation of the workflow to get from Fusion 360 to kw40 ;)
Forgot the link…
https://youtu.be/tq4yC7RW0Xs
I have used those aquarium pumps for their actual purpose.
They are not reliable so the solution for a fish tank is to use two of them so that when one fails the other continues (hopefully).
If you must use them then perhaps you can put two in parallel and have some way of observing flow rate so that you know when one has failed.
They also need to be completely immersed for cooling.
Is there a reason that you don’t just pump CO2 into the box during the cutting to prevent fires from getting started in the first place? A 20lb tank of CO2 is cheap and assuming the box is mostly sealed, you wouldn’t need to do much more than fill it with CO2 and the turn on a very slow stream of it to ensure no fires.
If there is a problem, I’d like to know as I’m really considering one of these soon.
Thanks
The box isn’t completely sealed. All lasers should have some kind of exhaust fan to remove the cutting smoke and fumes to the outside. When cutting plastic, the fumes are especially bad.
Well what a carbon dioxide molecule giveth it will taketh away. It will absorb the 10.6um light. Nitrogen would be better.
CO2 absorbs the radiation of a CO2 laser. If you want to flood it with an inert gas, you could use nitrogen. But some laser cutting even uses oxygen (usually for fast cutting of thick metal, e.g. steel. That works somehow likje a cutting torch. So your results could be different with an inert gas vs. air.
Thanks for the tips about using nitrogen. I doubt I’ll be cutting plastic(at first anyway) but the thing about it potentially using O2 for cutting is a good consideration.
I can’t help but wonder if you couldn’t build an effective cooling solution out of PC water cooling components.
You can get a nice 360mm radiator, a pump and reservoir… flow meters with alarms even
PC watercooling parts are relatively expensive though. Car parts should be cheaper, e.g. £30 gets me a car radiator that fits a car with 60-100kW mechanical output. I’m not sure how that relates to the heat output but cars are not efficient beasts so that radiator would probably dissipate a few kilowatts.
It wouldn’t be a drop-in replacement and you’d need far more static pressure to get the best out of it mind.
PC cooling harware is stupidly overpriced… go for car parts instead. A heater core or the main radiator. Or a radiator for a house, you won’t even need fans for it :P
The pond pump is cheap but without monitoring the water tempure & level you risk
Loosing Laser tubes to over heating. They can as stated be dangerous.
Here in Australia the water gets too hot very quickly so you need to add ice.
So the pond pump is far from ideal.
I have converted water chiller stations. The ones that have a large inverted bottle.
You can find them 2nd hand or even thrown out on verge collections.
The ones with a real compressor are best. Cheap Peltier ones work for short jobs but they can’t keep the temp low while the laser is running.
Make sure the water pump has a flow similar to the pond pump. Most water chillers use a pond pump anyway but they are often very small ones.
DO NOT USE A PUMP WITH HIGHER FLOW/PREASURE THAN THE PUMP THAT CAME WITH YOUR LASER. This can crack your laser tube.
Do not let it get too cold either as thermal shock can crack a tube also.
This is why I remove the bottle you don’t want 2,water tanks ie the bottle for room temp tap & the small chiller tank for the chilled water.
Modifications:
Connect the lower drain of chilled water container to the input of water pump.
Run the output of pump to the back of chilled water tap.
Then run a hose from the back of room temp tap.
So it flows into top of chilled water tank.
This only works if chiller tank is mounted higher than the laser tube.
If lower you need to seal the top of tank to prevent leaks & maintain pressure.
I recommend always mounting any cooling device so the water tank is higher than the tube. This insures any air bubbles in the Laser tube will rise to the tank.
Air bubbles near the hot end of the tube can kill a tube in minutes.
Plus having higher means only the water input to the laser tube is under pump presure.
The return is open to drain back into tank & allows for easy topping up with distilled water. As over time the water will evaporate from the heating process.
NOTE, so far this is only good for small laser tube doing short jobs.
Adding a larger tank improves it a lot but you may need to run the chiller for an hour to cool down the larger quantity of water before you start lasering.
Insulating the larger tank also helps if you are in a hot environment.
So chilled tap becomes cold out & is connected to water IN on laser.
Water OUT on Laser is connected to the Room temp tap.
Cheers @ndre’
There is a youtube channel for people who want to go down the rabbit hole: https://www.youtube.com/user/SarbarMultimedia
Something to consider, especially being a nubie, and probably starting off with raster engraving. Don’t blow your money on the digital display. It is a total waste of money. The analog meter is actually much better when you are doing raster work as it has no choice but to average the peaks, and unless you are running the tube right up to the point where another ma is going to make it explode, you get a better general feel with the analog meter. If you *really* need to know what is going on, a scope would be the ticket. The digital numbers look nice but don’t do you near as much good in the real world.
A cheap multimeter is a good substitute for dialing in your outputs digitally. Harbor Freight even gives them away for free with a coupon.
However, there are some digital display K40 control boards that have I/O pins and can talk to the software. This allows you to do automated variable passes and even achieve grayscale raster engraving. Those are definitely worth the money if you can get them to work.
Fire extinguishers: water mist.
Is the K40 powerful enough to cut copper on a PCB? Assume bout, but thought I’d ask…
If it can cut through copper, then imagine the number it’d do on fr4.
Though you could spray it matte black so it’d absorb the heat, and dissolve the leftover paint afterwards.
No. To cut copper you need UV or at least green and high pulse power.
Of course with enough power you can cut copper with a CO2 laser, but once you are through…see the comment of “0 says”
It’s a bad idea, but you can burn through about 1 mm of copper if you have about 100 times more power on a CO2 laser. Keep your hand over the E-stop when doing this – if you lose the cut, you can burn out your optics from the beam being reflected straight back.
Perhaps black paint used as an etch resist? I had mixed results with my tiny 2.5W laser.
Yes, no benefit ccompared to uv photo exposure though, I think?.
Not sure I place much store re fr4 comments, ablation of copper by late has been done many times before. Perhaps the wavelength is the key…
i saw an industrial laser cutting steel and aluminium. i asked them whether they could perforate aluminium with the laser to have a very fine mesh of micro-holes. they said that they can’t do this, and in general it is easier for them to cut through steel as aluminium is a good heat conductor. i am sure it is even worse with copper, and there are actual machines that “vaporise” copper directly off the PCB – crazy expensive and used for rapid prototyping.
btw, as i remember, they also said that it is not the laser itself what does the cutting, it just melts the material in a very thin point and it is the compressed gas (CO2) that blows out the molten metal from the cut. but it was a pretty old industrial laser
No, these use Q-switch UV lasers, they ablate the copper off the surface and leave the FR-4 behind. We build these machines where I work. They also drill holes for microvias this way and can cut through the top copper, fr4, and then leave the second copper layer intact in the middle of the board to connect to.
One of the better articles, here. Thanks, Mr. Fabio!
A friend gave me an old one of these yesterday. I need to fire it up to see if the tube is still useful.
But I am missing the dongle for the software, does anyone have one left over from an upgrade that I could buy off them?
I greatly recommend not using the software nor the driver provided with the unit.
You can get far better stuff with a bit of fiddling. I recommend looking around for DIY solutions.
(The approach I took over a year ago is probably outdated, nor something I recommend. (But a DSP controller were a nice option at the time….))
A link to real software would be ideal.
From my comment above: http://www.scorchworks.com/K40whisperer/k40whisperer.html
If I was doing anything other than cutting I would agree but I just need it to cut shapes.
But that it moot now, the tube is only putting out 12 watts so its pretty much junk. By the time I mess around with getting a new tube and a controller I am 2/3rd the way to a whole new unit that runs off USB.
Yeah agree don’t use existing software. But making a DIY controller yourself is a lot more work than it sounds. Look at the upgrade market, check out something like mini gerbil k40 controller https://awesome.tech/cheap-chinese-k40-ebay-laser/
If you don’t open the machine while running, you don’t need goggles of any kind… If you must open it while the laser is on for whatever reason, a sheet of plexiglass/polycarbonate is all that you need. Thin goggles are actually worse then a 4mm sheet of…well…pretty much anything transparent in the visible spectrum, the 10um wavelength IR simply gets absorbed by it.
Save money for laser protection gear where it actually needed – everything that can actually pass through to your retinas, 1.5-0.35-ish um.
The K40 has so many holes in the case, I wear laser glasses in addition to keeping it closed.
Once worked in a machine shop that had an industrial laser with a large cutting bed installed. Across the room stood a turret punch press. Nothing unusual about either piece of equipment, except that the turret punch press had a panel that looked like it had gotten burned (scorched paint and distorted metal). Turns out a laser tech was doing maintenance on the laser and had the beam go wild. An operator was at the punch press at the time. Lots of yelling to not move, and people hitting e-stops to shut down the laser. That laser tech was told to leave. They got another tech in to finish what the first tech had started.
As to laser dust, one Illinois company had a friendly visit from the new regional OSHA chief. He got there and they invited him out onto the factory floor. You could not see from one end of the factory to the other end.due to the airborne dust. The OSHA guy gave them six months to get air scrubbers in place or he was going to shut them down. How bad was it? A day or so on the floor would have you blowing out brown colored snot. Not good. The workers were glad OSHA stepped in.
Ugh, laser dust is nasty, though I think plasma dust is worse. On the big bystronic we had at one place I worked everything was filtered through a huge tort filter before being sent outside.
Plasma cutters? Yuck. Nasty, nasty, nasty. They spew out a dust that gets into everything. If I was setting up a machine shop the plasma cutter would be in a room alone. No other equipment. Once had to replace the seals on a customer’s punch press. Took out the ram block and punching cylinder. Ram block had worn ripples in it and when the ram block stopped draining hydraulic fluid, I noticed a very fine, brownish material in it. Cutting dust from the plasma cutter that evaded the filters in the system. It was everywhere.
Looks like that tech didn’t remember the rule to always use a backstop to hold the target when testing the laser. Unless that was some sort of prank gone wrong, like the story I heard about a shop that where somebody had tried to pull a mirror out of the beam path on a laser cutter and tried to fire a pulse at a bird that had flown into the shop. They missed and left scorch marks on the ceiling.
What sort of dust collectors was that shop that was full of dust using? I’d forgotten about laser dust – nasty stuff. The dust you’d get from cutting steel sometimes had me wanting to eat a raw lemon to get the metallic taste out of my mouth. There was one time we were testing a new dust collector and actually needed MORE laser dust. I wish I could have seen the look on the guy’s face at a laser job shop where I’d called and asked, “Could I come over and pick up a bucket of laser dust?”
I bought an older K40 blue box from a local chap via gumtree. I walked into his kitchen and took it away pretty quick as the total lack of safety was going to kill someone. I vowed to sort it out and convert to OS HW/SW. Three years on and it’s still on its shelf on the equipment rack, under the unfinished reflow oven, next to the part rewired Prusa i3. You get the idea.
This thing is a total death trap – the main grounding bond to earth is screwed straight to powder-coated steel, so makes absolutely no contact. Different metal sections are not wired to each other. There is no water flow cutoff, no over temperature shut off. No grommet on the hole where the HT wires passes through, no strain relief. The water pipes can easily be pulled off, easily kinked to throttle the flow. There is nothing to stop 20kV hitting the water sump if the tube cracks…
I could go on all night finding various areas of badness and reckless design.
Cheap is one thing, but you need to spend a bit of money sorting it and some precious time to build and test. Maybe at Xmas I’ll finally tackle this one, just after my life insurance renewal comes in.
The tube is going to be shot at this point so it might not be worth bothering with. These tubes go bad just sitting on the shelf, my guess is helium migration through the soft seals of the tube.
Also, for Australians: These things require a license from ARPANSA, since they meet the definition 13.5(c) of a ‘controlled apparatus’ : “… that produces harmful non-ionizing radiation” under the Australian Radiation Protection and Nuclear Safety Act 1998. ( See for the actual legislation).
In order to ‘be legal’ without a license, they would have had to have met the basic appliance things you mention, and also have a non-trivially circumventable safety interlock so you can’t get access to the beam, as well as the required appropriate labelling and everything else required in AS/NZS IEC 60825:2011 to be properly classified as a ‘Class 1 Laser product’ like your typical blu-ray or DVD burner. Or that ~$2000 AUD more expensive Laser cutter table that came from a reputable and authorized Australian company.
But this is hackaday so I guess you’d prefer to DIY:
Parts .1 .4 and .14 are the parts of that AS you want — annoyingly available only behind paywall from SAIglobal.com – (Don’t you just love legislated standards owned by private, for-profit companies?). You could possibly ask at a local library whether they have or can get a copy of those you could look at.
The AS is the same as the IEC standard, pretty much verbatim, and covers all kinds of lasers.
There’s actually a separate standard just for ‘bright lights’ which might also be hazardous: AS/NZS IEC 62471:2011 : Photobiological safety of lamps and lamp systems.
UV Light Sources are covered under the same act above which covers Ionising radiation, and a good source (without a paywall!) for ionising radiation standards is arpansa.gov.au.
This has the interesting side-effect that a govenment worker in Australia getting red-skin from UV exposure (what happens if you just go outside too long around midday!) but from any kind of ‘controlled apparatus’ then legislatively triggers the requirement that the matter be brought up at the very next sitting session of parliament – exactly the same as for the case of a nuclear accident! Of which, in Australia, there are extremely few.
Possibly because the Greens political party back in the 60’s or 70’s sometime managed to get such things as nuclear power plants, nuclear fuel fabrication, reprocessing or enrichment plants completely prohibited in Australia.
Personally, I really wish they’d just change that to no ‘solid fuel, water cooled, or fast-breeder nuclear reactor’ in place of ‘nuclear power plant’, and have ‘solid fuel’ inserted into the part referencing the other prohibited plants.
But hey, what do I know.
I keep tagboard (say from dry goods boxes like cereal or the sort) for easy real-world size testing of cuts.
I’ve had a K40 (originally with Mosh board and that lousy moshi software) for about 4 years, perhaps a bit longer. Given that the moshi software interfaced with the proprietary moshiboard, it was laughable that they thought they needed a security dongle – the board itself should have sufficed. Nevermind that the software was bugsville, and with the dongle, could not be run inside a VM.
Upgraded to a SmoothieBoard, necessitating a few helper boards to convert interfaces. Added several 1W LEDs to the interior of the cutting chamber (with a custom G-code command to turn on and off), air assist, visible position indicator LED, proper adjustable max endstop switches, etc. It is a whole different beast.
Besides etching all your puzzles and coasters, making enclosures, etc – it’s useful for garden plant stakes, and replacement gaskets for throttle bodies, pumps and such.
Yes, a lot of upgrading necessary to make it a good unit – but still a LOT less expensive than alternatives, and if you’re a DIY type, the updates aren’t a big deal. You’ll learn quick enough that the included software is crap (the sudden shoot off at a diagonal cut seems to be a common failure of the moshi firmware), and switch to open source promptly. I had the benefit of getting a membership at a local hackerspace that had a unit, so I could tinker with it a bit before determining if I’d buy one.
im triying to start up my K40 and everything its OK but the laser never flah on when i push the test button or starting a engraving.? thanks for help.
Is it grounded properly?
A bit late to the question, but in case you are still having problems.
When you say ” It never flash ” are you saying ” the laser tube doesn’t light up at all ? “.
I am looking for ways to engrave plastic car button decals. Basically I need to remove a layer of paint to get the plastic underneath visible. Is this machine suitable for that work or is it overpowered?
Hi! Is it possible to engrave a word on a flat gemstone (amethyst, citrine..) with this laser? If yes, that set up I should make? Thank you
Want to do rubberstamps but have not yet figured out the right power and speed any help I will appreciate please.
can a Mac run any of the software?