Relativity Space’s Quest To 3D Print Entire Rockets

While the jury is still out on 3D printing for the consumer market, there’s little question that it’s becoming a major part of next generation manufacturing. While we often think of 3D printing as a way to create highly customized one-off objects, that’s a conclusion largely based on how we as individuals use the technology. When you’re building something as complex as a rocket engine, the true advantage of 3D printing is the ability to not only rapidly iterate your design, but to produce objects with internal geometries that would be difficult if not impossible to create with traditional tooling.

SpaceX’s SuperDraco 3D Printed Engine

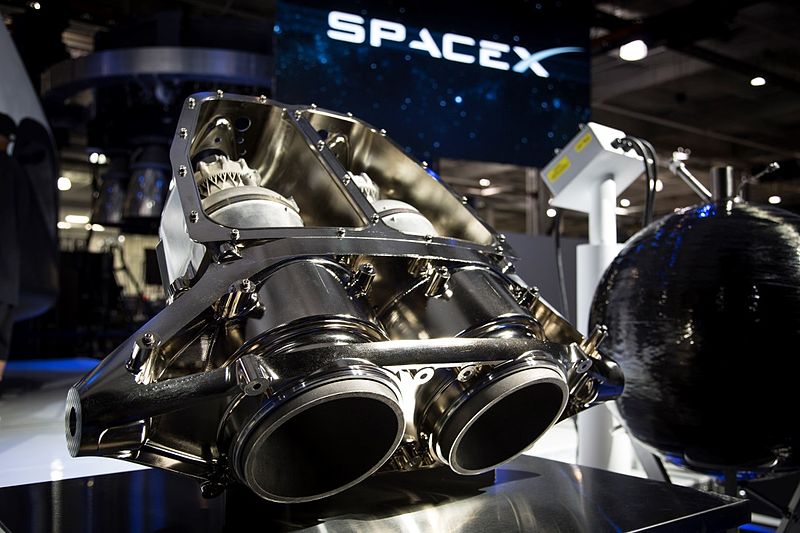
So it’s no wonder that key “New Space” players like SpaceX and Blue Origin make use of 3D printed components in their vehicles. Even NASA has been dipping their proverbial toe in the additive manufacturing waters, testing printed parts for the Space Launch System’s RS-25 engine. It would be safe to say that from this point forward, most of our exploits off of the planet’s surface will involve additive manufacturing in some capacity.

But one of the latest players to enter the commercial spaceflight industry, Relativity Space, thinks we can take the concept even farther. Not content to just 3D print rocket components, founders Tim Ellis and Jordan Noone believe the entire rocket can be printed. Minus electrical components and a few parts which operate in extremely high stress environments such as inside the pump turbines, Relativity Space claims up to 95% of their rocket could eventually be produced with additive manufacturing.

If you think 3D printing a rocket sounds implausible, you aren’t alone. It’s a bold claim, so far the aerospace industry has only managed to print relatively small rocket engines; so printing an entire vehicle would be an exceptionally large leap in capability. But with talent pulled from major aerospace players, a recently inked deal for a 20 year lease on a test site at NASA’s Stennis Space Center, and access to the world’s largest metal 3D printer, they’re certainly going all in on the idea. Let’s take a look at what they’ve got planned.

Continue reading “Relativity Space’s Quest To 3D Print Entire Rockets”

Burn Some Time With This Arduino Reddit Browser

If you’re like us, you probably spend more time browsing Reddit than you’d like to admit to your friends/family/boss/therapist. A seemingly endless supply of knowledge, wisdom, and memes; getting stuck on Reddit is not unlike looking something up on Wikipedia and somehow managing to spend the next couple hours just clicking through to new pages. But we’re willing to bet that none of us love browsing Reddit quite as much as [Saad] does.

He writes in to tell us about the handheld device he constructed which lets him view random posts from the popular /r/showerthoughts sub. Each press of the big red button delivers another slice of indispensable Internet wisdom, making it a perfect desk toy to fiddle with when you need a little extra push to get you through the day. Like one of those “Word a Day” calendars, but one that you’ll actually read.

For those curious as to how [Saad] is scraping Reddit with an Arduino, the short answer is that he isn’t. Posts are pulled from Reddit using an online tool created for the project by his wife (/r/relationshipgoals/), and dumped into a text file that can be placed on the device’s SD card. With 1500 of the all-time highest rated posts from /r/showerthoughts onboard, he should be good on content for awhile.

[Saad] has done an excellent job documenting the hardware side of this build, providing plenty of pictures as well as a list of the parts he used and a few tips to help make assembly easier. Overall it’s not that complex a project, but his documentation is a big help for those who might not live and breathe this kind of thing.

For the high-level summary: it uses an Arduino Pro Mini, a ILI9341 screen, and a 3.3 V regulator to step down 5 V USB instead of using batteries. A bit of perfboard, a 3D printed case, and a suitably irresistible big red button pulls the whole thing together.

We’ve seen a similar concept done in a picture frame a couple of years back, but if that’s not interactive enough you could always build yourself a Reddit “controller”.

Lessons In Disposable Design From A Cheap Blinky Ball

Planned obsolescence, as annoying as it is when you’re its victim, still has to be admired. You can’t help but stand in awe of the designer who somehow managed to optimize a product to live one day longer than its warranty period. Seriously, why is it always the next day?

The design of products that are never intended to live long enough to go obsolete must be similarly challenging, and [electronupdate] did a teardown of a cheap LED blinky toy to see what’s involved. You’ve no doubt seen these seizure-triggering silicone balls before, mostly at checkout counters and the like where they’re sold at prices many hundreds of times what it took to make them. This particular device, which seems representative of the species, has two bright LEDs, a small controller chip, a trio of button cells for power, and a springy switch to activate it. All this is mounted to a cheap scrap of phenolic resin PCB, with the controller chip and one of the LEDs covered by a blob of clear epoxy.

This teardown one-ups most others, as [electronupdate] disrobes the chip and points a microscope at the die; the video below shows just how few transistors are employed and proposes a likely circuit. Everything about this ball just oozes cheapness, and it’s likely these things cost essentially nothing to build. Which makes sense for something destined for the landfill within a week or so.

Yes, this annoying blinky-thing is low-end garbage, but there are still design lessons to be learned from it. Anything that’s built for a broad market has to be built to a price point, and understanding those constraints is important to understanding how planned obsolescence works.

Continue reading “Lessons In Disposable Design From A Cheap Blinky Ball”