If you’ve been kind enough to accompany me on these regular hardware explorations, you’ve likely recognized a trend with regards to the gadgets that go under the knife. Generally speaking, the devices I take apart for your viewing pleasure come to us from the clearance rack of a big box retailer, the thrift store, or the always generous “AS-IS” section on eBay. There’s something of a cost-benefit analysis performed each time I pick up a piece of gear for dissection, and it probably won’t surprise you to find that the least expensive doggy in the window is usually the one that secures its fifteen minutes of Internet fame.
But this month I present to you, Good Reader, something a bit different. This time I’m not taking something apart just for the simple joy of seeing PCB laid bare. I’ve been given the task of repairing an expensive piece of antiquated oddball equipment because, quite frankly, nobody else wanted to do it. If we happen to find ourselves learning about its inner workings in the process, that’s just the cost of doing business with a Hackaday writer.
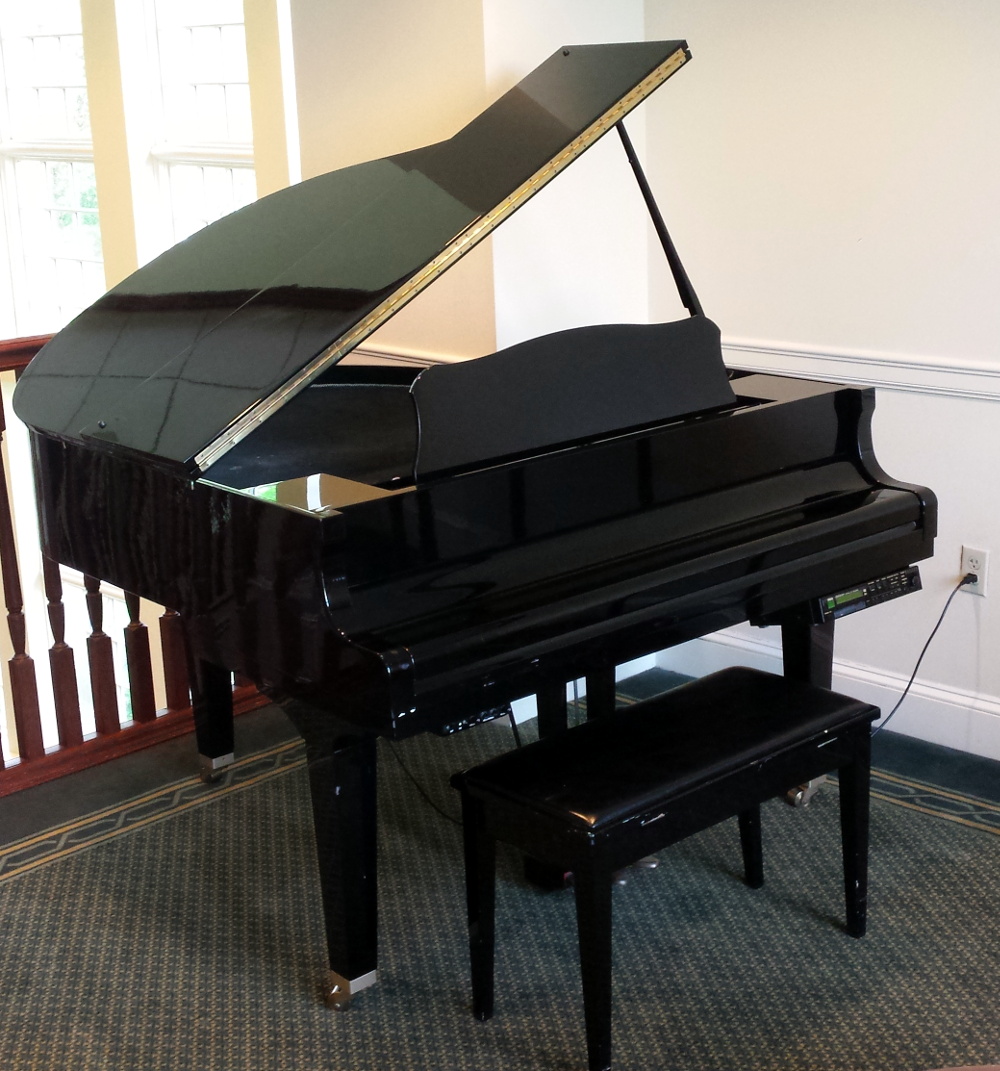
The situation as explained to me is that in the late 1990’s, my brother’s employer purchased a Yamaha Mark II XG “Baby Grand” piano for somewhere in the neighborhood of $20,000. This particular model was selected for its ability to play MIDI files from 3.5 inch floppy disks, complete with the rather ghostly effect of the keys moving by themselves. The idea was that you could set this piano up in your lobby with a floppy full of Barry Manilow’s greatest hits, and your establishment would instantly be dripping with automated class.
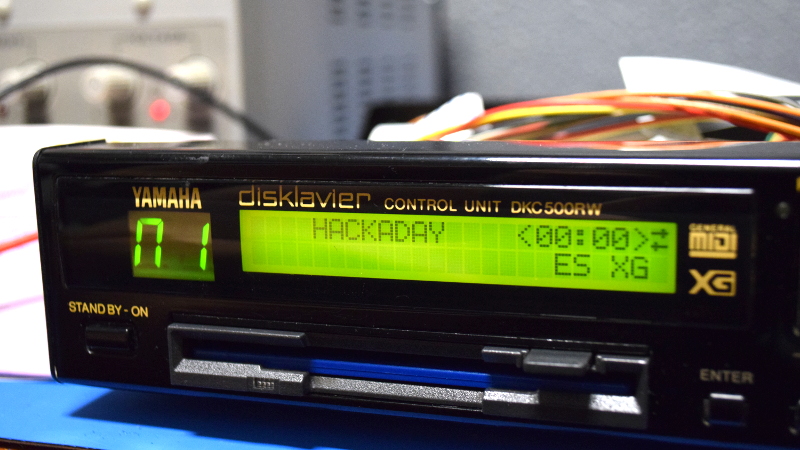
Unfortunately, about a month or so back, the piano’s Disklavier DKC500RW control unit stopped reading disks. The piano itself still worked, but now required a human to do the playing. Calls were made, but as you might expect, most repair centers politely declined around the time they heard the word “floppy” and anyone who stayed on the line quoted a price that simply wasn’t economical.
Before they resorted to hiring a pianist, perhaps a rare example of a human taking a robot’s job, my brother asked if he could remove the control unit and see if I could make any sense of it. So with that, let’s dig into this vintage piece of musical equipment and see what a five figure price tag got you at the turn of the millennium.
Beauty is Only Skin Deep
The look and feel of the DKC500RW reminds me of a DVD player from the early 2000s, back before they started selling them at grocery stores. It’s got a nice solid construction, and all of the buttons and controls feel pretty much like what you’d expect for a piece of gear that cost as much as a car. Yamaha made sure this thing had all the trappings of an expensive piece of electronics, at least externally.
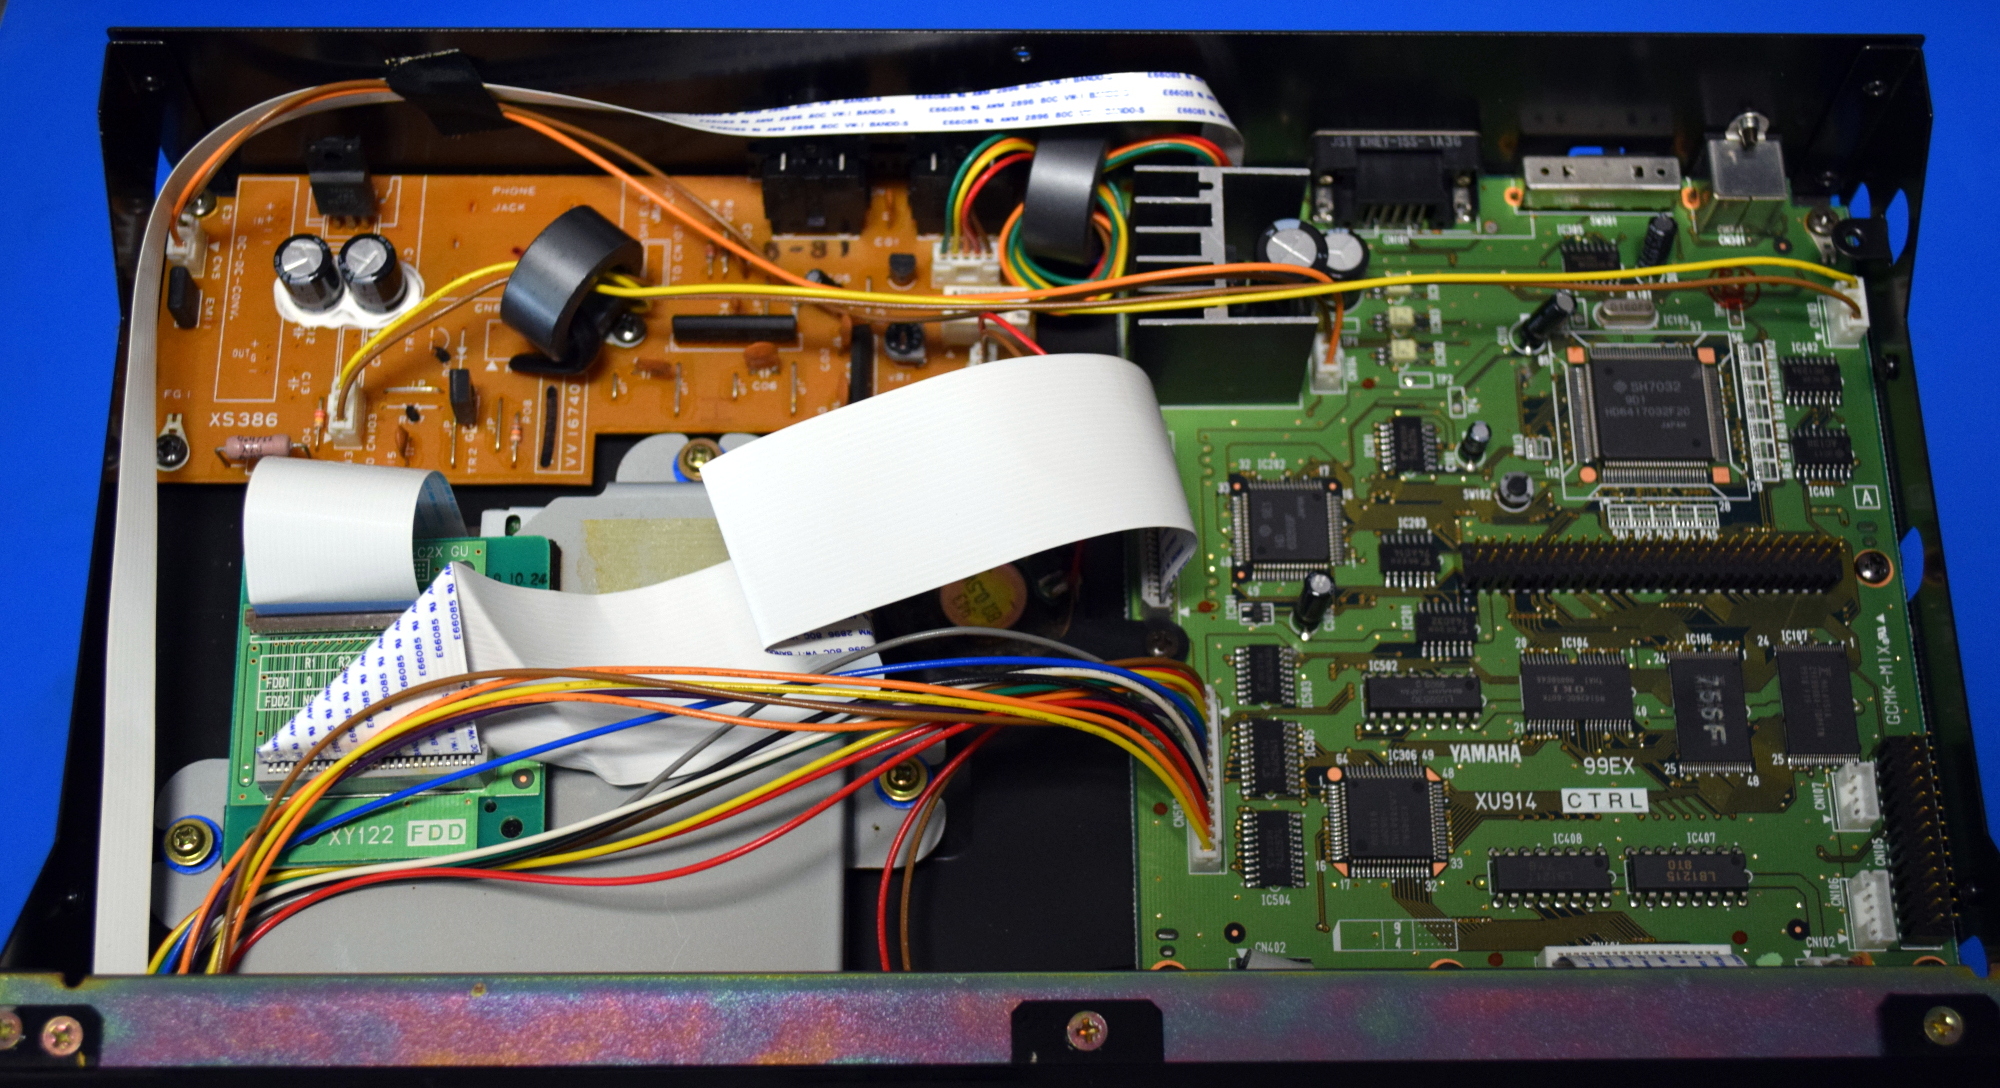
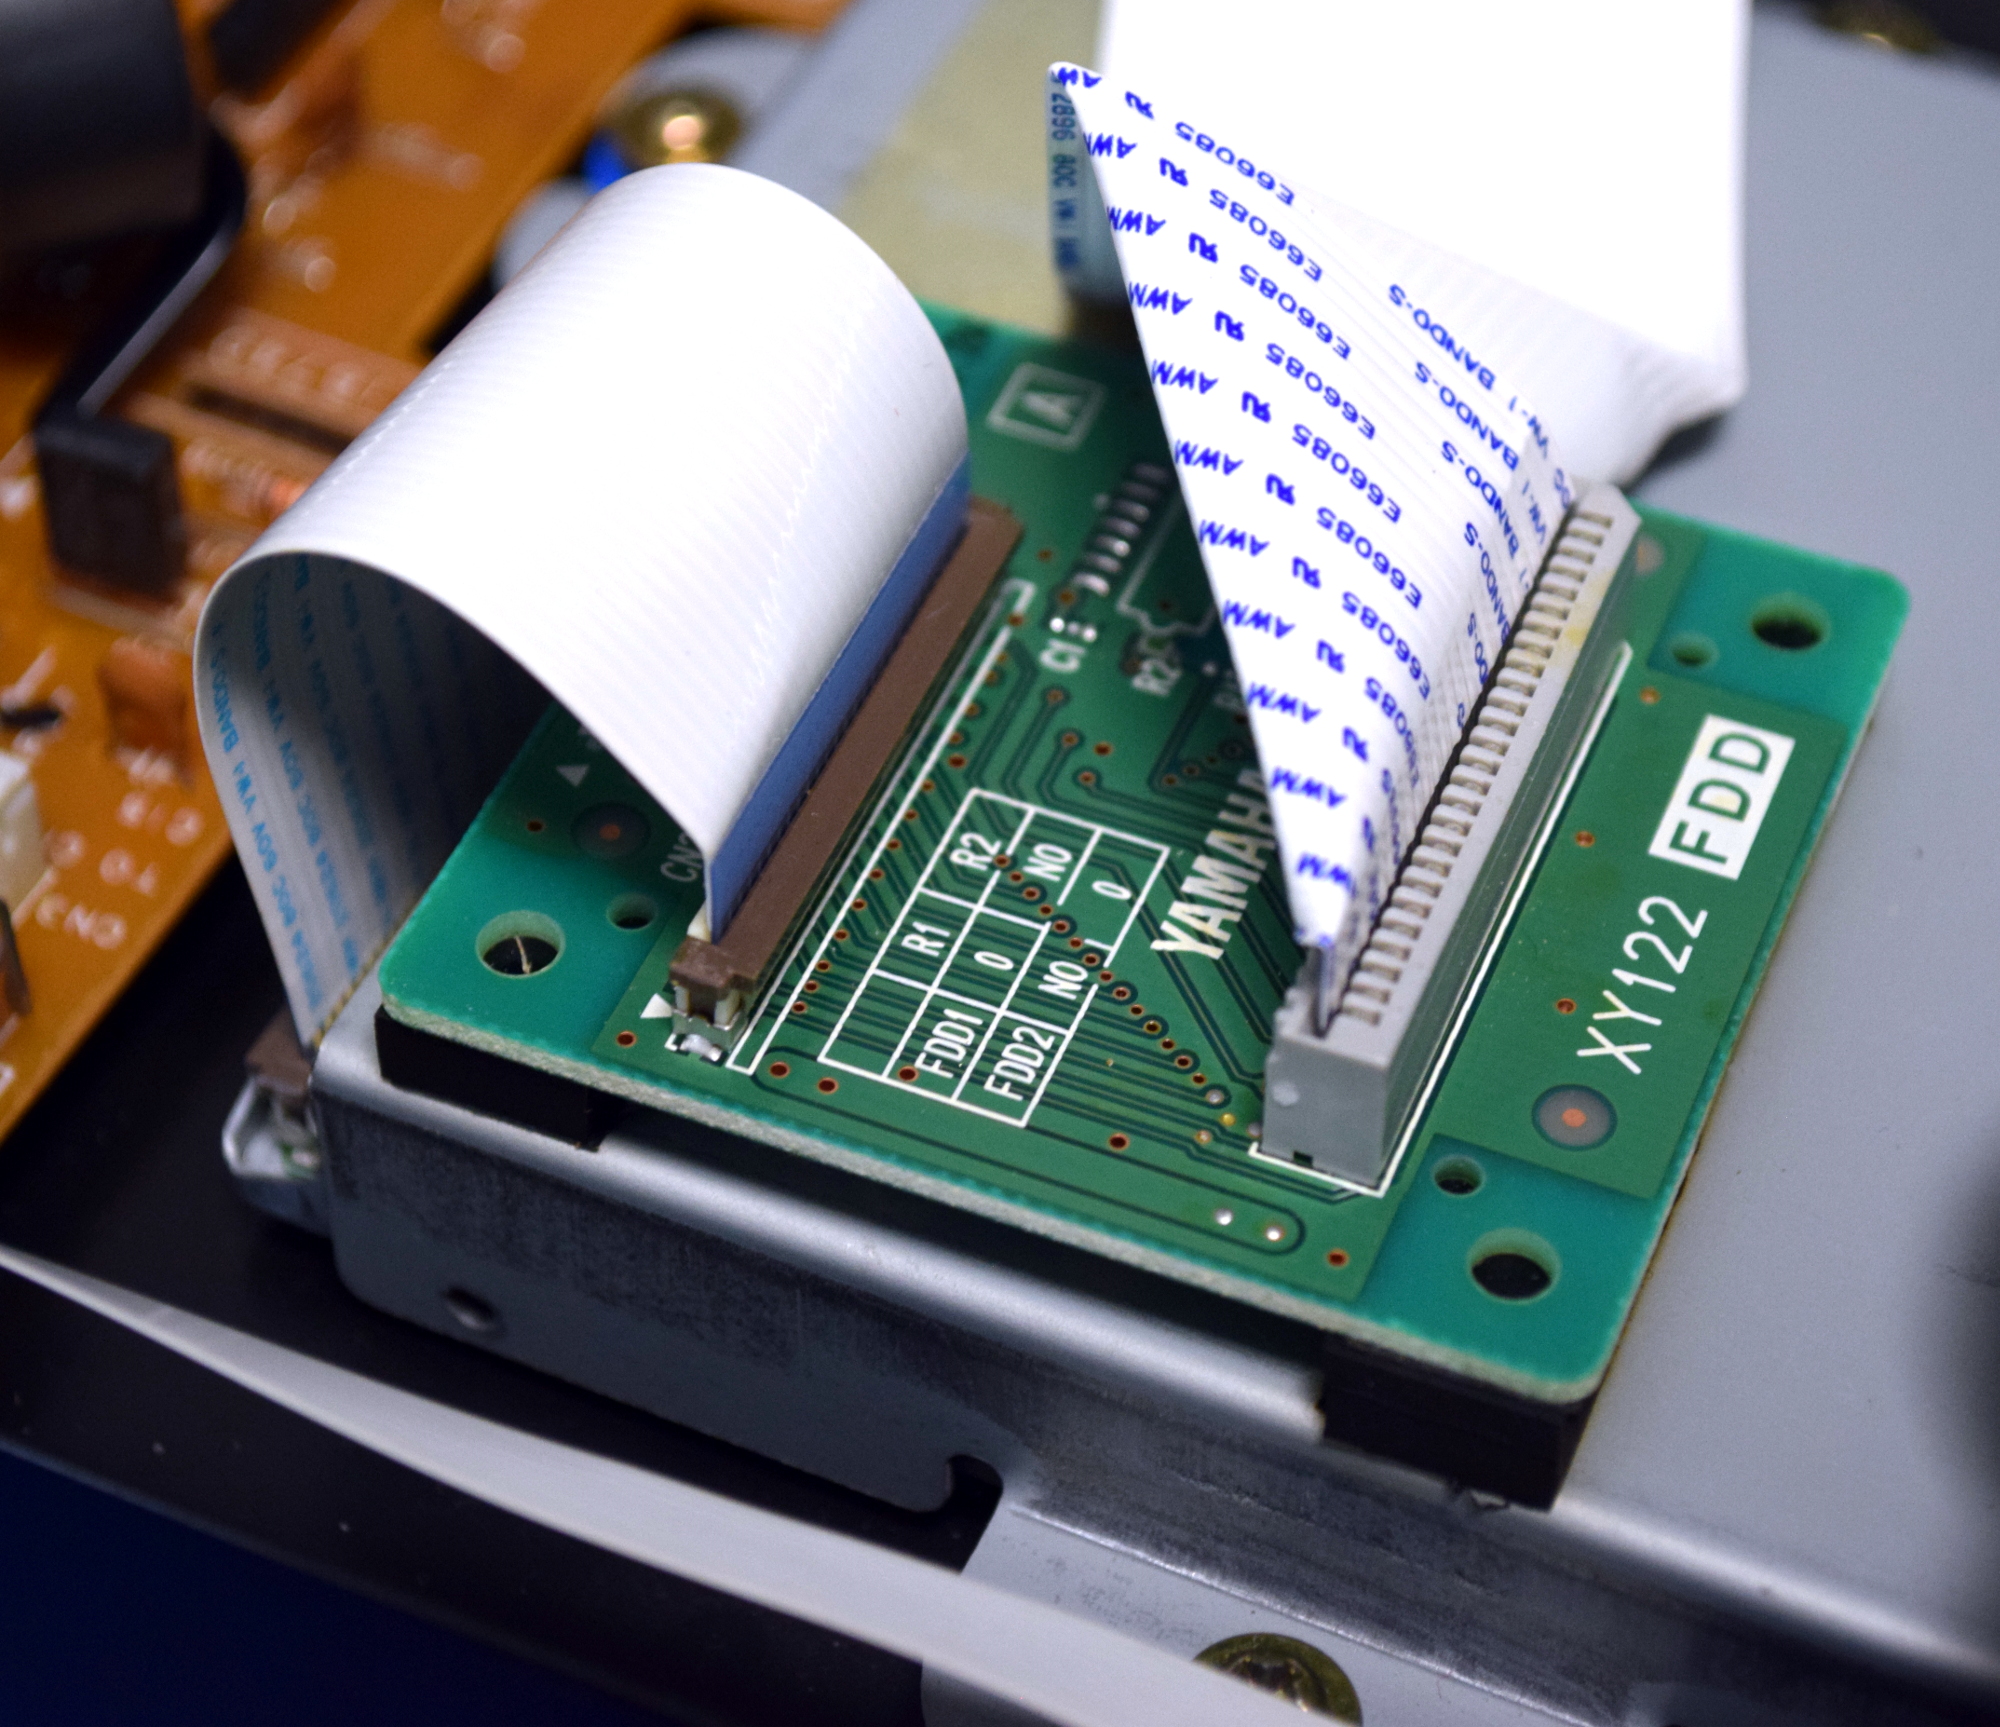
On the inside though, it looks for all the world like a cheap VCR. The half-populated tan PCB and haphazard wire routing immediately reminded me of the dusty thrift store gadgets that I occasionally strip for components in the post-RadioShack era. In general, the inside of the device is sloppy and looks like it was thrown together at the last minute. Very disappointing.
One Size Fits Most
I wasn’t able to find any useful information from the various numbers on the silkscreen, but I get the distinct impression the main PCB in the DKC500RW would have been shared among other devices in the Disklavier family. In that case, the other PCB is something of an afterthought; a shim necessary to get the primary board working in this particular configuration. Certainly the differences in build quality and board complexity are night and day.
 There’s also a large number of unused connectors, which would potentially link up to alternate control panels or storage devices. From the research my brother did, it seems that some of the control units featured optical drives and even hard disks. I’d love to get a look inside one of the higher-end models to see how they compare.
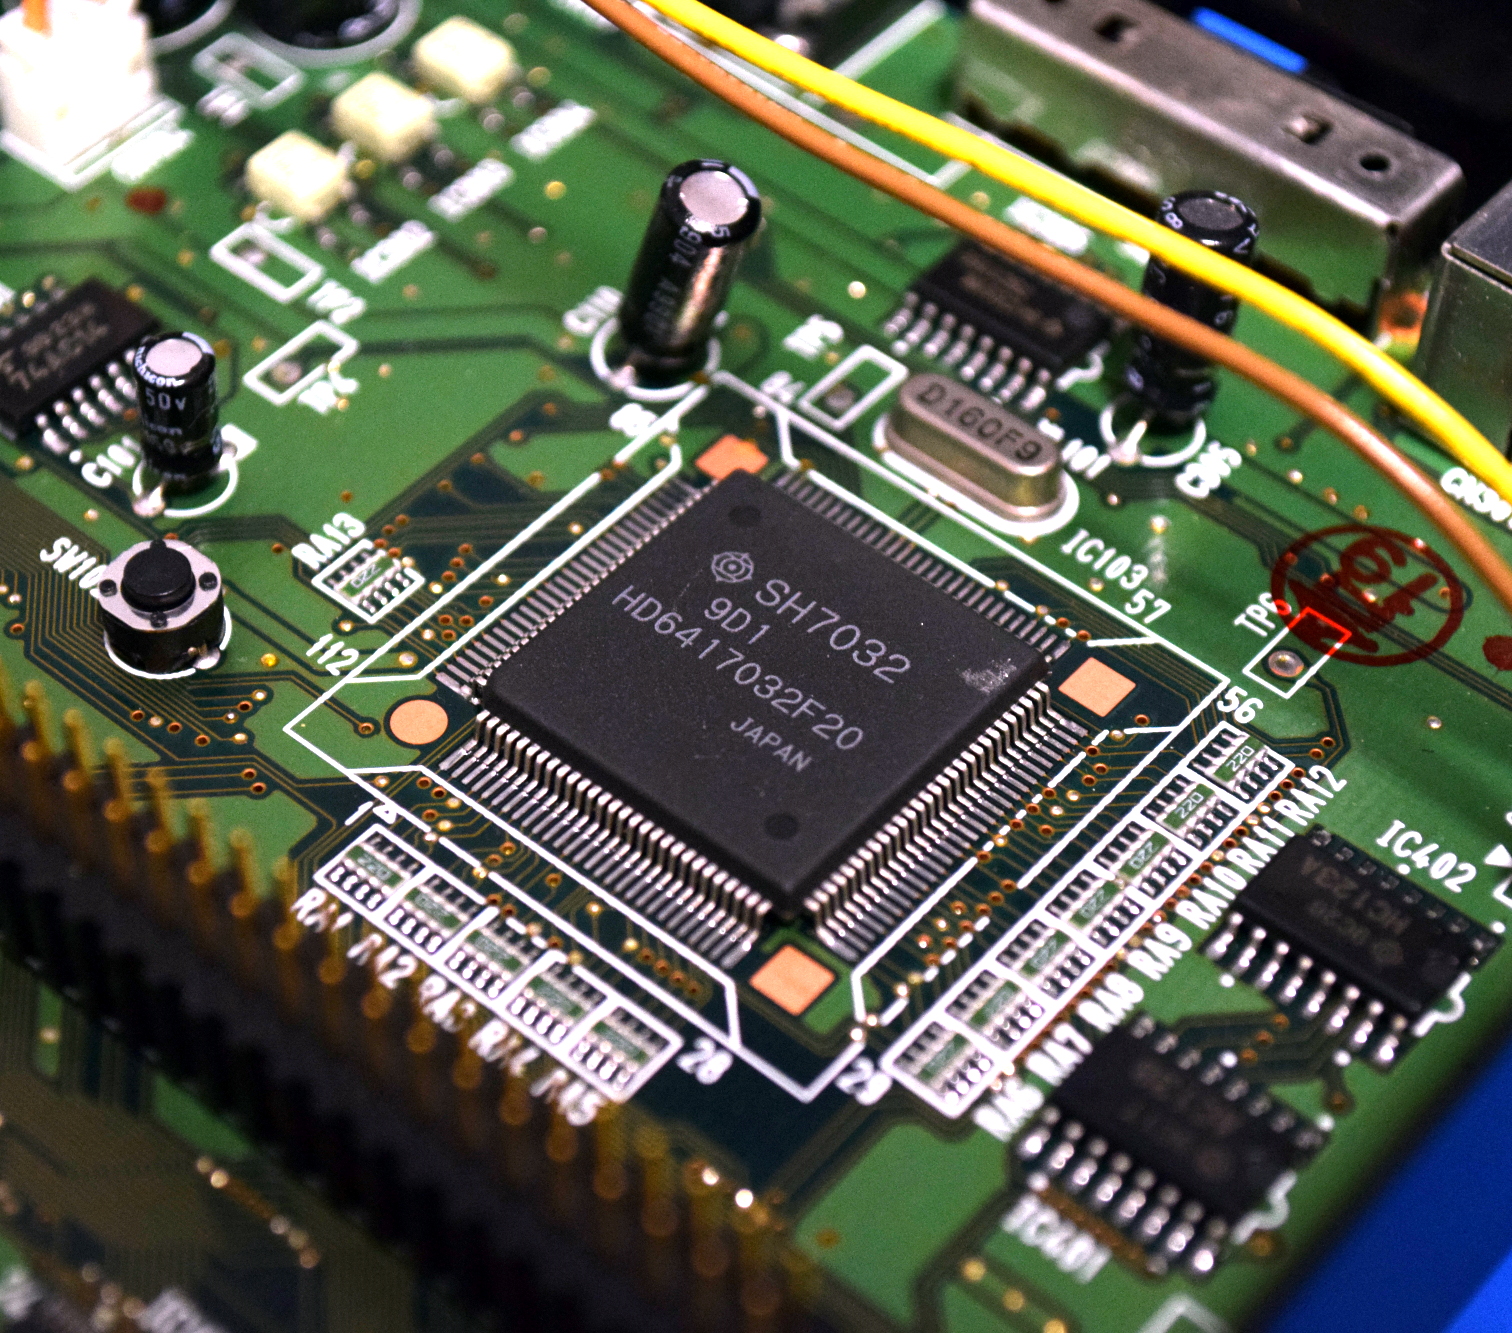
The star of the show here is the Hitachi SH7032, a 32-bit RISC processor running at 20 MHz. Incidentally, it looks like this chip (or at least a similar variant) is supported by Rockbox, an open source firmware for digital audio players. So if you’re looking for a challenge and see one of these control units at a swap meet, you might try your hand at getting it to run DOOM.
Looking around the board we also see an M38881M2, an 8-bit microcontroller from Mitsubishi, which is connected to a few 74AC574 flip-flops. It seems this chip is in charge of interfacing with the front panel controls on behalf of the SH7032. Next to the ribbon cable heading to the floppy drive, there’s also a HD63266F floppy disk drive controller. A lot of the other chips have their markings obscured, but it doesn’t seem like there’s many surprises to be had in any event.
The Floppy Root of the Problem
The first step to figuring out what was wrong with the DKC500RW was getting it powered on. Unfortunately, I couldn’t find a pinout for the DE-15 connector that linked it to the host piano, nor did I know what voltage to give it. But I did see a LM7805 with a beefy heatsink on the main board, and after hooking the adjustable power supply to the input and ground legs, it fired up without any complaints.
I tried a few of the disks intended for the system, and sure enough the device reported they were unreadable. Even blank disks caused an immediate error message on the screen. Looking through the settings, I noticed it had a function to format the disk. Curious about what would happen, I gave it a blank disk and waited for it to finish. Once formatted, the DKC500RW recognized the disk immediately. Uh-oh.
Now there’s probably a large number of people reading this who’ve never worked with a floppy drive before, and wouldn’t know why this turn of events is significant. Basically, it’s not unheard of for a floppy drive to become so physically out of alignment that the only disks it can read are the ones it formatted itself. If you’ve got the magic touch it’s possible to realign a drive in this condition, but I don’t know anyone who’s ever pulled it off personally.
My brother had already got a quote of several hundred dollars for a replacement floppy drive from a company that still services these pianos, but looking at it, it didn’t seem like anything special to me. It appeared to be a basic laptop floppy drive, with some sort of pin-switching adapter attached to it. Taking it apart, I was eventually able to find markings on the drive that identified it as a Mitsumi D353F3. A replacement was sourced on eBay for the princely sum of $8 USD, and once installed, the DKC500RW was able to read every disk we threw at it.
Digital Archaeology
 My brother took the DKC500RW back to his job, reinstalled it without issue, and now the sweet sounds of Copacabana can once again be heard wafting through the halls. He’s the big hero, and I toil away in obscurity. Such is life.
But there’s actually a bit more to the story than that. In the week or so it took the replacement drive to arrive, I started wondering if there was anything I could do with this stack of weirdo Yamaha MIDI disks before they had to go back. It turns out that as a rudimentary form of DRM, the disks have no boot sector or traditional file allocation table (FAT). Accordingly, any operating system that tries to mount them just sees them as corrupted.
However, with a hex editor and an amount of time I’d rather not admit to, I was able to figure out the structure of the disks. From there, I started work on a Python script which can list and extract the individual audio files from a disk image. In the exceedingly unlikely event you’re interested in ripping the MIDI files from your personal collection of Yamaha Disklavier 3.5 inch floppy disks, you can follow along with that project over at its Hackaday.io page.


The Mechanical Music Digest has a ton of information on player pianos, including the Disklavier. Here’s a pointer to several resources: https://www.mmdigest.com/Links/PianoDisks#selected_table
Could the floppy drive be replaced with a floppy emulator that takes SD cards?
Not likely, as it doesn’t us a standard disk layout.
I don’t think that’s an issue, at least with FlashFloppy firmware you can configure a custom disk layout to match basically any platform. Then the disk files on your USB stick are just raw data files of appropriate size.
There’s a USB floppy emulator that a lot of people have reported working well for the old Disklaviers. This was a route they were considering taking as it’s cheaper (~$180) than what they’d been quoted for a refurbished floppy drive.
But they had a few issues with going in that direction. A big one was how ugly the thing is, and the fact you now have a usb thumb drive sticking out at knee-level. More practically, they already have a library of the floppies they didn’t want to lose access to.
Though to be fair, now that I can reliably rip the tracks from the disks, that last point doesn’t really apply.
There are wee little flash drives that only poke out 1/4″ or less. I picked up a couple of Verbatim 4 gig ones, which happened to be Micro SD readers with the car inserted from the USB plug end. After using a pointy knife to extract the card I used a Dremel to carve a divot in the metal so I could catch the raised edge on the cards. So now it’s a reader for most any Micro SD, just like ones that can be bought cheap with the divot already there.
Not necessarily the magic touch. Just patience and a scope, along with the necessary knowledge. A special “alignment disk” helps lots in this also.
If you know what screw to adjust, there’s also the good ol’ trial & error technique, along with searching for the highest & lowest positions that are able to read a known-good disk, and then aiming for the middle.
Any resources for this? That might make an interesting piece.
Yeah I’m all ears for this, as I’ve got several FDD to fix
90% of the time the drive needs cleaned, rather than re-alligned.
Back in the late 80’s, I had to manually re-align one of these: https://www.wikiwand.com/en/Commodore_1541
Wasn’t as hard as I’d thought, to be honest. Found a program I could type in to read the alignment, put in a known good disk, turned a screw until it worked properly, then put a small dab of fingernail polish on it (to lock the screw into place).
The 1541 drivedps were notorious for getting out of alignment. It must have something to do with the bodge job of not having a home sensor, just save a few cents by leaving it out, and step to home the full number of tracks no matter where the head is. The noise of the hammering against the mechanical end stop was a “feature” of these expansive and not too good drives. I had quite a few to fix in my time.
I think nearly all the 5.25″ floppy drives of the 8-bit era were like that. On the Apple II, I remember that the track 0 seek during boot produced a gentle rattling, whereas the seek that accompanied a read-error was a much more urgent, nerve-grating rattling.
Just talking about floppy drives makes me remember all the sounds that the drives used to make. The slewing of the head across a large number of tracks, the tick-tick-tick as sequential tracks were read off, and the random seeks produced by reading highly fragmented data; all these gave you an idea of how the data was laid out on the disk. The early Mac drives featured a variable-speed spindle motor (which provided a way to pack more data onto longer outer tracks vs. shorter inner ones; later drives would vary the data transfer rate instead of the motor speed). In those, you’d hear the tone of the motor changing speeds as the head moved from one zone to the next.
Early hard drives had stepper motors to move the drive heads. Those made some cool sounds as well, which were often used as foley sounds in movies whenever random computer noises were needed.
Kids these days wouldn’t recognize these noises that used to be common. I wonder if there’s an archive of obsolete sounds somewhere? (Of course there is.)
You’re giving me chills. My first workstation synth was a Yamaha V50 back around 1992. I programmed my own backing tracks for gigs with a singer and saved them to its 3.5 inch floppy drive, probably the same Mitsumi in the Disklavier. Reliability was perhaps 75% and sometimes it would corrupt disks. Even with backups, there were many difficult moments in gigs with that machine.
I remember the 1541’s getting the crap beat out of them by the DRM of the day. Used to make me sick to hear the heads banging on the inner and outer stops.
Also, Tom, somewhere you say the disk images were not accepted when written back to a floppy. Your ddrescue log show some unreadable sectors. This used to be a kind of copy protection, so maybe these unreadable sectores occur in the same position for all disks, ( would be too easy ) or there is some information in the disk header about their position. Then you would need to recreate this situation, or try using goold old utilities ( copyIIpc comes to mind ) to try duplicating them ….
Good catch. Yes, every floppy I imaged with ddrescue would top out 99.44% like that. I’ve since wondered the same thing, that maybe the “bad” sectors might be some kind of identifying mark the hardware uses.
Unfortunately, I didn’t have ddrescue make a detailed log file when I made the images, so I don’t have a listing of their locations. So at this point I’ll have to go back and image them again with logging enabled to see if there’s a pattern.
If there is copy protection utilizing hidden tracks (or some other custom track layout), it’s also possible that the USB floppy drive can’t read all the relevant data from the disk in the first place. USB floppy drives (and even some internal laptop floppy drives) don’t typically support that level of low-level access required for full capture of custom disk formats. I’ve used a program called OmniFlop for various disk capture tasks, and for that I have an old PC with a floppy drive as I know it can do this thing right.
Can OmniFlop read Amiga disks in the pc ? couldn´t find that information from its page…
Unfortunately PC can’t read Amiga disks in general, this is because the Amiga disk controller is different from the PC. On the Amiga, large part of the disk control mechanism is implemented in the software. This allows creating custom disk formats that are incompatible with basically anything else except Amiga. Especially game disks utilize this for copy protection. You’ll need specialized HW such as KryoFlux to read those on a PC.
In theory regular AmigaDOS formatted disks could be readable on a PC floppy drive, but I haven’t tried if OmniFlop can do it. There is a program called adfread, but it requires a PC with two internal floppy drives. It switches between drives while reading and tricks the PC controller / driver this way to support Amiga formatted disks. OmniFlop has a custom floppy disk driver that can be used in place of the default Windows driver, so in theory it could do the same without requiring two disk drives.
The best way to create images from Amiga disks is to use an Amiga. If you have a network card, plipbox, or just a serial link cable, you can then copy the data to a PC.
I worked on reverse engineering a floppy setup for computerized knitting machines – their 3-1/2 floppies were unreadable, until I happened to look at the raw data and noticed it was just a little slow – they had used a 14.?? mhz crystal instead of a 16mhz crystal in the floppy circuit. Changed my crystal from 16Mhz to the 14.?? mhz, and the data was readable.
That would be 14.318 MHz. Why? you may ask. Because it was cheap being in every TV to provide the appropriate frequency for the color burst.
Well done on going the extra mile with the disk image ripping and file extraction utility. Awesome work.
>> “So if you’re looking for a challenge and see one of these control units at a swap meet, you might try your hand at getting it to run DOOM.”
Oooooh, this is definitely going to happen, now.
The clock is ticking, everyone.
Has anyone got DOOM running on a 24×2 LCD?
Well at least the piano could kinda play the “classical” DOOM music. ;-)
Wouldn’t that be more of a TETRIS platform? :-)
Have the Disklavier play the DOOM music in DMX MUS format. Call the software “DOOMLavier”.
With the disk image format, maybe it could at least run Doom MIDI files :)
Nice writeup and good job with the Python-tool (altough i prefer Perl…). Any idea how many of these devices are still used?
I still have a floppy drive but i think it has some alignment problem too, as it refused to read every disk i put inside. I keeped the drive (mostly for the nice case and USB-cable) but i tossed all my floopy disks some time ago. I am not into old computers so they really are no longer usefull. I probed around the drive with an oscilloscope but without any documentation i wasn’t able to fix it (or maybe it was fine and the disks went all bad after like 15-20 years?).
The advantage of experience (being old) is that as soon as you said “…recognized the disk immediately…” i said to myself “The head’s out of alignment.”
I concur and confirm that… damn, I’m old…
Ditto! When techs were viewed as half wizard, half mad scientist!
Wizards? Yes, we still are, among some of our friends and relatives. “Could you please fix my computer (or phone)?” We increasingly answer, “You’re better off to buy a new one, and maybe stop poking at bright and shiny things and responding to unsolicited email.” “Oh, come on,” they tell us, “you know how to fix this stuff.”
We have experience in knowing when to disclaim fixit knowledge. I had to stop knowing how to adjust an ASR-33 TTY in order to be able to get my C coding done. Yes, we ARE old.
I had the same thought, despite being only 26 years old….
Oh, that brings back memories of the mid-70s and SA800 8″ floppy drives – pop in an alignment disk, scope the raw output waveform, loosen the clamps on the stepper motor just a hair, and with a pair of channel lock pliers, twist the stepper just a little….
You know you’re old when you reminisce about repairing computers with big hand tools.
I’m so old, I remember when Comm chips were called ‘ThouArts’ instead of UARTS.
I’ve actually done a fair amount of experimenting with these before, and in my opinion, it’s easier to just throw out the whole unit. These pianos have a spot to plug in a MIDI cable on them, and if you do that, you don’t have to deal with anything floppy related. Some friends and I got a USB to MIDI cable off Amazon and had a ton of fun playing all kinds of stuff on these pianos.
With the DKC500RW, the MIDI in is actually in the back of the control unit rather than the piano itself. So it’s got to stay there even if you’re feeding MIDI from an external source, unfortunately.
Yeah, MIDI has not been obfuscated by these companies. There is a MIDI IN jack on all of them. It’s lotsa of fun to download the preserved library of digital music from a century ago. A cellphone or tablet with USB-to-go can go at it.
The older PianoDisc units go controller dead though. The oldest not as much. I suspect early flash memory failure as they take longer and longer to boot up, then die.
I am putting one of the latest ones into a piano that the customer had one of the first generation units put into in ’92. Internet of pianos! Then they had 128 levels of playing force. Now they 1024 levels and memorize the minimum force to play each note so that when playing softly no notes drop out. I have 2 or 3 of these oldest units pulled but still good along with all of those solenoids.
I saw one once, no twice. The contraption was at a mall in Westchester County. Depending on which individual started it up it could be playing that kind of music. Or it could be playing something classical and confusing the shoppers. Personally I prefer the traditional player pianos. And oddly the high school I went to, owned one in their completely ignored as such music room. Every time some one played it, or tried to, I would announce it was out of tune. And everyone would want to ask me how would I know that.
I’m the same way, my brother will play the piano at my parents’ house and I’ll be like yeah play one octave higher or I’m going to go out in the garage and find a wrench and tune the damn thing! it’s got like, one or two keys that are out of tune. But it had some damage to it that they had to have repaired, and when they did the repairs they said it would take playing it and having it tuned 2-3 times for everything to “Settle” to where it would stay in tune.
A good piano technician can determine whether a pin (or a few) needs replacement with a bigger diameter, or whether the entire pinblock needs replacement. An unskilled tech will clobber the loose pin with a hammer or put on some sort of “pin tightener” glop, possibly ruining the pinblock.
Correct tuning of a piano requires physical and mental skill in order to get all the notes to sound correctly together and to hold the tuning over a lengthy period of time. The harmonics of a physical string are not exact, owing not only to the inherent qualities of the metal but to compromises that need to be made for any individual piano. Often the correct tuning of each individual string reflects tuning so that the harmonics mesh well with other strings.
Modern tuning uses equal temperament, where the interval of a minor second is the 12th root of 2. Earlier tunings use precise fifths, fourths or thirds as part of the tuning method, with disastrous results in certain key signatures, with some intervals being heard as bright, mournful, harsh, etc. See http://www.biteyourownelbow.com/keychar.htm
Why has nobody said Black MIDI yet? That’d be the first thing I’d do if I had access to a Disklavier.
https://hackaday.com/2015/11/12/black-midi-there-is-no-denser-music/
Been there, tried that. The piano doesn’t like 1/64th notes and faster.
https://www.youtube.com/watch?v=BswLMDavu80
The whole Thoman event where the video I linked is from it worth a Hackaday write up, if there hasn’t been one already. One of the world biggest music instrument stores invited YouTube creators that make experimental electronic music. Some large scale experiments took place that are impossible other places, because of the cost and access to equipment.
If all else fails, you can look at the data stream from the read electronics with a logic analyzer or even bit-bang with something like a Blue Pill. At 160MHz you can sample and have loads of time to process. You should even be able to easily get the analog read signal at high enough resolution to decode on the fly. In fact, that might be a pretty cool project to use on any drive.
The neatest trick with a misaligned 1.44M floppy is when it’s out to where it reads and writes right in the middle between the normal tracks.
Then you can do tricks like booting a PC with DOS and a Macintosh with System 7.5 off the same floppy. Hide secret documents in plain sight because they can only be read with a specially misaligned drive.
At one time, I worked for Pertec (PCC). My group was concerned with complete computers (this is right after PCC acquired MITS and all their Altair stuff), and our offices were in the same building where PCC built 51/4″ floppy drives. There was a “mezzanine” where you could look down on the manufacturing floor.
I remember watching the guys align newly-manufactured drives. The fellows had leather aprons and leather-headed mallets, and sat next to about $20,000 worth of specialized test gear.
The alignment procedure was to look at some waveforms, WHACK the drive with the mallet, and look again. WHACK! WHACK! Whack. TAP, tap, tap. Done.
The problem with being a computer tech for 54 years is that anyone with about 3 year’s of experience is able to do about 80% of the things that make you your bread and butter for about 1/5 what you charge hourly. They only call you in when some other tech has screwed something up so badly that they need you to rescue them.
Screw that. I now charge by the day, sometimes half-day for my friends. I get a lot less work, but what work I do get is more interesting, more important, maybe more challenging, and definitely more appreciated.
If this sounds good to you, start at $1200 per day and increase it until the ratio of fishing time to tech time is right for you. One bonus is that, since they know you are charging by the day, they don’t constantly check over your shoulder to estimate a meter-reading.
Don’t work like this for any “foreign” outsourcing companies. They will gladly pay your rate 7 days a week so you can work from 7AM to 3PM and then spend another 4 hours from 10PM to 2AM bringing their overseas techs up to speed. You will not get a good night’s sleep, nor will you get in any fishing.
Sounds about right. After graduating I worked for Burroughs and one of the things I had to do was calibrate Redactron word processor discs in the field. However an important detail was that we were issued with calibration disks which had a limited life due to moisture absorbtion: stick one of those in the drive and get a “cat’s eye” on the scope. Back in those days heads were positioned using a band around a pulley, not completely unlike one of today’s desktop laser engravers.
I’ve similarly had a Yamaha drive go, but it was older and I think the problem was the (WD) controller chip which was unobtainium.
Apropos “copy protection”, in DOS days I used something which I think was called Disk Analyzer from Quaid Software, whose claim to fame was a major lawsuit with Lotus for just that reason.
MarkMLl
I bought a Yahama disklavier around 1978 along with a hundred or so floppy music selections. Have really enjoyed it until I got grandchildren. Seems that little slot is just irresistible to sticking things in. I had it repaired once. Now it’s damaged again. I believe beyond repair and needs to be replaced. It was pretty easy to take out but how do I order a replacement part? Markings are 33253 on one side and SS26DB on the back side. Will I need to do anything other than install new part?
Update. I found a disc drive. It booted up and planed for a while. However next time It said disc unformatted. Same disc 20 minutes later. Tried several disc. Same result. Ideas.
Thanks for the writeup! Just laboring with the same problem and still wavering between the “ready to run” but a bit ugly Nalbantov replacement, a standard HxC slimline drive and replacing the floppy. I don’t have a lot of saved stuff on floppies, so that’s not an issue.
Hi friends. Does anyone know where to download more music for Disklavier floppies?
Thank you so much if you can…
Hello Friends!
I would like to share a story how I overcame the floppy drive failure on DKC-500R XG. Upon the failure, I did some digging but option was limited. DKC-900 was the latest but not compatible with my Mark II XG Disklaiver. Then I leaned that DKC-850 is compatible however, it was discontinued and difficult to get. So I look at the part level to replace the Floppy Drive:
• The ebay sells Mitsubishi Floppy Drive (https://www.ebay.com/itm/Compatible-MITSUBISHI-MF355H-262MG-Floppy-drive-for-Yamaha-DKC500-Disklavier-/264559776497)
• Amazon sells Nalbantov USB Emulator (https://www.amazon.com/Emulator-N-Drive-DKC500RWXG-DGT2IIXG-MX100IIXG/dp/B07S1TVTST)
However, I decided to go through the back door and use the MIDI interface:
• Amazon sells Yamaha Wireless MD-BT01 5-PIN DIN MIDI Adapter (https://www.amazon.com/Yamaha-Wireless-MD-BT01-5-PIN-Adapter/dp/B01CFOHF6U/ref=sr_1_3?dchild=1&keywords=yamaha+bluetooth+midi+adapter&qid=1616510406&s=electronics&sr=1-3)
Now through the Bluetooth Midi interface, I have full control of the Disklavier via iOS devices like iPhone and iPad. If you guys have any issue with Floppy Drive, I would like to recommend leap frog the technology and come to 21st century.
Just a thought and hope it helps to whom has issue with Floppy Drive on DKC-500R XG.
Buy the BT01 and get the PIANOSTREAM app from Apple store. This guy made it all work through the iPhone.
Can you post more detail image of the pin-switching adapter? i have older control unit with other FDD model which is not require this board (Mitsubishi MF355H-262MG), this FDD has 26-pin flat cable with 1.25mm pitch, now I need replace it with new TEAC FDD which has 26-pin flat cable with 1mm pitch. Thank you.