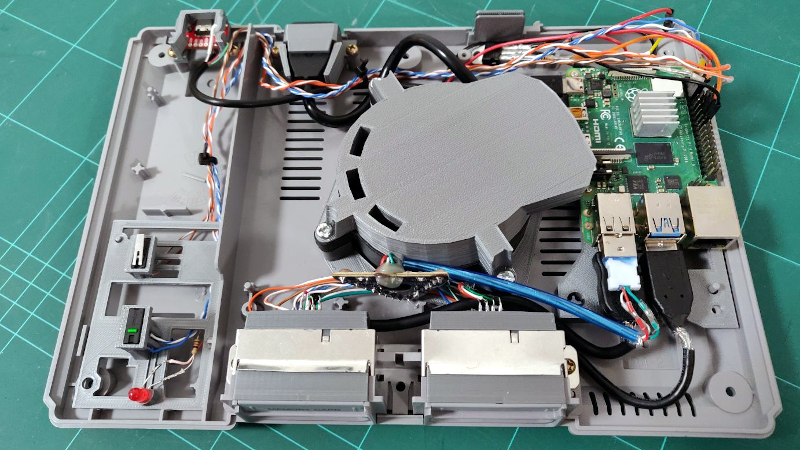
[Andreas Wilcox] wanted to get his brother a birthday gift that reflected their shared love for the early days of 3D gaming, but just handing him a second-hand original PlayStation lacked a certain style. So he decided to gut the classic system and replace its dated internals with a shiny new Raspberry Pi 4. But rather than taking the easy way out, he put in the time and effort to integrate the new hardware so seamlessly that the nearly 25 year old console still looks stock from the outside.
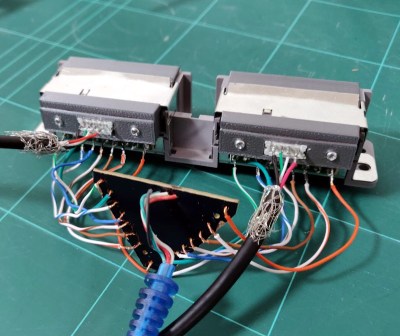
 The fact that the front ports are functional and work with the original controllers really helps sell the stock look. [Andreas] found a USB to PlayStation controller adapter, liberated the PCB, and soldered it to the back of the system’s ports. Even the memory card slots got in on the action, thanks to female USB connectors installed where the original connector went. It was a tight fit, but the final result was well worth it.
We also love the GPIO-controlled cooling fan complete with a duct designed to blow across the notoriously toasty Pi, and check out that carefully designed holder for the power and reset buttons. This entire project is really a fantastic example of how 3D printed parts can give your projects a far cleaner and more professional look than the hacker’s old standby of hot glue; though of course it demands a considerable time investment.
This isn’t the first time we’ve seen a Raspberry Pi shoehorned into a classic video game console, but it’s absolutely one of the cleanest examples we’ve ever seen. Though if we lump Raspberry Pi portables into the running, the competition is considerably fiercer.


I’m glad I’m not the only one who raids the extra CAT5 cables when I need some copper wire!
Everyone’s got to have a big bag of cables to choose from for tinkerin’ purposes :)
Besides that it’s an awesome build!
I always keep a 1000ft spoil handy :)
Is there another source of wires?
B^)
Dead power supply cables when you need to run amps :D
Dead headphone cables when you need to run microamps… well small signal crap on really tiny strands, or closing bridges or modding vid pins on older CPUs.
I saved all our old phone wires precisely for this reason!
Oh man, invest in a kit of 8 colored stranded and solid core wire
It’s one of the most satisfying feelings going from cat5e and speaker wire to a beautiful color coded interconnects and you just want to stare at it all day
Literally just did a project last night with a cat 5 and and an old xbox (og) composite cable
I’d rather have the stock PlayStation and a stack of classic games.
Your in luck. eBay is your friend. And if you want to go the slightly greyish route, you can even get them with mod chips ore installed at pretty reasonable prices.
I took the later path and got one pre-modded. Had it for years and still running. Not really the most legal way of doing things, but let’s be honest, there are games out there that are so hard to get a legit copy of your only option is to dl them.
forget modchips. ODEs are where it’s at for older disc based systems. no drive means no dealing with disc read errors. ps2 is easy with some custom software, a network adapter, and an ide hdd or sata with adapter. ps1 requires a custom external module that fits where a GS would go and a minor internal mod to allow the external module to take the place of the internal drive.
What is the point of this comment, other than to be negative? The Pi 4 will be able to emulate whatever PS games he wants to play, plus games from literally every console that came before it; all on a real TV with real controllers.
This is an improvement in every conceivable way over the original console running discs.
Why not exercise some genuine creativity and show off his mad 3D printer skillz and create a new awesome enclosure for the Pi? He didn’t make any improvement to the PS. It just happens to be around all this modern stuff now. This whole “hey look… aren’t I cool? I gutted this (insert name of some retro old gadget here) and put a raspberry Pi inside it. Isn’t that RAD!!!” thing has long since gotten old and it isn’t clever any more.
This is a bad take.
There’s (currently) no shortage of used PS1’s for sale.
I’m more impressed by the very polished reuse of the old case than I would be by a relatively crappy from-scratch design.
If you don’t find this RAD or clever, what’s the point of commenting?
Please show us your projects that are so much better (in your opinion).
Well fine, whatever. Guess you’re easily impressed. I’m not.
These types of people never have any kind of accomplishments to show for themselves.
Probably part of why they’re so bitter, they’ve never done anything interesting enough to actually get picked up on HaD, so they complain about the projects that do.
I bet this Alex dude can’t even put together the toys you assemble from a McDonald’s happy meal lol
Also waiting to see your projects that are better.
>3D printer skillz
The blower fan shroud and controller port braces are 3D printed.
I happen to think that this project is quite cool. Not only is it art, but it’s a functioning device that someone made with their hands, driven by passion. If that’s not cool, I don’t know what is.
The last bit of your comment sounds like a challenge to yourself. I want to see your project hit the front page, so get to it, fam.
Sounds like a stack of loading time, laser and disk cleaning time and walking back and forth to eject… How you gonna find time to play?
You only say that because you havent played one in a long time. First PlayStation games were a wobbly fixed point vertex no subpixel precision no transparency no perspective correction mess full of gaps between triangles. At lest with emulation you can ameliorate some of those problems.
There is a mention in the build that the Pi4 doesn’t stop providing 5V when it’s off : it is customisable in the EEPROM Settings.
Here is how to achieve it from the start :
# apt-get install rpi-eeprom
# rpi-eeprom-config /lib/firmware/raspberrypi/bootloader/critical/pieeprom-2019-09-10.bin –out /root/bootconf.txt
# sed -i ‘s/BOOT_UART=0/BOOT_UART=1/g’ /root/bootconf.txt
# sed -i ‘s/POWER_OFF_ON_HALT=0/POWER_OFF_ON_HALT=1/g’ /root/bootconf.txt
# sed -i ‘s/WAKE_ON_GPIO=1/WAKE_ON_GPIO=0/g’ /root/bootconf.txt
# rpi-eeprom-config /lib/firmware/raspberrypi/bootloader/critical/pieeprom-2019-09-10.bin –config /root/bootconf.txt –out /root/pieeprom-new.bin
# rpi-eeprom-update -d -f /root/pieeprom-new.bin
# rm /root/pieeprom-new.bin /root/bootconf.txt
# reboot
You can ommit the BOOT_UART line, it’s only usefull if you want a serial UART available from boot on RX/TX GPIOs.
A bit late as didn’t find this article until today.
That’s great, I didn’t know that! I should probably have searched around a bit more when I stumbled upon that problem, I’ll definitely keep in mind for that next time, thanks!
A modded memory card with a USB connector would require no change in the door mechanism.
This is really cool.
Very nice job.
Great rework and good 3D prints too. Old becomes new!
i love this. really well-done internals. jealous of the 3D printed parts, something i need to get on someday.
i’m a bit biased, as i have an Android TV setup built inside of an Atari 2600. i replaced the rear controller ports with HDMI, USB & Ethernet. other than that, the front is completely stock and it does everything you could want a TV to: play emulators, watch Netflix, or just be a computer.
i know “new thing inside old thing” is done to death. but it really does make a difference at home when you have something like a museum piece instead of a boring black box. definitely fun projects to do.
Great retro game project! Nothing but gratitude and admiration for those who create and share. No doubt this has inspired at least a few to search for their old consoles to upgrade.