Catch The Old School BASIC Bug With This Computer Kit

Does the complexity of modern computing ever get you down? Do you find yourself longing for the old days, where you could actually understand what your desktop machine’s hardware and software was doing at any given moment? You aren’t alone, but unfortunately running a 40+ year old computer as your daily driver isn’t really a viable option.

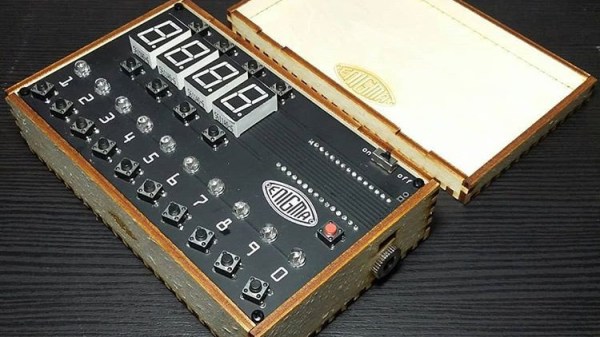
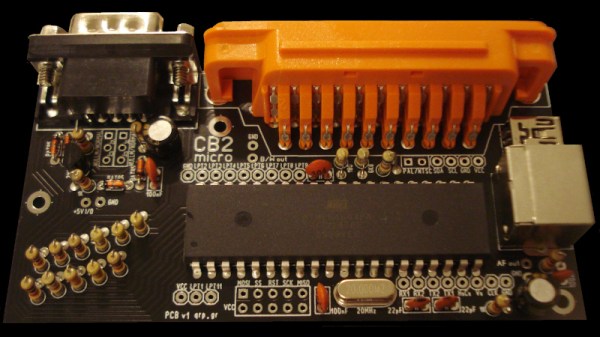
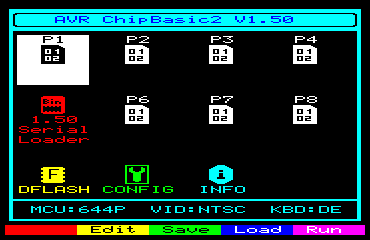
But that doesn’t mean you don’t have options. [Kostas] writes in to tell us about the “CB2 micro”: a diminutive open source retrocomputer kit that can be built in as little as 30 minutes thanks to its through-hole construction and exceptionally low parts count. When completed the miniature computer is an all-in-one BASIC development platform; just connect up a display and a PS/2 keyboard, and you’ve got everything you need to write you own programs or run games and applications developed by the community. You don’t even need a floppy, as the ATmega644P powered board has enough internal flash to store eight programs for easy access through its graphical menu system.

Main menu of the CB2 micro

For many in the audience, a cheap little board that you can assemble yourself and use as a stand-alone BASIC experimentation platform is appealing enough. But thanks to a collection of hardware add-on boards, the CB2 micro can be augmented with some interesting capabilities.

Some are fairly obvious such as adding additional flash storage or RAM, but you can also run the computer on AA or AAA batteries, or add an S-Video port. [Kostas] even explains how to assemble a special serial cable that allows you to network multiple boards together. If you take the plunge and start building your own hardware modules, the sky’s the limit.

Of course, purists may balk because the CB2 micro isn’t using a “real” computer processor. Fair enough. For those that want a more authentic retro experience, you could always pick up a kit like the RC2014, or go all out and cram a Z80 into an Altoids tin so you can carry it around with you.

An Open Assistive Robotic Arm To Help People Feed Themselves

Despite being otherwise capable, not everyone is able to feed themselves. [Julien]’s robot arm project aims to bring this crucial independence back to those people. Assistive devices in this space do exist, but as always they’re prohibitively expensive and the approval process is a nightmare. The development of the arm started by working closely with people who needed it at a local hospital. We note with approval, quite a few cardboard mock-ups to get the size and shape right before more formal work was done in CAD.

The robot arm only has to support a very light payload so its construction can be quite light. A frame of steel rods or plywood is all that’s required. We like how the motion is transferred from stepper motors to the joints of the arm by generously sized timing belts allowing the weight of the arm to remain towards the base. The team behind the project has gotten it to a point, but they’re hoping it will inspire community involvement as they move forward with it.

It’s worth noting, this is not the first assistive eating aid we’ve covered.

A Stunning Ray Gun Built From Junk

If ever there was a quintessential weapon of science fiction, it would have to be the ray gun. [lonesoulsurfer] built this one-of-a-kind stunner from his impressive collection of junk. It’s centered around a vintage Bakelite soldering gun, a vacuum tube, and a portable stove burner, all of which contribute to the fantastic mid-century look.

Inside is a slightly modified version of a ray gun sound effects circuit from MAKE: that squeezes square waves from a lo-fi synth builder’s favorite IC, the 40106 hex inverting Schmitt trigger. [lonesoulsurfer] was able to reuse the soldering gun’s trigger to start the pew-pew-pew, and he can adjust the death ray’s output with potentiometers. The gun is powered by an old cell phone battery and a combo Li-ion charger/step-up module from the world’s largest virtual auction house. Blast past the break to watch the build video.

If one little green LED isn’t enough for you, maybe you’d prefer this light painting gun.

Continue reading “A Stunning Ray Gun Built From Junk”

Software Defined Radio Gets Physical Control

Software Defined Radio (SDR) is a great technology, but there’s something so satisfying about spinning a physical knob to cruise the airwaves. Wanting to restore that tactile experience, [Tysonpower] purchased a cheap USB volume knob and set out to get it working with his software. Unfortunately, getting it up and running took a lot more work than you’re probably expecting.

Programming the knob’s STM32

After verifying that the knob worked for volume control on his computer, [Tysonpower] decided to try and pull the firmware from the device’s STM32 microcontroller. Unfortunately, this is where things got tricky. It turned out the chip had Code Protection enabled, so when it was wired up to a programmer and put into DFU mode, the firmware got wiped. Oops.

That left [Tysonpower] with no choice but to write a new firmware from scratch, which naturally required reverse engineering the device’s hardware. Step one was reading up on STM32 development and getting the toolchain working, which paved the way to getting the knob’s LED to blink. A couple more hours worth of work and some multimeter poking later, and he was able to read the knob’s movement. He describes getting USB HID working as a nightmare due to lack of documentation, but eventually he got that sorted out as well.

The end result is a firmware allows the volume knob to mimic a mouse scroll wheel, which can be used for tuning in many SDR packages. But we think the real success story is the experience [Tysonpower] gained with reverse engineering and working with the STM32 platform. After all, sometimes the journey is just as important as the end result. Continue reading “Software Defined Radio Gets Physical Control”

An Arduino And An Enigma All Rolled Into One

This hacker has been wanting to design an Enigma machine simulator for a while, but didn’t take the leap until they realized there was a compact Arduino with a surplus of I/O.

The logs go through all sort of variations on the machine. Everything from a plug board variation similar to the original to a 16 segment LED tester are covered. In one of the posts you can even see it decode a real U-Boat message. 

The earlier revisions are housed in very attractive laser cut cases but the latest designs employ an even more elegant casing solution. The simulator uses 16 segment displays and momentary push buttons for the keys. At its core is a 2560 Pro mini. The write-up contains a lot of detail about the code behind the Enigma and is interesting to read.  Interestingly, the PCB was designed in Fritzing, the EDA software many love to hate.

We love the craftsmanship and attention going into this project and can see it turning into a very appealing kit as it goes through its design cycles.

Supercon SMD Challenge Gets 3D Printed Probes: Build Your Own

This year was the second SMD challenge at Supercon, so it stands to reason we probably learned a few things from last year. If you aren’t familiar with the challenge, you are served some pretty conventional tools and have to solder a board with LEDs getting progressively smaller until you get to 0201 components. Those are challenging even with proper tools, but a surprising number of people have managed to build them even using the clunky, large irons we provide.

During the first challenge, we did find one problem though. The LEDs are all marked for polarity. However, since we don’t provide super high power magnification, it was often difficult to determine the polarity, especially on the smaller parts. Last year, [xBeau] produced some quick LED testers to help overcome this problem. This year we refined them a bit.

As you can see, the 2018 model was a very clever use of what was on hand. A CR2032 holder powered the probes and the probes themselves were two resistors. If you can get the LED to light with the probes you know which lead is the anode and which is the cathode. A little red ink makes it even more obvious. Continue reading “Supercon SMD Challenge Gets 3D Printed Probes: Build Your Own”

Custom Nixies Perform When Cranked Up To 100,000 Hertz

With the popularity of Nixie clocks, we’d be forgiven for thinking that the glowing tubes are only good for applications with a stately pace of change. But we forget that before they became the must-have hobbyist accessory, Nixies were used in all kinds of scientific instruments, from frequency counters to precision multimeters. In such applications, update rates in the hundreds or thousands of Hertz aren’t uncommon, and the humble Nixie handled display refreshes with ease.

But what about refreshing a Nixie at 100 kHz? That was the question put to artisanal Nixie maker [Dalibor Farný] by a client who wanted a timer to calibrate high-speed cameras. It was a feat that [Dalibor] wasn’t sure his custom-made tubes could handle. The video below shows his efforts to find out.

If you ever wanted to know about the physics of gas-discharge displays like the Nixie, the fifteen minutes starting at about 5:13 will give you everything you need. That basic problem boils down to the half-life of excited neon, or how long it takes for half the population of excited molecules to return to the ground state. That, in turn, dictates how long a given cathode will continue to visibly glow after it’s turned off, which determines how many digits will appear illuminated at once.

To answer that, they engaged a company in Prague with a camera capable of a mind-blowing 900,000 frames per second. Even though they found a significant afterglow period for each cathode, even at 100 kHz it’s clear which digit is the one that’s currently illuminated. They also looked at the startup of digits in a cold Nixie versus one that’s warmed up, leading to some fascinating footage at around 26:30.

We appreciate [Dalibor]’s attention to detail, not only in the craftsmanship of his custom tubes but in making sure they’re going to do their job. He recently did a failure analysis on some of his high-end clocks that showed the same care for his product and his brand.

Continue reading “Custom Nixies Perform When Cranked Up To 100,000 Hertz”