 [jcprintnplay] has challenged himself to making Raspberry Pi cases in different ways, and his Fold-a-Pi enclosure tries for a “less is more” approach while also leveraging the strong points of 3D printing. The enclosure prints as a single piece in about 3 hours, and requires no additional hardware whatsoever.
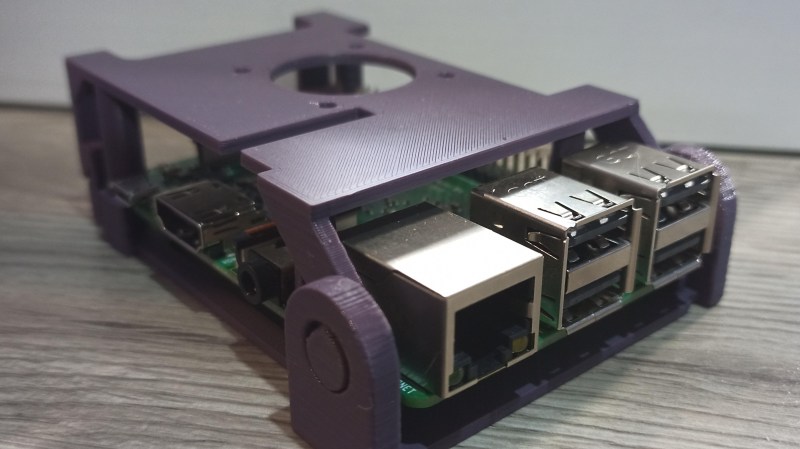
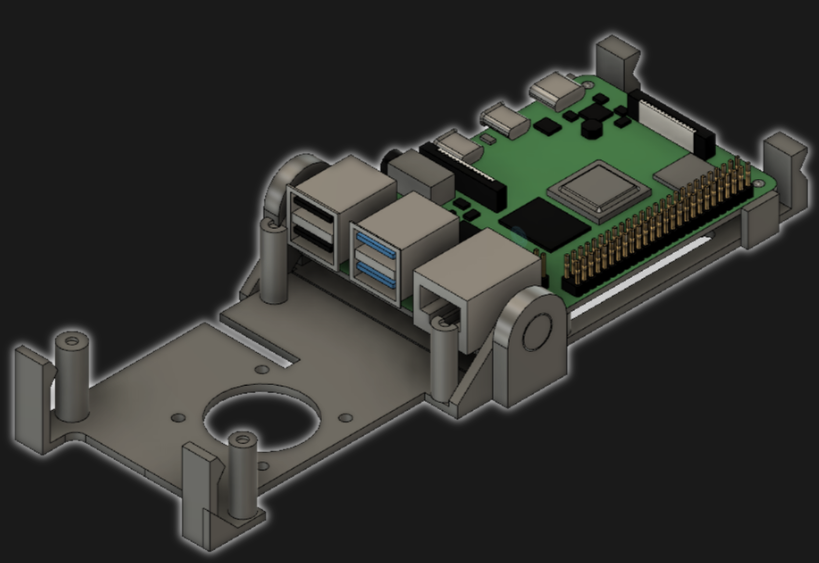
The design requires no screws or other fasteners, and provides a mounting hole for a fan as well as some holes for mounting the enclosure itself to something. All the ports and headers are accessible, and the folding one-piece design is not just a gimmick; in a workshop situation where the Pi needs to be switched out or handled a lot, it takes no time at all to pop the Raspberry Pi in and out of the enclosure.
[James] points out that the trick with a print-in-place hinge like this is leaving enough space between the parts so that the two pieces aren’t fused together, but not so much space that the print fails. He doesn’t go into detail about how much space worked or didn’t work, but an examination of the downloadable model shows that the clearance used looks like 0.30 mm, intended to be printed with a 0.4 mm nozzle.
[James] also demonstrates the value of being able to do quick iterations on a design when prototyping. In a video (embedded below) The first prototype had the hinge not quite right. In the second prototype there was a lack of clearance when closing. The third one solved both and shows the final design.
The tricky process of finding just the right amount of clearance for something can be made much easier with the Goldilocks approach, and can be an efficient use of 3D printing.
[via Reddit]


Silly me, I was expecting enclosing to happen. 11/10 for ventilation though.
I was thinking “pizza box”, fan mount is nice tho… “speed holes”
Yeah, I don’t think I’d ever want to use this since it doesn’t enclose, but it’s a great tech demo.
How do those hinges even work? you can’t print in midair, so how is there clearance at the bottom? Does the plastic actually fall down 0.3mm and hit the bottom partially cooled so it doesn’t really stick? Wouldn’t the next layer be 0.3mm off and do the same thing and not stick well?
What’s going on here?
You can print in mid air to some degree, its called bridging.
It requires enough speed and cooling that the plastic cools faster than it sags!
I figure it must be like you say, it is partially cooled so it doesn’t really connect to the layer that it sags near/onto. I have had a lot of luck printing overhangs and just letting it sag…the first few layers sag like you say, but it doesn’t take many layers for the sag to diminish. Basically, the early layers just don’t get as compressed/smooshed. I imagine if you really did a cross-section or strength analysis, you’d find it’s not as well-bonded but, you know, whatever. :)
If you look carefully in the video, you will see he isn’t printing in mid-air. The pin of the hinge is actually connected to the outer part by a very thin sliver of plastic that he breaks off once he tries to close the enclosure the first time.
Pretty clever idea but you better have a very well calibrated printer for this.
You can also print the ‘axle shaft’ as a truncated cone based on the maximum overhang angle for your setup. That will also make the top of the (matching) hole smoother.
I was not expecting that kind of hinge. Pretty neat, but I’m skeptical about how much work it would be to try to tune something like that to work with my printer. Maybe I ought to try it sometime.
But yeah, it’s not an enclosure. The whole point of an enclosure in my book is that I can throw it in The Pile Of Cables and not worry about a random bit of metal shorting it out.
For the most part, my enclosures are a box with a lip-groove-lip along the top, and a flat lid that slides into the groove. Often I have a set of holes so I can slide a kind of cotter pin in so it won’t open on accident. Easy to open and close, and so far I have had luck getting things printable to work with all the various openings that are needed…sometimes I have to print the box “sideways” *shrug*
I’ve printed a bunch of in-place joints for strandbeast legs. I leave 20-30mils between the outer and inner parts of the print, and that gets filled with supports. The parts break apart when I flex the joints and the support falls out, and then I’m good to go.
There is a bunch of print in place mechanisms on thingieverse my favorite is the predator pliers totally useless but the mechanism looks cool
https://www.thingiverse.com/thing:2949649
Let me start by saying I never intend to undermine or unnecessarily criticize anyone’s projects. Because they all (usually) involve somebody learning something.
But from a resources/engineering standpoint, I don’t see the point in designing this. What does a single-print design get you in the end? It likely takes longer than two simpler prints that could actually enclose the thing, even without hardware. Even aside from that hardware is cheap, print time is not. Not to mention the time spent to design it.
I first thought maybe it was more of a chassis for clipping into a rack or something, but I don’t see any apparent clips or slides that would facilitate that.
Feature sheet so far goes…
Excludes particles larger than ~3x(10^-2) m
???
givetheguyabreak
Perhaps this is what he wanted to make and he succeeded at it. If you disapprove of calling it an enclosure, fine, how about raspberry pi exoskeleton?
Printed this and it works well. Print-in-place is a really useful technique and there are a lot of designs out there that use it for all sorts of things. Most benefit from using a hobby knife to help with breakaway, but not always required.
A case like this is useful when you’re doing bench work and you want something that will mostly keep the pi protected but still leave it open to everything. There are a lot of designs out there like this, but the print-in-place part of this one makes it nice. It would also be trivial to throw the STL into Tinkercad and make it more solid if that’s what you need.