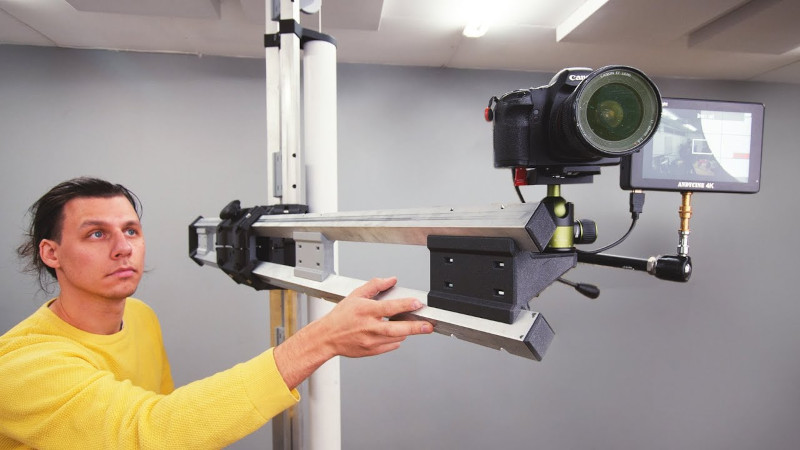
One of the first purchases for anyone looking to shoot video should be a tripod. Key to getting clean and stable shots, they can nevertheless be limiting in their range of motion. Wanting something a little more high-end, but dissatisfied with the high cost of commercial options, [Alexandre Chappel] decided to build his own camera arm.
The build is based around square alumiunium tubing, with the high-tolerance material acting as the arm’s vertical and horizontal rails. 3D printed brackets and adapters are used to bolt everything together, along with several printed components used as drilling guides to help accurately machine the aluminium tubes. Adjustment is built into the carriages that travel along the rails, to help account for any slop in the 3D printed parts. A counterweight system is then installed to ensure the camera doesn’t hit the floor when not in the locked position.
It’s a tidy build, and one that has given [Alexandre] far more flexibility to shoot than his existing tripods. Additionally, adjusting the camera position is much quicker than before. Of course, when you’re building your own rigs, the sky is the limit. Video after the break.
[Thanks to Keith Olson for the tip!]


A quarter million views in 7 days! There must be millions and millions of people making “content” who want better camera support. I was going to remark about tech video makers who use up the frame with their face and arm waving but the numbers show it works. And those 3D parts don’t look much like a hack! They look like a mechanical engineer spent two months on the designs
Anyway, the write-up says “high-tolerance material acting as the arm’s vertical and horizontal rails” and I wondered what this means. I want low tolerances for precision, where low equal small and high means large. But others say “high tolerance” to mean better or best or a greater degree of measurement and fit or approaching idea. What is the common usage?
I don’t make content and thought it worth a watch – I only use my camera for keeping track on my own projects and as a hobby..
Have wondered about documenting more… But it doesn’t seem like fun – seems like it would actually get in the way of doing the thing I wanted to do in the first place….
Wonders of the language – High-tolerance is often used when people really mean “made to a high degree of accuracy” or able to take high loads. But can also be used as you say to indicate the part has a high tolerance to sloppy building in the sense that accuracy isn’t essential anything in the ballpark is good enough..
Unfortunately I don’t think there really is a common usage, its all contextual as to exactly which variety you mean.
With this kind of viewership you could have a heck of a hobby shop! But the number of people who want to watch a video on camera supports is fascinating. Do you have any info on how you designed the 3D parts?
And yes, I can see using “high tolerance” to mean a design will accept a wide range of dimensions in some places. For example where screw/bolt and nut clamping forces will make up any difference. Or modern aluminum airplane kits with CNC drilled sheets for riveting. Jigs and supports can be very sloppy because the parts will all pull themselves into place during the riveting process.
And that’s why mechanical engineers use “tight” or “loose” to mean manufacturing tolerance levels, and “high” and “low” for a designs ability to deal with these tolerances.
I’ve never heard anyone actually use the phrase “high tolerance” for materials, only for withstanding pain or crappy situations.
I’m a machinist and when I say low tolerances or tight tolerances I mean a tight or precise fit/size. Low tolerances to me mean sub 0.001″
I might be wrong, but high-tolerance means that even if you 3d print is not “perfect” there is a high chance of your parts will still fit together and work.
This guy did a fantastic job on this. And then he shared the BOM and all the STL files! Hacker Hall of Fame, I think.
Why not use 80×20 (R)? It seems like it’s a bit of a false optimization to do it entirely from dimensional stock.
Wouldn’t dimensional stock be more generally available from local metal suppliers?
should’ve used an 555
“If all you have is a hammer…”
Sure, you could’ve used 80×20 stock (as you could do for just about anything else, if you’re willing to compromise), but square tubes provide a better sliding surface, is lighter and seems in general better suited for the task (which is likely why professional rigs use it).
box tubes also have far better torque stability, as I found out in robotics club. the same dimensions of 8020 (or similar extrusion profile) is far more wiggly than its equal in box tubes, and tends to cost a lot more than the box tube
Interesting! I would have thought the opposite. I stand quite corrected.
Remember the core of the extrusions is the only solid part of the profile – all the square outer part with attachment points do is add to its stiffness compared to just that core tube – much more in some directions than others but all those gaping holes for the nut to sit in mean the outsides are all able to compress/expand around that gap relatively easily under load – so its more like that central tube acting spine taking the larger portion of the load.
The solid box all the forces are taken on the entire structure – the whole mass is involved in resisting forces in all directions (though the box shape still imparts greater strength in certain directions of course)
That said the tubes certainly can be weaker than extrusions – as wall thickness etc come in to play. Personally I’ve never bought extrusions as they are way way pricier than simple tubes or profiles. But they are damn useful when you get hold of some – especially for temporary setup or very rapid prototype developments.
If you know where the holes are going ahead of time, stock is great. The deal with 2020/whatever is that it’s easily adjusted.
Square profile is also 1/2 the price and you can get it at the hardware store.
if you look at a Core And Corners profile twisting, there’s a Shear action going on longwise between the corner-lines
Great idea, and great starting point to modify to make a motorized camera slider with multi-axis capability. Lots to think about!
Indeed, biggest problem with it for me is that like almost all boom arm, tripod type things it needs significant space behind it, which I never have in my small spaces. Great build and design though. And not hard to motorise if you so desire.
Recently bodged together a small arm for over my workbench that instead of sliding backwards concertinas up a little, yet to really try it it and its very hackish and made entirely of leftovers which dictated alot of the design… This build has given me an idea or two on alternate properly designed options… Such bad timing if only I’d seen it last week… I’d still have built the bodge job as I need something and leftovers are ‘free’.
You have me sitting here in my hotel room (had to evacuate home in the wee hours due to very, very close wildfire here in Napa), pondering just what it would take to make. I do a lot of off-road in the Sierras and Death Valley for time-lapse. I’ve spent time doing an initial design of a mobilize camera “cart” (RPi driven) that would travel down a 10′ length of 3″ aluminum ‘U’ channel. BUT, your build has me rethinking how I might put this all together. Seems a bit more portable in my Toyota FJ than my channel idea – at 10′ long, it’s a bit of a challenge to transport inside, and my roof-rack is already occupied. This approach would likely work well with my 40-y/o Gitzo tripod I bought for use with a 4×5 view camera.
Hope you come through the fire ok.
If you are taking a rig off-road I assume it needs to be pretty durable or easy to pack into a flight case, and to use and set it up can’t weigh a stupidly high amount… For such a long travel distance, what a fun challenge. I’d have thought over 10′ the Al channel would become too prone to twist anyway or is this a gimbled camera setup so able to correct for that (mostly)?
Be interesting to see what you come up with.
Well, happily the FJ does the heavy-lifting. I’ve reached the point where I’m no longer interested in proving the heavy loads I can tolerate in a backpack. Those days were over 50 years ago.
The AL channel I have is very solid – walls and channel 5mm thick, and the larger dimensions 8cm wide by about 5cm deep. It was bought for a different project that I found a better solution for.
As to the tripod rig, I figure about a meter’s travel should cover my needs. Putting steppers on the tripod axis, a traveller on the channel, and a stepper controlled gimbal for the camera mount should work out. One thought regarding the camera’s weight (great camera, the EOS 5D Mk III, but it weighs a ton) is to hang a counterweight on the opposite side and walk it out as the camera travels out. I seem to recall you mentioned in your video something to the effect of “more complex is fun?”
Your studio space looks pretty decent. Better than my portrait studio back in the late ’70’s.