Most consumer-grade audio equipment has been in stereo since at least the 1960s, allowing the listener to experience sounds with a three-dimensional perspective as if they were present when the sound was originally made. Stereo photography has lagged a little behind the stereo audio trend, though, with most of the technology existing as passing fads or requiring clumsy hardware to experience fully. Not so with the DIY stereoscopic cameras like this one produced by this group of 3D photography enthusiasts, who have also some methods to view the photos in 3D without any extra hardware.
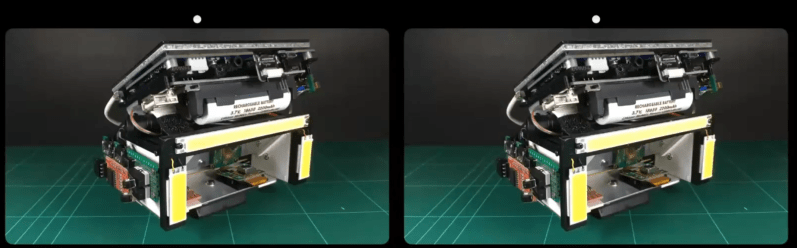
The camera uses two imaging sensors to produce a stereo image. One sensor is fixed, and the other is on a slider which allows the user to adjust the “amount” of 3D effect needed for any particular photo. [Jim] is using this camera mostly for macro photography, which means that he only needs a few millimeters of separation between the two sensors to achieve the desired effect, but for more distant objects more separation can be used. The camera uses dual Raspberry Pi processors, a lithium battery, and a touch screen interface. It includes a ton of features as well including things like focus stacking, but to get a more full experience of this build we’d highly recommend checking out the video after the break.
As for viewing the photographs, these stereoscopic 3D images require nothing more than a little practice to view them. This guide is available with some simple examples to get started, and while it does at first feel like a Magic Eye puzzle from the late 90s, it quickly becomes intuitive. Another guide has some more intricate 3D maps at the end to practice on as well. This is quite the step up from needing to use special glasses or a wearable 3D viewer of some sort. There are also some methods available to create 3D images from those taken with a regular 2D camera as well.
Thanks to [Bill] for the tip and the additional links to the guides for viewing these images!


Overthinking. Take an old photo cam with a slide film. Take shot. Move small distance to the left or right. Take shot again. View the slides with two of these little boxes that you could a slide into and put it against your eyes. That does a surprisingly good job with 3D. For extra bonus points use black and white slide film.
What you can’t do there is Stereo video or take photo of something that moves quickly – effectively the same problem of too long between images.
Where if both of your camera are running simultaneously, which can be the case even with old film recording methods with some work you can at least attempt to do both. Not going to get a good 3d macro shot of that insect by your method, as the pesky thing will no doubt move long before the second exposure can be done. And with how little deviation you would want in Macro I’m not sure you could even manage it without two small digital camera fixed together – need rather trick optics to do it on film…
Been there, done that. It really works well, particularly with a quality 3D slide viewer like a 1950s Realist Red Button viewer. They are still readily available and easy to repair and upgrade.
http://www.drt3d.com/realistrepair/RBRepair.htm
I also enjoy doing digital 3D as well, using a smartphone and a VR adapter to use as a digital 3D viewer. Stereo photography is almost as old as photography itself, with stereocards being the original VR. While viewing 3D photos goes in and out of style with the general public, there has always been dedicated enthusiasts who have created their own stereo images using purpose built cameras, and building their own rigs, be it film or digital. There’s a lot more depth to 3D photography (pun intended) than most people realize..
Er. Not quite. What’s a century between friends?!
Stereoscopic photography started in the *18*60s!
There are many commercial stereoscopic photos available at auction. Many are of the Boer War and WW1, and those “of distant lands” can fetch a decent price.I
Stereoscopic photography was a big business in the 1950s, with actors, politicians and even presidents advertising cameras for use at home.
There’s a reasonable collection at https://vintagestereoscopicglassslides.wordpress.com/
“1839, a date generally accepted as the birth year of practical photography” [wikipedia] The Wheatstone stereoscope was invented in 1832 and was initially used to view 3D drawings. But it didn’t take long for the Wheatsone and Brewster stereoscopes to be used for viewing 3D photographs, followed by the wildly popular Holmes viewer and the large scale production of stereocards. So I’d say widespread use of stereo photography followed very closely the widespread use of 2D photography.
Agreed.
To confirm our points, this auction item popped up today:
https://bid.mendipauctionrooms.co.uk/auctions/8402/srmen10207/lot-details/77b757f3-9bb2-42b9-8f0e-af7000e9c912
It contains a stereoscopic picture of the Clifton Suspension Bridge during construction. It was opened in 1863 :)
Anaglyph
Absolutely. I made one with a pair of inexpensive digital cameras mounted on a board. I rigged up a switch to “snap” a picture with both at the same time.
Just to be clear, the Photo-3D interest group did not have a hand in creating this neat digital 3D camera. But the Photo-3D group is a good place to ask questions and learn more about how to make and view your own stereo images.
Stereo photography is just a myth created by two-eyed people to make one-eyed people feel inferior.
My old one eyed friend never feels inferior.
He’s pretty much in charge.
If I go cross-eyed, I can keep the image in sharp focus, but if I go the other way (divergent-eyed) the image gets blurry.
Why don’t they make these images work with cross-eyed mode? Am I the only one that experienced this blurriness when I go divergent?
Correction, I mean parallel, not divergent.
You can change the way to look at such image on-the-fly (e.g. parallel to cross view) thanks to this online tool: https://stereopix.net/viewer
My father who designed large glass furnaces would use a Polaroid stereo camera to document the wall erosion on furnace rebuilds so he could make designs that would last longer. Since rebuilds only happened every 10 to 15 years it was a great way to document before and after conditions.
I used to make walls of repeating ASCII characters spaced differently depending on the line, and if you do either technique, you could see different heights to the lines. It was fun for a while. Then back on my iPhone 3G I found a camera app that would take a picture, then you would press a button on the screen and hold your finger still in space while moving the phone horizontally, and it would take the second picture after the correct movement. That did quite well, and you could output any 3D viewing technique you wanted. That was a lot of fun too. I’ve always been enamored with 3D imagery, but the timing was never right for me to go any deeper than I have. This looks like a fun project, but now I’m on synths, and prefer not to get distracted.
Thanks for the article, though. Clicking through the links was a blast.
I guess the reason why it is not comparable to using a camera and moving it a bit for a second shot is that this can do automated things like focus stack shots and adjustable separation and remote use, you could set it up somewhere to monitor insects/small animals remotely.
And as people say, by having 2 cameras you don’t have issues with the subject moving (although for focus stacking things would still have to be stationary of course).
And since it’s RaspberryPi-based it’s relatively cheap… if Raspberries are available.
I didn’t have the pateince to watch the whole video, so why he uses a silvered mirror for overlap is something I have to guess at.
And that guess would be it’s for very very close shots where you need less separation than the module’s width?
That’s correct. For 3D photography the closer the subject, the closer the lenses have to be to each other. A workaround is to toe-in the lenses, much like your eyes cross to look at something close to your face. But the problem with that is you are now capturing two different backgrounds. For a plain background that’s fine, but not for deep depth macros. BTW professional 3D cameras for movies often use this beamsplitter arrangement. Syncrohonizkation is not a problem because professional cameras have a genlock support where multiple cameras can be run off a single clock.