Mouse Whisperer Keeps You Working, Even When You Need A Break

When life hands you lemons, you make lemonade, right? What about when life hands you annoyingly intrusive work-from-home policies that require you to physically stay at your computer even though you really, REALLY need to go to the bathroom, but can’t be trusted to act like a responsible adult who won’t get diverted by TV or the fridge on the way back? In that case, you build something like the Mouse Whisperer — because malicious compliance is the best kind of compliance.

To be fair, [andrey.malyshenko] does list other plausible use cases for what amounts to an automatic mouse wiggler. Like many of us, [andrey] isn’t a fan of logging back in from screen locks, and recognizes that not absolutely every minute of work requires staring at one’s screen. There’s also the need for bio-breaks, of course, and the Mouse Whisperer is designed to accommodate these use cases and more.

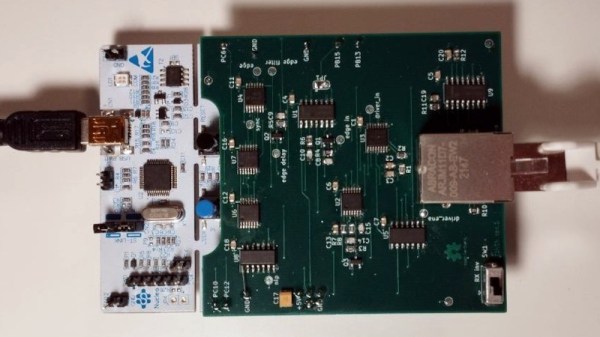
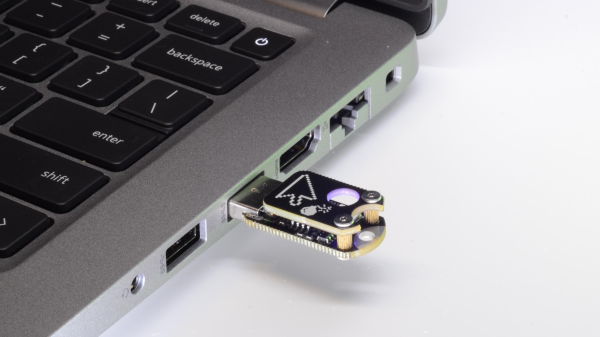
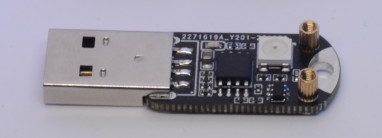
The design is quite compact, occupying barely more space than a wireless mouse dongle. Plugged into a USB port, the ATtiny85 mostly sits idle, waiting to detect the touch of a finger on an exposed pad via a TTP223. The dongle then goes into a routine that traces lazy circles with the mouse pointer, plus flashes an RGB LEB on the board, because blinkenlights are cool. The mouse wiggling continues until you come back from your Very Important Business and touch the pad again.

Now, if anyone is actually monitoring you remotely, the circling mouse pointer is going to look a wee bit sus. Fear not, though — the code uses a *.h file to define the circle, so other patterns should be possible. Either way, the Mouse Whisperer is a nice solution, and it’s considerably more compact and integrated than some of the alternatives we’ve seen.

Snail Mail Notifier’s Simple Power Management To Maximize Battery Life

There are no weird, specialized components nor esoteric sleep mode tricks behind the long battery life of [Zak]’s WiFi mail slot watcher. Just some sensible design and clever focus on the device’s purpose: to send an HTTP request whenever it detects that the front door’s mail slot has been opened. The HTTP request is what kicks off useful notifications, but it’s the hardware design that’s really worth a peek.

The watcher’s main components are a ESP-M2 WiFi module, a reed switch, and a single lithium cell. Here’s how it works at a high level: when the mail slot is opened (detected by the reed switch), the ESP module is powered up just long enough to connect to the local WiFi network and send a single HTTP request, after which it shuts back down. The whole process takes between four and ten seconds.

As mentioned, the power control isn’t managed by any unusual components; it comes down to a NAND gate with a single inverted input, and a MIC5504 3.3 V regulator responsible for feeding the ESP board. The logic gate controls whether the voltage regulator is enabled or disabled, and therefore whether the microcontroller receives any power at all. Most of the time the regulator is disabled, but when the reed switch triggers, its input to the NAND gate is pulled low and the regulator is turned on, booting up the ESP board.

In order to stay on, the first thing the ESP board does is use a GPIO pin to drive the inverted input of the NAND gate high in order to keep the regulator enabled, and it has a window of about half a second to do this. Once the HTTP request is sent (and the battery voltage sensed), the ESP board pulls that pin low, disabling the regulator and turning itself off until the reed switch once again begins the process.

After seven months of use, the battery has dropped from 4.2 V to 3.9 V, so there’s plenty of life left. The project’s GitHub repository has the necessary code if you’d like to apply some of its ideas to your own projects. Alternately, you may wish to consider supercapacitors and solar in lieu of batteries. Even if ultra-level power savings isn’t your bag, when WiFi and networking is involved, there are software-level opportunities to be more efficient. Even a judicious 1 ms delay can save a surprising amount of power in the right circumstances.

Two hands holding a 3d printed alarm clock with an LCD display, snooze button and knob on top

IO Connected Radio Alarm Clock

[CoreWeaver] creates an alarm clock that includes features one might expect in such a project, including an FM radio, snooze button inputs and a display, but goes beyond the basic functionality to include temperature sensing and a PC connection, opening the way for customizable functionality.

Block diagram for the IO connected Alarm Clock

An Atmega328 is used for the main microcontroller which communicates via I2C both to a DS1307 real time clock (RTC) and a TEA5767 FM module. The main power comes from a 9V power source with an LM317 and LM7805 linear regulators providing a 3.3V and 5V power rail, respectively. Most of the electronics are powered using 5V except for the TEA5767, which is powered from the 3.3V rail and has its I2C communication levels shifted from 5V to 3.3V. The audio output of the TEA5767 feeds directly into the TDA7052 audio amplifier to drive the speakers. Since the RTC has an auxiliary coin cell battery for power, the alarm clock can keep accurate time even when not plugged in. Continue reading “IO Connected Radio Alarm Clock”

Photography, The Stereo Way

Most consumer-grade audio equipment has been in stereo since at least the 1960s, allowing the listener to experience sounds with a three-dimensional perspective as if they were present when the sound was originally made. Stereo photography has lagged a little behind the stereo audio trend, though, with most of the technology existing as passing fads or requiring clumsy hardware to experience fully. Not so with the DIY stereoscopic cameras like this one produced by this group of 3D photography enthusiasts, who haveĀ also some methods to view the photos in 3D without any extra hardware.

The camera uses two imaging sensors to produce a stereo image. One sensor is fixed, and the other is on a slider which allows the user to adjust the “amount” of 3D effect needed for any particular photo. [Jim] is using this camera mostly for macro photography, which means that he only needs a few millimeters of separation between the two sensors to achieve the desired effect, but for more distant objects more separation can be used. The camera uses dual Raspberry Pi processors, a lithium battery, and a touch screen interface. It includes a ton of features as well including things like focus stacking, but to get a more full experience of this build we’d highly recommend checking out the video after the break.

As for viewing the photographs, these stereoscopic 3D images require nothing more than a little practice to view them. This guide is available with some simple examples to get started, and while it does at first feel like a Magic Eye puzzle from the late 90s, it quickly becomes intuitive. Another guide has some more intricate 3D maps at the end to practice on as well. This is quite the step up from needing to use special glasses or a wearable 3D viewer of some sort. There are also some methods available to create 3D images from those taken with a regular 2D camera as well.

Thanks to [Bill] for the tip and the additional links to the guides for viewing these images!

Continue reading “Photography, The Stereo Way”

It’s Ethernet, From An SPI Interface

Over the years as microcontrollers have become fast enough to do the heavy lifting, we have become used to 10 megabit Ethernet being bit-banged from interfaces it was never meant to emerge from. We think however that we’ve never seen one driven from an SPI interface, so this one from [Ivan] may be a first. With a cleverly designed transceiver using logic chips, it even offers a chance to understand something about the timing of an Ethernet interface, too.

The differential logic signals derived from a simple Ethernet transceiver can be read by an SPI bus, but for the lack of a clock line. The challenge was then to construct a circuit the would construct the required clock pulses from the state changes on the data line. This would become a monostable with XOR gate, and a shift register to handle the clock during the preamble phase.

The resulting circuitry fits neatly on a shield for the ST Nucleo 64 board, where while it might not be the obvious choice for an Ethernet shield it certainly does the job.

If unexpected Ethernet is your thing, how about the i2s peripheral on an ESP8266?

Laser Fusion Ignition: Putting Nuclear Fusion Breakthroughs Into Perspective

This month the media was abuzz with the announcement that the US National Ignition Facility (NIF) had accomplished a significant breakthrough in the quest to achieve commercial nuclear fusion. Specifically, the announcement was that a net fusion energy gain (Q) had been measured of about 1.5: for an input of 2.05 MJ, 3.15 MJ was produced.

What was remarkable about this event compared to last year’s 1.3 MJ production is that it demonstrates an optimized firing routine for the NIF’s lasers, and that changes to how the Hohlraum – containing the deuterium-tritium (D-T) fuel – is targeted result in more effective compression. Within this Hohlraum, X-rays are produced that serve to compress the fuel. With enough pressure, the Coulomb barrier that generally keeps nuclei from getting near each other can be overcome, and that’s fusion.

Based on the preliminary results, it would appear that a few percent of the D-T fuel did undergo fusion. So then the next question: does this really mean that we’re any closer to having commercial fusion reactors churning out plentiful of power?

Continue reading “Laser Fusion Ignition: Putting Nuclear Fusion Breakthroughs Into Perspective”

Closeup of a film restorer's hand holding a 35mm film print to check for defects as it goes into a film scanner

35mm Film Restoration Process Explained

For a large part of the 20th century, motion pictures were distributed on nitrate film. Although cheaper for the studios, this film was highly flammable and prone to decay. On top of that, most film prints were simply discarded once they had been through their run at the cinema, so a lot of film history has been lost.

Sometimes, the rolls of projected film would be kept by the projectionist and eventually found by a collector. If the film was too badly damaged to project again, it might still get tossed. Pushing against this tide of decay and destruction are small groups of experts who scan and restore these films for the digital age.

still showing the difference in quality between a 16mm print of a 35mm animated movie and a new scan of the 35mm original
The quality difference between a smaller-format print and the original restored negative can be startling

The process is quite involved – starting with checking every single frame of film by hand and repairing any damaged perforations or splices that could come apart in the scanner. Each frame is then automatically scanned at up to 10K resolution to future-proof the process before being painstakingly digitally cleaned.

The real expertise is in knowing what is damage or dirt, and what is the character of the original film. Especially in stop-motion movies, the subtle changes between frames are really part of the original, so the automatic clean-up tools need to be selectively reined in so as not to lose the charm and art of the film-makers.

The results are quite astonishing and we all have teams like this to thank for protecting our cultural heritage.

If you’re interested in watching the process, then check out the video after the break. If you fancy a go at automatic film digitising yourself (preferably not on unique historical prints!) then we’ve shown projects to do just that in the past.

Thanks to [Cliff Claven] for the tip.

Continue reading “35mm Film Restoration Process Explained”