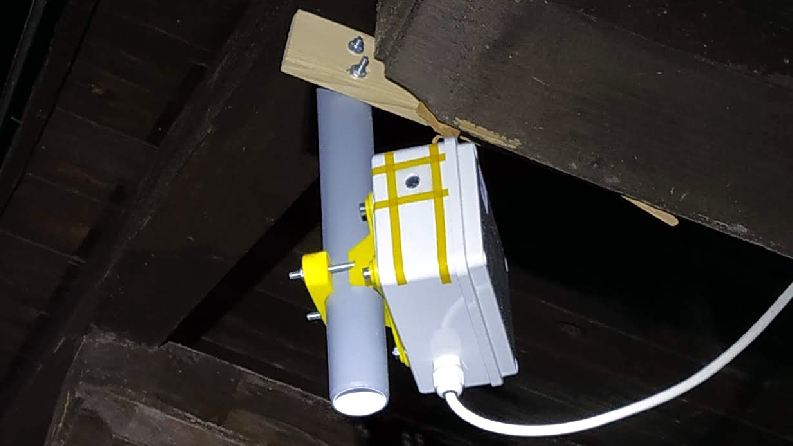
The Raspberry Pi is the foundation of many IoT camera projects, but enclosures are often something left up to the user. [Mare] found that a serviceable outdoor enclosure could be made with a trip to the hardware store and inexpensive microscopy supplies.
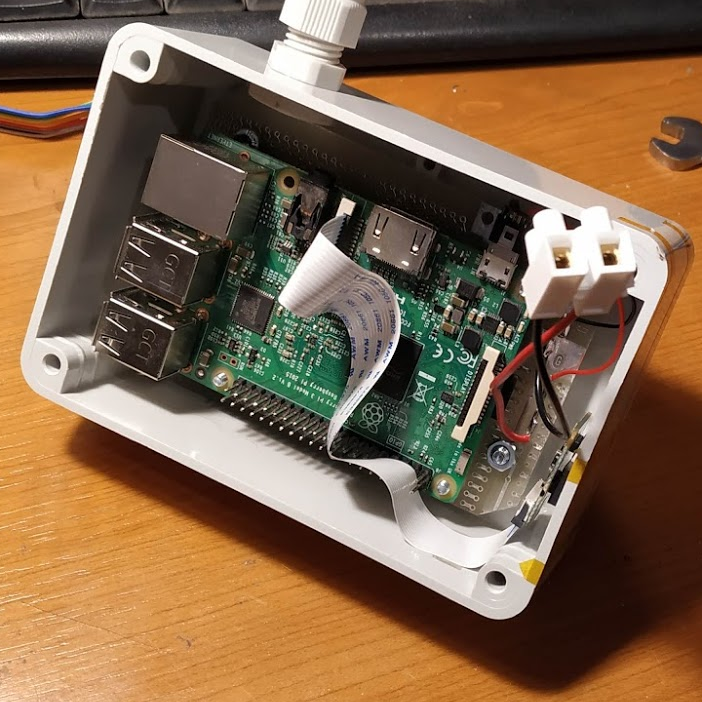
The main component of the enclosure is a small plastic junction box, but it takes more than a box to make a functional outdoor enclosure. First of all, cable should be run into the box with the help of a cable fitting, and this fitting should be pointed toward the ground when the enclosure is mounted. This helps any moisture drip away with gravity, instead of pooling inconveniently.
All wire connections should be kept inside the enclosure, but if that’s not possible, we have seen outdoor-sealed wire junctions with the help of some 3D-printing and silicone sealant. That may help if cable splices are unavoidable.
The other main design concern is providing a window through which the camera can see. [Mare] found that the small Raspberry Pi camera board can be accommodated by drilling a hole into the side of the box, cleaning up the edges, and securing a cover slip (or clover glass) to the outside with an adhesive. Cover slips are extremely thin pieces of glass used to make microscope slides; ridiculously cheap, and probably already in a citizen scientist’s parts bin. They are also fragile, but if the device doesn’t expect a lot of stress it will do the job nicely.
[Mare] uses the Raspberry Pi and camera as part of Telraam, an open-source project providing a fully-automated traffic counting service that keeps anonymized counts of vehicle, pedestrian, and bicycle activity. Usually such a device is mounted indoors and aimed at a window, but this enclosure method is an option should one need to mount a camera outdoors. There’s good value in using a Raspberry Pi as a DIY security camera, after all.


In the long yime of electronics in the wild, my enclosures faced wind, UV, snow, insects and theft. The circuits faced poor contacts, low voltage, electrostatic charges and magnetic pulse from nearby lightning.
Harsh and challenging, outdoors is fun.
A friend of mine works in the chemical industry, he said I can perfectly fine “drown” my circuits in special silicones. In fact he told me, car manufacturers do it. However sadly the Pi has this issue with their silly SD cards… if I could MOLEX cable extend the card reader out of the silicone… it may work.
To clarify, not oils but low shore silicones.
Just throw it in a glass jar full of mineral oil.
The camera would not like it.
Like this: https://www.zdnet.com/home-and-office/i-just-solved-one-of-my-biggest-raspberry-pi-headaches/ ?
Remind me my outdoor picam. https://iooner.io/autopsie-de-ma-premiere-picam-exterieur/
You forgot to check the temp spec. of the RPI & the SD card
STLs for the 3D printed box holder clamp?
You can mitigate that with a bag of dessicant, that will be changed / dried at regular intervals. Can be coupled to a humidity sensor inside the enclosure to warn when humidity gets too high. Condensation happens near 100% Relative Humidity
Extra or old mobile phone screen covers have worked for me as the camera cover glass. And, ptfe tape plugged up and covering an extra small hole has kept bugs out while allowing air and moisture movement. Luckily, maybe, the pi runs so warm in the enclosure that it cooks the moisture out pretty good… so far.
I have used Gore-tex breathing vents, they are very good, and “pump” moisture out of the enclosure. About $5 each for an M12 one. (I believe Al Gore has his underpants made out of the same material)
You can get -40C rated SD cards, which might be more reliable than the standard crap. The RPi has already been shown to work while dunked in liquid nitrogen.
I built a kind of wooden birdhouse for my Pi / NoIR backyard setup. It was open at the bottom and had a small gap just under the roof on top, and it ran for two years before we took it in — the Pi and camera are all still fine.
I think it had enough airflow bottom-to-top that it never stayed wet inside, or got too hot in the summer. Every time I checked up on it, it was bone dry inside.
I agree with the “water will find its way in” crowd, but have come to the conclusion that if you also give it a way out — evaporation and good ventilation — then you should also be OK. At least that was my experience.
Mason jar…
One great idea I heard in a LinkedIn learning video was to use those “liquid safe” food containers: the ones in which you can actually store liquids safely and which won’t leak even if tipped. An example (there are many others – not an advert):
https://www.sistemaplastics.com/460ml-square
I never thought of this, but it makes sense and would have a better waterproof seal than typical jiffy boxes.
We did this for Christmas lights in our front garden tree. The cheapo seal on the light battery box rarely is actually waterproof so everything corrodes inside. Worked great.
Nice article !
I have this project of using a Time-of-Flight sensor to monitor the water level in my tank. I tested a few things including the plastic junction box, with a hold covered with plexiglass. It was working, but a pain to correctly fit the sensor and have it kind of parallel to the glass. I also had some issues with the I2C data (the sensor is a few meters from the main board, linked with an ethernet cable. I think I need some I2C extender).
In the end I wonder if I need to go to the custom 3d printer enclosure route.