3D Printed Berlin Uhr Is An Attractive Germanic Clock

As much as Big Ben steals the spotlight when it comes to big public clocks, the Berlin Uhr is a much beloved digital communal timepiece. [RuudK5] developed their own 3D printed replica of this 1980s German icon.

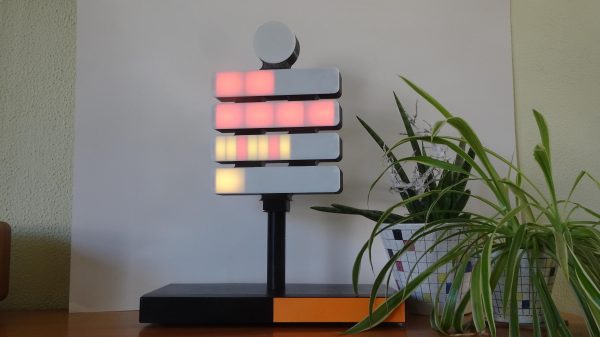
The revision we see today is the [RuddK5]’s third attempt at replicating the Berlin Uhr. The clock features a design with four linear elements with a round light on top. The top light is responsible for blinking the seconds. The lowest line has four lights, each indicating one minute, while the next line has eleven lights, marking out five-minute intervals. Above that, the top two lines represent one hour and five hour blocks respectively. It’s a display unlike most other clocks out there, but when you learn it, it’s easy enough to use.

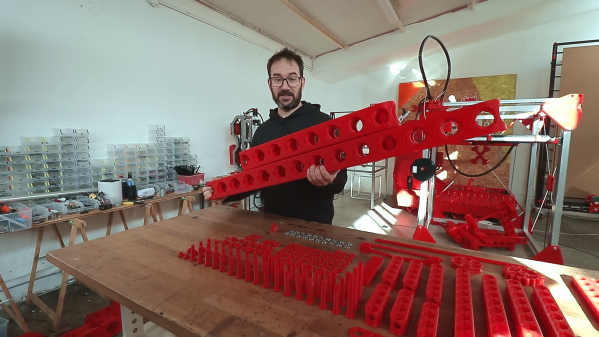
[RuddK5]’s replica relies on addressable LED strips to serve as the individual lighting elements. The strips are placed inside a 3D printed housing that is a scale replica of the real thing. Running the show is an ESP32 microcontroller, which is charged with getting accurate time updates from an NTP server.

Great design really does shine through, and this clock looks just as appealing at the small scale as it does lofted on a pole over the city of Berlin. If you prefer to read out the time in a simpler fashion though, we’ve featured plenty of clocks like that, as well!

A small electronic board next to colorful stylized speaker

Soundscape Sculpture Is Pleasing Art For Your Ears

Artist and self-described “maker of objects” [Daric Gill] is sharing some of the world’s most pleasing and acoustically interesting soundscapes with museum patrons in his latest work, ‘The Memory Machine: Sound‘.

Now featured at the Center of Science and Industry museum, the interactive stereo soundscape generator resembles three decorated ‘tree trunks’, suspended high above the exhibition floor. When visitors approach the artwork, they are treated to a randomly selected soundscape sample.

The build, which is described in blog form here, teases just some of the sixty soundscape samples that can be heard. These include the noisy chattering of crowds underneath the Eiffel Tower in Paris, the mellow melodies of a meadow high in the Swiss Alps, and the pumping atmosphere of a baseball match played in Yankee Stadium, New York City.

Only the middle trunk reveals the electronic soul of the installation – an Adafruit M4 Feather Express, Music Maker Featherwing and a motion sensor. The flanking trunks house the speakers and amplifier. The motion sensor triggers the microcontroller, which then plays a randomly selected sample from an SD card.

[Daric] went to great lengths to reuse discarded materials, and even cannibalized parts from other sculptures to see his vision through. This focus underpins a substantial amount of woodworking and machining that went into this build, so the full video is certainly worth a watch to see the whole project come together.

Make sure to check out our coverage of other funky installations, like this mesmerizing ceiling decoration.

Continue reading “Soundscape Sculpture Is Pleasing Art For Your Ears”

Weatherproof Raspberry Pi Camera Enclosure, In A Pinch

The Raspberry Pi is the foundation of many IoT camera projects, but enclosures are often something left up to the user. [Mare] found that a serviceable outdoor enclosure could be made with a trip to the hardware store and inexpensive microscopy supplies.

A suitably-sized plastic junction box is a good starting point, but it takes more than that to make a functional enclosure.

The main component of the enclosure is a small plastic junction box, but it takes more than a box to make a functional outdoor enclosure. First of all, cable should be run into the box with the help of a cable fitting, and this fitting should be pointed toward the ground when the enclosure is mounted. This helps any moisture drip away with gravity, instead of pooling inconveniently.

All wire connections should be kept inside the enclosure, but if that’s not possible, we have seen outdoor-sealed wire junctions with the help of some 3D-printing and silicone sealant. That may help if cable splices are unavoidable.

The other main design concern is providing a window through which the camera can see. [Mare] found that the small Raspberry Pi camera board can be accommodated by drilling a hole into the side of the box, cleaning up the edges, and securing a cover slip  (or clover glass) to the outside with an adhesive. Cover slips are extremely thin pieces of glass used to make microscope slides; ridiculously cheap, and probably already in a citizen scientist’s parts bin. They are also fragile, but if the device doesn’t expect a lot of stress it will do the job nicely.

[Mare] uses the Raspberry Pi and camera as part of Telraam, an open-source project providing a fully-automated traffic counting service that keeps anonymized counts of vehicle, pedestrian, and bicycle activity. Usually such a device is mounted indoors and aimed at a window, but this enclosure method is an option should one need to mount a camera outdoors. There’s good value in using a Raspberry Pi as a DIY security camera, after all.

Internal Heating Element Makes These PCBs Self-Soldering

Surface mount components have been a game changer for the electronics hobbyist, but doing reflow soldering right requires some way to evenly heat the board. You might need to buy a commercial reflow oven — you can cobble one together from an old toaster oven, after all — but you still need something, because it’s not like a PCB is going to solder itself. Right?

Wrong. At least if you’re [Carl Bugeja], who came up with a clever way to make his PCBs self-soldering. The idea is to use one of the internal layers on a four-layer PCB, which would normally be devoted to a ground plane, as a built-in heating element. Rather than a broad, continuous layer of copper, [Carl] made a long, twisting trace covering the entire area of the PCB. Routing the trace around vias was a bit tricky, but in the end he managed a single trace with a resistance of about 3 ohms.

When connected to a bench power supply, the PCB actually heats up quickly and pretty evenly judging by the IR camera. The quality of the soldering seems very similar to what you’d see from a reflow oven. After soldering, the now-useless heating element is converted into a ground plane for the circuit by breaking off the terminals and soldering on a couple of zero ohm resistors to short the coil to ground.

The whole thing is pretty clever, but there’s more to the story. The circuit [Carl] chose for his first self-soldering board is actually a reflow controller. So once the first board was manually reflowed with a bench supply, it was used to control the reflow process for the rest of the boards in the batch, or any board with a built-in heating element. We expect there will be some limitations on the size of the self-soldering board, though.

We really like this idea, and we’re looking forward to seeing more from [Carl] on this.

Continue reading “Internal Heating Element Makes These PCBs Self-Soldering”

Frequency Tells Absolute Temperature

It is no secret that semiconductor junctions change their behavior with temperature, and you can use this fact to make a temperature sensor. The problem is that you have to calibrate each device for any particular transistor you want to use as a sensor, even if they have the same part number. Back in 2011  1991, the famous [Jim Williams] noted that while the voltage wasn’t known, the difference between two readings at different current levels would track with temperature in a known way. He exploited this in an application note and, recently, [Stephen Woodward] used the same principle in an oscillator that can read the temperature.

The circuit uses an integrator and a comparator. A FET switches between two values of collector current. A comparator drives the FET and also serves as the output.  Rather than try to puzzle out the circuit just from the schematic, you can easily simulate it with LT Spice or Falstad. The Falstad simulator doesn’t have a way to change the temperature, but you can see it operating. The model isn’t good enough to really read a temperature, but you can see how the oscillation works

You can think of this as a temperature-to-frequency converter. It would be easy to read with, say, a microcontroller and convert the period to temperature.  Every 10 microseconds is equal to a degree Kelvin. Not bad for something you don’t have to calibrate.

Thermistors are another way to measure temperature. Sometimes, you don’t need a sensor at all.

Retro Gadgets: Tired Of The Beatles On 8 Track? Try The Police

In the 1970s, 8-track audio players were very popular, especially in cars. For a couple of bucks, you could have the latest album, and you didn’t have to flip the tape in the middle of a drive like you did with a cassette. We’ve seen plenty of 8-tracks and most of us a certain age have even owned a few players. But we couldn’t find anyone who would admit to owning the Bearcat 8 Track Scanner, as seen in the 1979 Popular Electronics ad below.

Continue reading “Retro Gadgets: Tired Of The Beatles On 8 Track? Try The Police”

3D Printing Giant LEGO-Like Blocks To Build Big Toys

[Ivan Miranda] is all about big 3D prints. He’s now set about printing giant blocks in the vein of LEGO Technic to build himself a full-sized rideable go kart. The project is still in progress, but [Ivan] has made great progress with his design.

The benefit of 3D printing giant blocks like this is that they open up the possibilities for rapid prototyping of big projects. It’s already easy to snap together a little LEGO tank, boat, or car at the small scale. Bigger blocks would make that possible for larger builds, too. Plus, once you’ve got plenty of blocks, there’s no need to wait for the 3D printer to churn out parts. You can just play with your toolbox of existing components.

[Ivan]’s design has faced some teething problems along the way. He struggled to solve various coupling problems for joining the blocks in various orientations, and made iterative changes to solve the issue. Eventually, he realized if he just eliminated an offset between the top and side holes of his beam design, everything would neatly work out. Plus, he learned that he could print a tiny scale version of his big blocks in order to test out designs without using as much plastic.

We love the idea of having a garage full of adult-sized LEGO-style blocks for big projects. The only caveat is that you really need a giant printer like [Ivan’s] to make them. Continue reading “3D Printing Giant LEGO-Like Blocks To Build Big Toys”