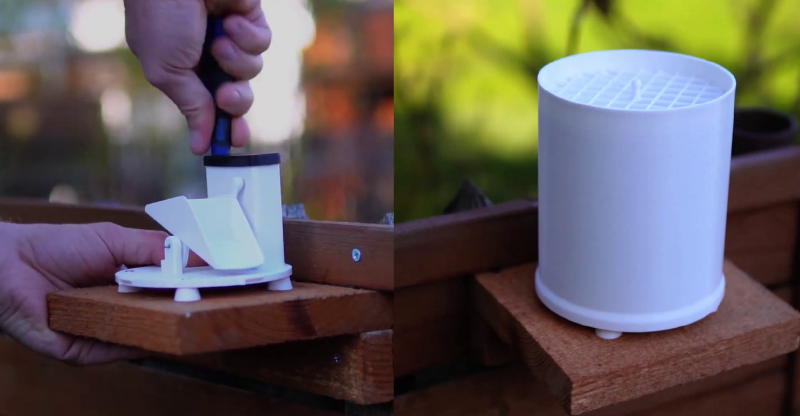
Measuring local rainfall has real practical uses, especially in agriculture, but most of us will have to admit that it’s at least partly about drawing cool graphs on a screen. Whatever your motivation, you can build this open source electronic rain gauge designed by [Sebastian] of Smart Solutions for Home, and integrate it with Home Assistant.
This 3D printed rain gauge is of the ubiquitous tipping bucket type and uses a magnet and hall effect sensor to detect every time the bucket tips out. The sensor is soldered to a custom PCB with ESP32 configured using ESP Home. By keeping it in deep sleep most of the time and only waking up when the tip of the bucket, [Sebastian] estimates it can run about a year on four AA batteries, depending on rainfall. The hinge mechanism is adjustable to ensure that both buckets will tip with the same volume of water.
FDM 3D printed enclosures are not known for being waterproof, so [Sebastian] coated the PCB with varnish to protect it from moisture. This worked well enough that he could leave it running in a bowl of water for a few hours without any ill effects. The end result looks good and should be able to handle the outdoors for a long time.
Building a weather station is a popular DIY project. Some of the interesting varieties we’ve seen are powered by supercapacitors, show readings on antique analog dials and convert parking distance sensor kit into a wind gauge.


Excited to learn more, but the first link in the article goes to a wp-admin link in the guts of the Hackaday blog. Is it just supposed to point to the YouTube page for the embedded video?
Ah sweet, was looking for something like this. A cheap rain meter always costs 25 $/€ or more. And you still need to work on it to integrate into something.
Great work! Definitely going to use this.
I’m glad you like it!
Although this Rain Gauge also needs to be integrated with something, the good thing is that since it’s based on ESP32, it can be done quite cost-effectively :)
Thanks for publishing my project. If you have any questions, feel free to ask, I’ll be happy to answer :)
To how many millimeters of rain does one skip translate?
You can calibrate it however you want. Just adjust the screws to determine how much water triggers the cup.
I currently set it to 6 ml of water, which translates to approximately 0.631356 mm.
The first link in the post is pointing to an “admin editing” page/action: https://hackaday.com/wp-admin/post.php?post=591874&action=edit.
Fixed. Darn it!
Nice build, have you got a power curse to show how much of the power has gone while active vs in deep sleep? I not the regulator is 25 µA stand by, but how much does the board draw in both active and sleep state – and over time where does the power go?
And when will the populated boards be back in stock? :-)
You know what? Before I started this project, I spent quite a lot of time researching power consumption in different modes. In active mode, it draws around 120 mA for a while and then drops to around 50 mA. Of course, this value varies depending on the current activity.
In Deep-Sleep mode, it’s consistently around 28-30 uA.
As for the availability of populated PCBs, I’m actually waiting for the ordered components to arrive :)
If it is using 28-30 uA then it is the regulator taking most of it…
One suggestion I have for you is use the ULP and not wake up the eps32 as often. Here is a specific example that could almost be directly used with your project – https://github.com/espressif/esp-idf/tree/903af13e847/examples/system/ulp_fsm/ulp
Using the ULP can allow to accumulate over multiple tipping with the pseudo deep sleep current draw (yet, you don’t have interrupts on the ULP, so you’ll have to poll the GPIO).
Yet, it would require adding a (exterior waterproof) button to wake up the ESP for OTA. Currently, you just have to tip the bucket and then the ESP32 will stay awake for 5s (as far as I understand it), so you have plenty of time for starting the OTA.
One option might be to wake it up with an interrupt at the start of rain, check the ota, then put it into ULP for the rest of the time that it is raining – which might be hours… And then just go out of the ULP at the time interval that you want web updates.. :-)
Where are the 3D print files. I would like to build this project but don’t want to buy the products.
Thanks
After filling in your email address the link turns out to be:
https://download.smartsolutions4home.com/
Nice project! I am exploring to build up my own rain gauge and this write up shed light, perfect time. Quick question, how do you calculate amount of rain, is that relate to area of cross section of cylinder?
Thanks for the great project and the even greater Blade Runner scene :) Hail Rudger Hauer!