Jenny’s (Not Quite) Daily Drivers: Raspberry Pi 1

An occasional series of mine on these pages has been Daily Drivers, in which I try out operating systems from the point of view of using them for my everyday Hackaday work. It has mostly featured esoteric or lesser-used systems, some of which have been unexpected gems and others have been not quite ready for the big time.

Today I’m testing another system, but it’s not quite the same as the previous ones. Instead I’m looking at a piece of hardware, and I’m looking at it for use in my computing projects rather than as my desktop OS. You’ll all be familiar with it: the original Raspberry Pi appeared at the end of February 2012, though it would be May of that year before all but a lucky few received one. Since then it has become a global phenomenon and spawned a host of ever-faster successors, but what of that original board from 2012 here in 2025? If you have a working piece of hardware it makes sense to use it, so how does the original stack up? I have a project that needs a Linux machine, so I’m dusting off a Model B and going down memory lane.

Continue reading “Jenny’s (Not Quite) Daily Drivers: Raspberry Pi 1”

A photograph with labels showing the parts of a DIY scanning spectrometer.

DIY Scanning Spectrometer Is A Bright Idea

Spectroscopy seems simple: split a beam of light into its constituent wavelengths with a prism or diffraction grating, and measure the intensity of each wavelength. The devil is in the details, though, and what looks simple is often much harder to pull of in practice. You’ll find lots of details in [Gary Boyd]’s write-up of his optical scanning spectrometer project, but no devils.

Schematic diagram of [Gary Boyd]'s spectrometer, showing optical elements and rays of light as well as major physical elements like the motor and linear stage.
Schematic diagram of [Gary Boyd]’s Czerny-Turner type scanning spectrometer.
A scanning spectrometer is opposed to the more usual camera-type spectrometer we see on these pages in that it uses a single-pixel sensor that sweeps across the spectrum, rather than spreading the spectrum across an imaging sensor.

Specifically, [Gary] has implemented a Czerny-Turner type spectrometer, which is a two-mirror design. The first concave mirror collimates the light coming into the spectrometer from its entrance slit, focusing it on a reflective diffraction grating. The second concave mirror focuses the various rays of light split by the diffraction grating onto the detector.

In this case [Gary] uses a cheap VEML 7700 ambient light sensor mounted to a small linear stage from amazon to achieve a very respectable 1 nm resolution in the range from 360 nm to 980 nm. That’s better than the human eye, so nothing to sneeze at — but [Gary] includes some ideas in his blog post to extend that even further. The whole device is controlled via an Arduino Uno that streams data to [Gary]’s PC.

[Gary] documents everything very well, from his optical mounts to the Arduino code used to drive the stepper motor and take measurements from the VEML 7700 sensor. The LED and laser “turrets” used in calibration are great designs as well. He also shares the spectra this device is capable of capturing– everything from the blackbody of a tungsten lamp used in calibration, to a cuvette of tea, to the sun itself as you can see here. If you have a couple minutes, [Gary]’s full writeup is absolutely worth a read.

This isn’t the first spectrometer we’ve highlighted– you might say we’ve shown a whole spectrum of them.

A Tricky Commodore PET Repair And A Lesson About Assumptions

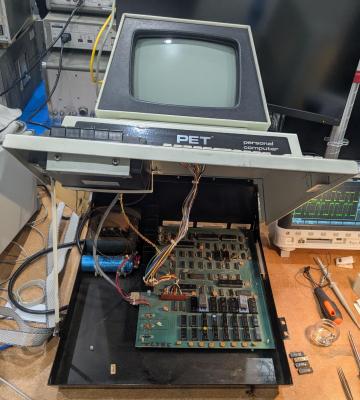
The PET opened, showing the motherboard. (Credit: Ken Shirriff)

An unavoidable part of old home computer systems and kin like the Commodore PET is that due to the age of their components they will develop issues that go far beyond what was covered in the official repair manual, not to mention require unconventional repairs. A case in point is the 2001 series Commodore PET that [Ken Shirriff] recently repaired.

The initial diagnosis was quite straightforward: it did turn on, but only displayed random symbols on the CRT, so obviously the ICs weren’t entirely happy, but at least the power supply and the basic display routines seemed to be more or less functional. Surely this meant that only a few bad ICs and maybe a few capacitors had to be replaced, and everything would be fully functional again.

Initially two bad MOS MPS6540 ROM chips had to be replaced with 2716 EPROMs using an adapter, but this did not fix the original symptom. After a logic analyzer session three bad RAM ICs were identified, which mostly fixed the display issue, aside from a quaint 2×2 checkerboard pattern and completely bizarre behavior upon running BASIC programs.

Using the logic analyzer capture the 6502 MPU was identified as writing to the wrong addresses. Ironically, this turned out to be due to a wrong byte in one of the replacement 2716 EPROMs as the used programmer wasn’t quite capable of hitting the right programming voltage. Using a better programmer fixed this, but on the next boot another RAM IC turned out to have failed, upping the total of failed silicon to four RAM & two ROM ICs, as pictured above, and teaching the important lesson to test replacement ROMs before you stick them into a system.