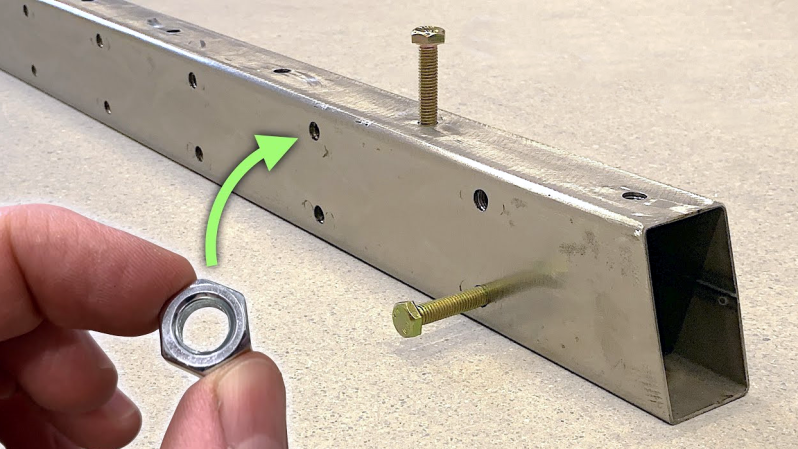
[Jer Schmidt] needed a way to put a lot of M8 bolts into a piece of square steel tubing, but just drilling and tapping threads into the thin steel wouldn’t be strong enough. So he figured out a way to reliably weld nuts to the inside of the tube, and his technique works even if the tube is long and the inside isn’t accessible.
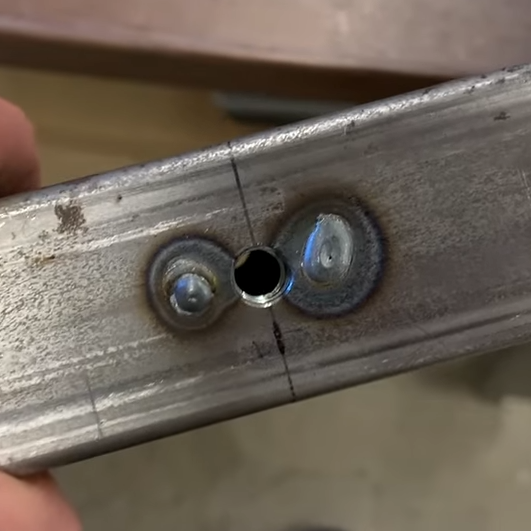
Essentially, one drills a hole for the bolt, plus two smaller holes on either side. Then one welds the nut to the tubing through those small holes, in a sort of plug weld. A little grinding is all it takes to smooth out the surface, and one is left with a strong threaded hole in a thin-walled tube, using little more than hardware store fasteners.
The technique doesn’t require access to the inside of the tube for the welding part, although getting the nut back there in the first place does require a simple helper tool the nut can slot into. [Jer] makes one with some scrap wood and a table saw, just to show it doesn’t need to be anything fancy.
Another way to put a threaded hole into thin material is to use a rivnut, or rivet nut (sometimes also used to put durable threads into 3D prints) but welding a plain old nut to the inside was far more aligned with what [Jer] needed, and doesn’t rely on any specialty parts or tools.
[Jer]’s upcoming project requires a lot of bolts all the way down long tubing, which is what got him into all of this. Watch it in action in the video below, because [Jer] has definitely worked out the kinks, and he steps through a lot of tips and tricks to make the process painless.
Thanks [paulvdh] for the tip!


Obligatory safety reminder – when welding hardware store nuts and bolts be careful of the plating on the part.
For instance – a lot of hardware is zinc plated, and it can emit quite a toxic gas when welded
On AMZ, Riv Nuts are like 0.10-0.15/per.
Drill close to size, install in 10 sec, move to the next one.
Appreciate the tip, but cost of the extra nut, extra drilling, welding sort makes it penny wise-pound foolish.
Unless you’re really broke, or have the time and equipment….
Think it more depends on what you need – far as I know nobody makes a riv-nut with a tapered seat or a drill bit for them to create that step for a standard nut to have that flush finish to the surface seen here. The rivet part also means you need a fair bit of depth to get the crumple zone in, so a tube like this it could be too thin to allow you to put them in everywhere you want. Also have the mixed material question – you can use this concept with a variety of steel, Aluminium, some copper alloy as long as you can plug ‘weld’ it.
This is more labour for you, but plenty of reasons you might find this preferable for the end result, and even ignoring the cost element entirely the riveting tool is then potentially another bit of ‘junk’ cluttering your workshop after this one project – I don’t have and likely never will pick one up for that reason alone, as while I have no doubt its a darn handy capability to have I can weld and machine custom nuts etc already, and those tools are already eating up so much of my space!
Countersunk RivNuts exist – easy example McMaster Carr 90764A350
(not the most economic place to order them)
You have to weld a lot more than a few nuts of zinc to get the fevers.
This is good – I personally use rivnuts in really thin material, but this is excellent because it’s truly flush to the surface. And rivnuts are expensive.
Well done.
Look into flowdrill. They are amazing. It friction melts the metal into a tube that can then be tapped. Faster and cleaner than this method.
A bit much for most home shops I’d think, and nowhere near as flexible – as I understand it you really need that big spindle motor drill press/CNC to actually make them work. So only of use where you can bring the work to the machine, which for most of us if even have that suitable machine might be tricky material handling and space wise… No personal experience in putting them in, and it certainly is a cool method though.
For something bigger like the M8 used here, yeah, probably not gonna happen in most home shops, but for smaller stuff you can absolutely manage with a decent drill press. IIRC I did M4 with an AliExpress bit in a 1 1/4 HP old Craftsman drill press.
Right. Buying a $3000 equipment to do this? Perhaps a better advice in that category was just to offload your machining to a machine shop. That’s very handy and clean.
Seems like it might sometimes be possible to weld bits of wire between nuts, to make a long strip of nuts at the appropriate spacing for the holes. Then slide the strip into the tube and weld the nuts into place. Seems like that might be easier than getting each nut into the right position one by one.
Yes, drill the metal tube, put a nut on a bolt, repeat, with the bolts in the holes weld the wire to the bolts. They should line up well enough once inside the tube.
Maybe a few drops of super glue or jb weld would hold the nut in place long enough.
Initial install is one thing, but what about when you later need to service?
You’ll get some great fumes when you weld near cyanoacrylate adhesive, on the plus side it will make the zinc fumes from the BZP nut seem like nothing.
Maybe a few drops of super glue or JBWeld would hold the nut in place long enough for most jobs.
Towards the end he realizes one can just view the inside through the hole right on the opposite side. The same also applies to deburring.
When drilling through, one side will have more error, but feature the burrs on the outside, and you can circle a hole-sized drift in it.
A few gentle hammer taps will smash down the burrs.
I had to do this with aluminium box section, so welding not an option, and have a flat surface, so rivnuts not an option.
I just stuck the nuts on the inside with epoxy, using the bolt to hold them in place while it cured. When the bolt is installed the glue is redundant, so it only needs to be strong enough to hold them in place before assembly.
Ah yes, plug-welding.
I can’t explain why but watching welding on YouTube feels like it actually hurts my eyes even though there is no reason that it would.
makes one wonder why welding masks are so dark and antiquated when with the correct filters it could be suitable to read a book through.
That’s exactly what my 3M Speedglas 9100 is.
Maybe don’t buy all your PPE in a $0.99 store.
These days a lot of people use the auto-darkening kind that are easy to see through until they detect an arc, then get much darker. And are adjustable in how dark they get.
You need to look at the state of the art in modern auto-darkening helmets my dude, they’re awesome.
The idea of adding wings to a nut that is then plug welded in place, nothing jaw dropping, but why wouldn’t you weld the wings on before sticking it in the tube. That way you aren’t welding through a hole.
Personal I either just make my own square nuts out of some 1″ x 0.25″ flat bar, or just use a flange nut.
Flat bar works best as I can make it big enough that I’m not cooking the threads when welding.
For threading thin metal, I drill the hole undersized and hammer a tapered punch through to open it to the tap hole size. this creates a “tube” in the metal instead fo just a hole and can give 3-4 threads for engagement. Also, tightening tends to pull the threads tighter.
This is not as strong as a nut but useful for many applications.
Not a bad trick.
Here’s a trick I used once; I had to prevent a nut from counter screwing that was fitted in a construction I made, and to achieve that I spot-welded some thin strips of metal to the side of the nut with one of those battery-terminal spot welders. Worked a treat and of course is much less messy than a full welder like in this article’s trick, but was plenty sturdy for its basic use of keeping the nut from rotating.
Please never hold any metal workpiece with your bare hands when drilling with a drill press.
I use this to hold nuts in hard to teach or blind applications.
https://wbtools.com.au/blog/The-perfect-tool-for-those-hard-to-reach-nuts-and-bolts
That.. looks extremely flimsy and their suggestion to unscrew actual installed nuts with it is.. well, nuts.
But for holding things it might be good.
I’d buy it from China though, but to each his own.
If weight isn’t an issue just slide a thick length of rectangular bar down the inside of the undrilled tubing, tack weld at either end then drill and tap many holes as you want
I call this a “cinch-nut”. For instance, a 1/2″ “cinch-nut; Weld a 1/2″ nut to a 1/2” washer. Drill a hole the diameter of the washer. Place washer in drilled hole with nut side first. Now weld the washer flush with matting surface.
Next time buy weld nuts – single and double flanged ones are available
Best practice is to use Rivnuts. You can buy the tool at harbor freight for $35 and each rivnut is about $0.10. Easy, repeatable, takes less than 5 seconds to install.
Maybe there were reasons not to do that here, but I would have considered using two bits of C-Section; welding the nuts on from the inside, then joining the C-Section into a tube.
Would it be possible to pull the nut upwards against the metal using a copper bolt and then connection the bolt to a spot welder?
All these armchairs here yet I wonder if we purged the comments of those who’ve never done what they suggest, how many comments would be left behind?