Embedding fasteners or other hardware into 3D prints is a useful technique, but it can bring challenges when applied to large or non-flat objects. The solution? Use a gap-cap.
 The gap-cap technique is essentially a 3D printed lid. One pauses a print, inserts hardware, then covers it with a lid before resuming the print. The lid — or gap-cap — does three things. It seals in the part, it fills in empty space left above the component, and it provides a nice flat surface for subsequent layers which makes the whole process much cleaner and more reliable.
This whole technique is a bit reminiscent of the idea of manual supports, except that the inserted piece is intended to be sealed into the print along with the embedded hardware under it.
If you have never inserted anything larger than a nut or small magnet into a 3D print, you may wonder why one needs to bother with a gap-cap at all. The short version is that what works for printing over small bits doesn’t reliably carry over to big, odd-shaped bits.
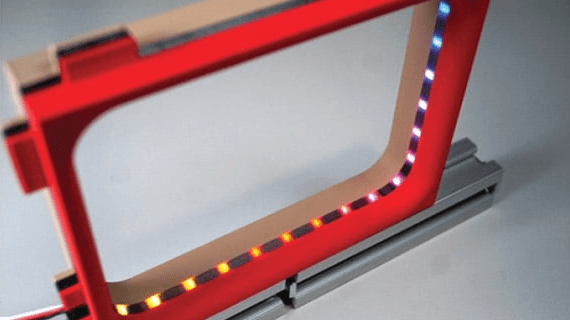
For one thing, filament generally doesn’t like to stick to embedded hardware. As the size of the inserted object increases, especially if it isn’t flat, it increasingly complicates the printer’s ability to seal it in cleanly. Because most nuts are small, even if the printer gets a little messy it probably doesn’t matter much. But what works for small nuts won’t work for something like an LED strip mounted on its side, as shown here.
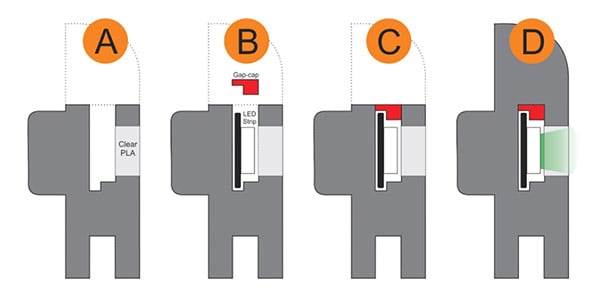
In cases like these a gap-cap is ideal. By pre-printing a form-fitting cap that covers the inserted hardware, one provides a smooth and flat surface that both seals the component in snugly while providing an ideal surface upon which to resume printing.
If needed, a bit of glue can help ensure a gap-cap doesn’t shift and cause trouble when printing resumes, but we can’t help but recall the pause-and-attach technique of embedding printed elements with the help of a LEGO-like connection. Perhaps a gap-cap designed in such a way would avoid needing any kind of adhesive at all.


or use the apple method to make things less repairable: glue!
Planned obsolescense…
What good purpose does it serve to make a component impossible to replace? This is bad design, IMO.
because there could be good reason for needing to seal hardware inside? use your imagination omg
use your imagination. there could be a reason to seal hardware inside (like protecting from water) that the user decides outweighs the need to be able to easily swap out whatever is inside the plastic.
Sealing something inside a 3D print doesn’t protect it from water. Even if it did, you should still use gaskets instead. Once again, this is just bad design and there is no use-case where it isn’t.
There are components (springs, magnets, pins) which will never fail. Sealing them inside is a totally valid approach.
Tell me you’re 12 and don’t know what you’re talking about without telling me you’re 12 and don’t know what you’re talking about.
It can, and if it can’t due to porosity gaskets aren’t going to fix the problem. So no, you are just wrong.
Arguing while posting as anonymous…?. OK, sure. For the example used in the article, the LED strip isn’t in a position that a gasket will work very well, plus this technique will give a much nicer/clean finish. If your LED strips fail that often that replacing them is such a concern to you, maybe you should look at buying better LED strips.
It is fine if the embedded part has very high reliability and life. Having a rail with many threaded holes instead of the same number of threaded inserts might be appealing. And an LED strip might well be reliable enough to make sense.
Oh no, you stop there, you. Some anonymous person on Hackaday already said there’s no way this could be good design — and they didn’t even give any rationale, which is clear proof of their superior intellect.
Like when you can’t replace cooked capacitors in a light bulb? Or on a potted PCB? It’s infuriating when you can’t repair such a failed device, but at the same time it provides more security or reliability.
Here i think that you have to choose between a better looking and more robust final product, and repairability at long term. But if you printed it yourself, or provide the design to allow anybody to reprint it in some years when the embedded electronics will have failed, it is quite a good choice i think. And if you add the fact that the plastic will eventually fail first, no more a problem at all!
Similarly, you can embed a 3D printed part in another 3D print pretty easily if you can design a flat surface for the inserted part parallel to the print bed.
(Example / Shameless plug for some drink coasters I designed using this technique and shared on Printables: https://www.printables.com/model/520936-letter-drink-coasters-full-alphabet )
Two words of caution from experience:
– Sufficiently small / light inserted parts can be blown out by the cooling fan on the print head.
– If you can get a lip around the entire inserted part, it’s less likely to tip out.
(On the example cross-section shown in this article, the lip is one-sided. That’s not a problem for a part that spans a perimeter, but for a small, linear section, a second lip would probably lower the risk of the nozzle bumping the inserted “gap-cap”.)
Good idea.
This leaves parts floating if you want them to be e.g. threaded rail.
Aside from complete 3D prints to make the cap, you could use tape, cardboard, paper, polyethylene, or small 3D prints for the awkward corner parts, and a cut strip of something for the long straight bits.
Rather confused by the example. Why would a gap the thickness of an LED strip cause problems? I’ve printed over gaps that were probably 1/2″ (10mm) without issue.
It’s clearly more of a demonstration than a need. A bead of caulk would work just as well and be faster in this specific case, but not always.
Make sure the component is properly fixed in place, otherwise when moved/tilted/shaken the end product will rattle (as if it contains a loose screw or something, you know the sound) .
5 years ago I developed a similar method for fine metal mesh. https://hackaday.io/project/182664-embedding-a-mesh-into-3d-print
Gratuitous perpetration of prospective e-waste…