
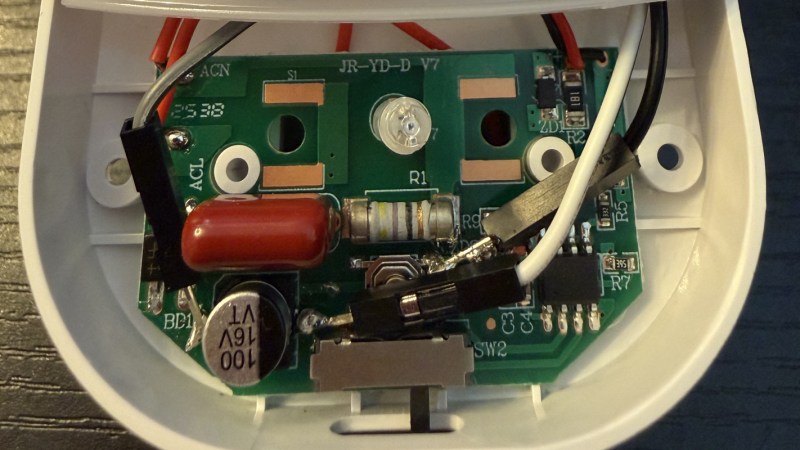
We’ve likely all looked at a simple problem in our lives and thought that it would be an easy fix, only to realize that the project is enormously more complicated than we first realized. Whether that’s starting a home improvement project, doing a quick repair to a bicycle or car, or trying to install an obscure piece of software on a Linux machine, the amount of time we budget for these tasks often ends up woefully underestimated. []’s night light needs to have its brightness set every night, and it seems easy enough to get a microcontroller to automate that, right?
Well, upon opening the small device, the first issue is that there is no labeling on any of the parts, so simply adding a jumper on to existing microcontroller pins without damaging anything wouldn’t easily be possible. Adding a secondary microcontroller is the next logical step, but the power supply in the night light is extremely underpowered so using even the smallest Raspberry Pi or off-the-shelf Arduino was out of the question too. [Oscar] instead chose an ATtiny85, which solves the power requirement issue, but these are a bit more of a challenge to program without a USB device. From there, it needs a transistor wired in to the circuit to actually push the button for him, plus a few support resistors, so [Oscar] actually had a PCB custom-built to hold all of these components.
Even after all of that, the space within the night light enclosure made installing the PCB a challenge, but in the end he has a device which, when his home automation system powers on the plug for the nightlight, automatically boots up and pushes the switch the required number of times and then puts itself to sleep. We’d call that a success even after the colossal effort getting this inexpensive, small light working the way he wanted. There are some other low-powered solutions for problems like these too, as long as being battery-powered isn’t a dealbreaker.












Sounds like it would have been easier to just make your own night light
sure. knit one. or else, a raspi using gpio serial to send athz or bespoke commands to a esp16 which then drives a relay.
Sure, but where would the fun in that be?
Bryan – your first paragraph couldn’t ring any truer. Well said!
Don’t buy chabuduo trash and you won’t have to waste time hacking it.
Oscar’s write-up was great; 100% hacker ethos on display!
Hardly anyone has projects using ATiny boards. How cool!!
Check out Technoblogy, he has a lot of cool projects with ATiny boards.
I built this one: http://www.technoblogy.com/show?2F5D
This is the coolest way to kill a fly with a cannon! Given the need described, and assuming there was no easier solution provided by the control software, I would have never gone this path, but rather used a resistor in series with the LED to dim it for good and perhaps a bypass switch across the resistor just in case I needed full light. But this is of course the best result achievable.
I think it uses a smart plug. Therefore no software solution available. On the other hand, this makes it less important to save the original pushbutton function as you need to go there in person anyway to change the light intensity.
A capacitive dropper works slightly oddly — you have a fixed current supply and you generally can’t reduce it using a resistor without serious consequences on the voltage front.
I can see two approaches here. One, replace the capacitor with a smaller one for less current, and then make any other adjustments necessary.
Two, add a resistor in parallel (not series) to bypass some of the current going to the LEDs. This might be the easy way.
The solution leaves me completely clueless why you don’t just design the whole circuit onto that custom PCB once you have decided to spin one.
The words “hack” and “Rube Goldberg contraption” should, and often do, occur in the same sentence. This is a fantastic example of that. And, as always on HAD, we each have different opinions on How It Should Be Done. The great thing about being Makers is that we can choose how we make things. This one, though perhaps different than how some might do, is such a project.
By the word “contraption” I see those pictures of Wallace&Gromit do cross before my mental eye. 😰
Gird up thy TechnoTrousers!!
It really seems like he just needed to replace one of the wires to the LED board with a reistor to dim it. Once I saw the capacitor drop power supply I immediately thought just power it off of a 7.5v power brick with a resistor.
This is a good way to learn about programming an Atmega Tiny I suppose. The irony in a night light with a bunch of extra processing power.
Also see, dump the EEPROM and see if you can write one that defaults to the setting you want. Assuming you can find a programmer for it. If it’s inside one of those write once 5¢ 6502 or Z80 clone processors then maybe it’s not a thing.
The irony of a night light on a home assistant is huge. Historically night lights just have a light sensor and come on when ambient light is low enough to require the night light.
They don’t known KISS