
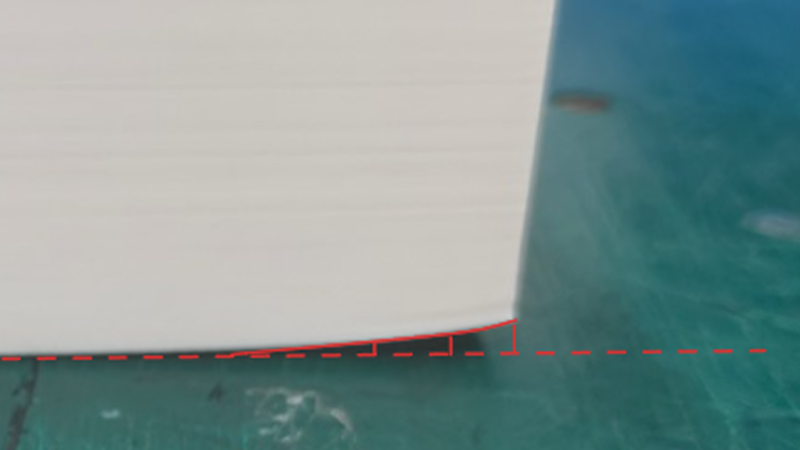
Large prints have a risk of warping, by which we mean corners can lift off the print bed as the object sort of curls inward on itself. It’s not always due to poor filament quality or an unclean build plate. Sound like something you’ve dealt with? Check out this handy roundup to understand why it happens, and learn ways to prevent it.
The reason some objects have trouble while others don’t is physics. Deposited plastic shrinks ever so slightly as it cools, and some shapes — like wide, flat surfaces with sharp corners — are worse for this than others. This sort of problem is what the guide addresses with a number of techniques.
Some are simple, like turning on brims which increases an object’s footprint. This increased surface area offers more adhesion, but also increases heat transfer from the print bed into the model, slowing the cooling process. Thinner walls and an altered infill pattern is another option. Other techniques are more complex.
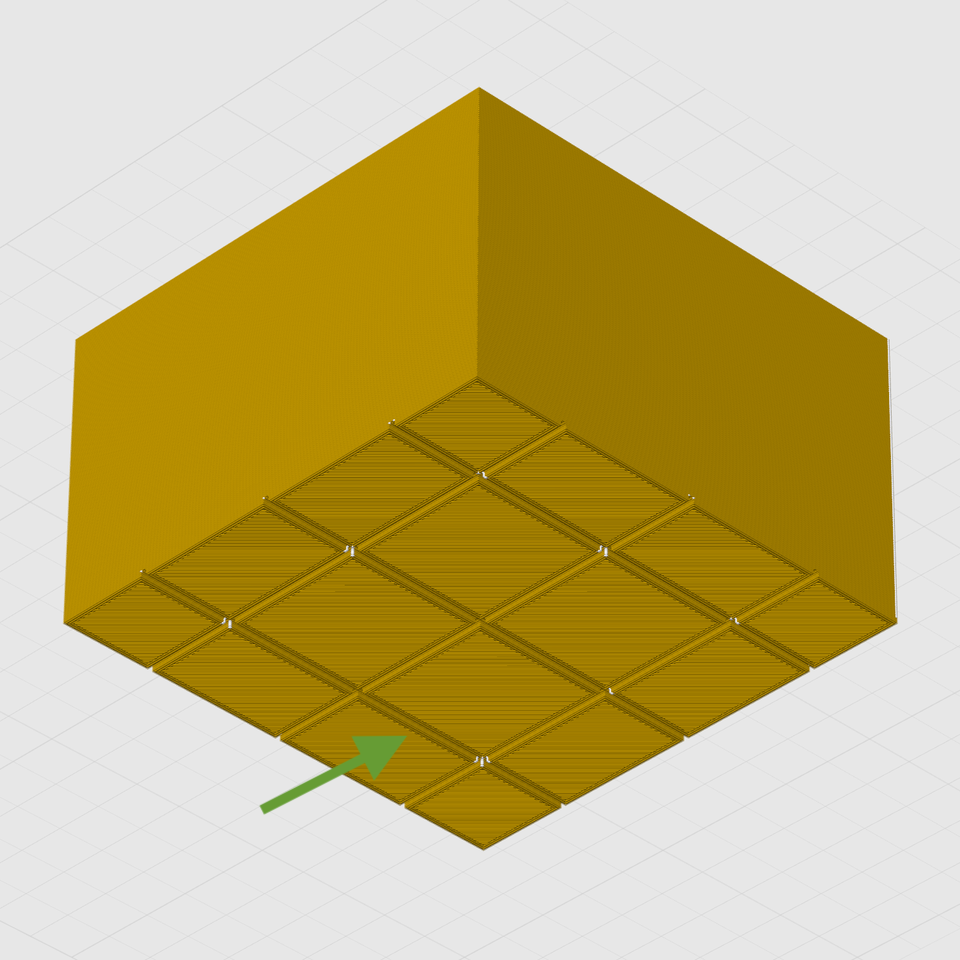
The most effective methods involve modifying the model itself to reduce or eliminate stress points. One such method is to break the model’s footprint into multiple zones with a shallow grid. Instead of one big flat bottom, the object has multiple smaller ones. Because big flat areas are more susceptible to warping than small ones, turning the bottom into a grid pattern helps spread those stresses out and prevent lifting.
If you design your own models, you’ll find several design tips worth keeping in mind. It’s always smart to practice good DFM (Design For Manufacturability) which means taking 3D printer strengths and weaknesses into account when designing an object. In this case, it can help prevent print failures. Good DFM can also make parts much, much stronger just by designing in the right features.












Guten Tag’s Bumpmesh is the solution. It breaks the even surfaces into bumbmesh of your choice.
Those automatic brim ears / mouse ears generated by Orca Slicer are an absolute joke. Those ears have to be at least 2 or 3 layers thick and be completely attached to your print to do something on bigger prints.
If the geometry is given and can’t be changed I add discs to the corners, make them at least 0.6mm thick and adjust their diameter to the size of the part. It is often by feel, but I rarely use discs smaller than 15 or 20mm in diameter.
Even those sometimes have trouble keeping the part stuck to the print-bed.
I pretty much only print with PLA and PETG and some occasional ABS, but I haven’t encountered these issues in a long time. Maybe it happens with some fancy filaments, but with the normal stuff, if you have a modern closed printer that does a mesh bed level with a normal cryogrip plate, you should never ever encounter warping. The largest print with the craziest angles should not lift up any corner and if you do, you need to figure out what is wrong with your setup. Sure, if you still rock a vintage Ender or similar with an oldschool PEI / ultem plate, then I can understand having these issues. But then you are constantly working against problems that have been fixed a long time ago and you end up with glue and mouse ears and brims and other solutions to problems from yesteryear.
Tell me you’re new to 3D printing without telling me. When I started I also was strongly against glue because, like you, I thought the modern ways didn’t need glue. That we could have some “pure”, minimal setup that worked for everything. And that’s a fair goal as reducing complexity is always appreciable. But the reality is that while some print surfaces are certainly better than others, none works perfectly all the time, for all geometries. And I’ve tried most of them, from painter’s tape to cryogrip. Besides, glue isn’t just about adhesion. Sometimes it helps stick your part to the bed, and sometimes it does the opposite and prevents your part from fusing with your bed’s delicate top surface, damaging it on removal. With experience, you tend to learn to use these tools (including the grid pattern in the article) for the more challenging prints, and it’s nice to have as many strings as you can on your bow.
Here is small tip i found – works great. Mix 1 part clear PVA glue, 2 parts IPA and 2 parts water. Then apply with sponge. Easy to apply, easy to clean, creates very even surface and costs nearly nothing. I like to print from cheap PLA from Spectrum – The Filament. Some colors, especially grey just dont’t stick to anything – with this thing it holds every time.
Funny you mention grey – I bought some grey Inland PLA and while it stuck good to the PEI bed the layer adhesion was abysmal.
Having an enclosure helps a lot, at least with PETG. I haven’t really had issues with lifting corners since I put my bedslinger in a box that stays at around 40 C while printing. But I feel like you’re being a little snobbish. Most printers around are probably bedslingers with PEI plates, and most people probably can’t justify the expense of upgrading.
Yes, It Does. I built a homebrew enclosure that was essentially a more sturdy tent over an Ender 3 clone, and that solved a LOT of bed adhesion issues.
I remember the day of non-heated beds, painter’s tape, glue sticks, and still having parts pop free of the bed. The heated bed upgrade was the best upgrade I did with that printer.
I just encountered this with PETG last week. I tried printing a build plate holder for my H2D. it was long and thin. First bunch of layers were mint but as the long layers stacked up the shrinkage caused the part to warp slightly and the ends peeled up just a bit. I let the print finish and the part works fine but it still happened. PLA isn’t much of a problem though as it doesn’t shrink as much.
The problem is material shrinkage. Two changes have solved 99% of my problems:
* Use a hilbert curve as the first layer. It takes longer, but the stress in the first layer is much less (think pipelines L-sections).
* Make sure the temperature differences (enclosure + extruder) between first layer and the rest aren’t too high.
Ooh I’ll try the hilbert curve. I’ve only ever used it cosmetically
I like these advanced methods a lot. You might never need them if all you print are trinkets from MakerWorld, but when making complex geometries with non-cooperative filament, these techniques go a long way when you’re cornered in a set of engineering restrictions or just want to make your prints more reliable. Thanks for sharing!
I had this problem recently. Hard a part that would print fine anywhere on the bed. Once kinks were ironed out I printed several pieces, only to find that some of them (mostly the outer ones) had corners turning up to various degrees. I put it down to the parts cooling more between layers as there was a lot more time between each visit to each part compared to when printing a single part.
I keep relatively higher bed temperature for petg it releases stress inside printed model, you need bed printing material that will keep object stick on i.e 60C or 70C to its position. Also it is good to have a very well adjusted layer 0 distance from nozle this helps a lot
“The reason some objects have trouble while others don’t is physics.”
I mean, this is pretty much true across the board, right?
I haven’t printed ABS since I got a hotend capable of printing PET-G. But.. back in the day I would keep jars of scrap dissolved in acetone for each color that I used.
I would make brushes by cutting strips out of cereal boxes and similar cardboard materials then I would cut a bunch of slits into one end to make little fingers to act like bristles.
I would use this to brush a thin layer of the dissolved ABS onto my build plate.
This helped a lot!
It also had the side effect of making a very smooth surface. Almost mirror like with some filaments. With other filaments though the color would be sort of fogged on that side.
When printing ABS / ASA
1. Get an enclosure, drafts can trigger the corner to raise
2. Get the enclosure temperature as high as you can, ideally 60C although 40 / 50 will also help a lot