The Solution To Oversized Dev Boards: A Literal Hack

Oh, there was a time when you could prototype just about everything on a breadboard. The CPU in your computer came in a DIP package, and there were no BGA packages. to be found anywhere. In the forty years since then, chips have gotten smaller, packages have gotten more cramped, and you can barely hand-solder the coolest chips anymore. No worries — companies are still spitting out dev boards with 0.1″ headers, but there’s a problem: they don’t fit on a solderless breadboard. They’re too wide. Our world is falling apart.

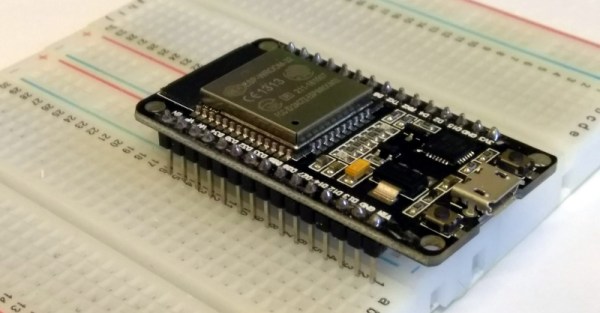
[Luc] had a problem when he was playing with a few NodeMCU dev boards. These are too wide for a breadboard. [Luc] came up with not just one solution, but two. This is how you prototype with dev boards that are too large.

The solution came to [Luc] when he realized the center of every breadboard has no electrical connections, and was simply held together by a little piece of plastic. Yes, he took a hacksaw to the breadboard. This is technically a hack.

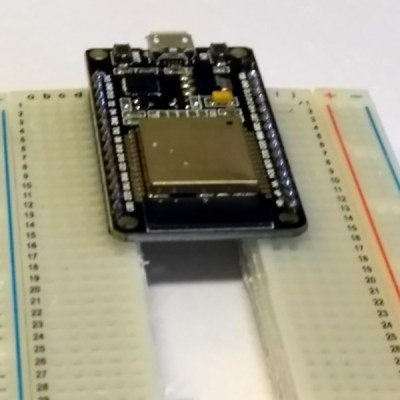
With two halves of a solderless breadboard torn asunder, [Luc] had an easy way to prototype with dev boards that are just too wide. But there is a simpler solution [Luc] realized after he destroyed a breadboard: those ubiquitous solderless breadboards have detachable power rails. If you simply take one of those power rails off, you have an easy way to use two breadboards across a module that’s too wide for one solderless breadboard.

Is this a hack? Oh, absolutely. [Luc] used a hacksaw. It’s also a nice reminder of a common trick that the noobies might not know. Thanks for that, [Luc].

The Best New Quad Is A Bicopter

RCExplorer, or [David], or just ‘The Swede’, has come up with a bicopter kit. Yes, there are a lot of people making frames and kits for quadcopter, multicopters, drones, and so forth, but [David] is really the leader in weird multicopters. Now, we have the weirdest multicopter imaginable as a kit, complete with firmware that works.

[David] is one of the great unsung heroes of the drone and multicopter world. He’s famous for rocket knives, even though that really doesn’t have anything to do with drones, he bought an airplane for his front yard (again, little to do with drones), he was one of the first to take a glider up to 100,000 feet with a balloon, and he’s been one of the main forces behind tricopters as a superior — or at least cooler — platform for aerial acrobatics and camera work. There’s a lot of work being done to the various firmwares to support tricopters, and we have [David] to thank for that.

Like [David]’s earlier tricopter kits, this frame is made entirely out of carbon fiber plate, square tube, and threaded standoffs. It also looks like batman’s drone. The firmware — the real trick for a bicopter — is stock betaflight, and there are a few problems with the stock firmware. The bicopter doesn’t like flying backwards, tuning is fiddly, and it’s harder to fly than a quad on rails. That’s to be expected with a platform as weird as a bicopter, but this kit does open the door to firmware developers hacking and making the bicopter features better.

This is what delivery drones will look like, once the people who think delivery drones are a good idea learn physics.

While pure bicopters are great, the release of what will surely be a popular bicopter with a good community of firmware developers means the door is open to a simple VTOL fixed wing, not unlike a V-22 Osprey.

Remember, San Francisco tech bros, if you need a delivery drone, you need three things: long range, VTOL capability, and payload capacity. A quad or hexacopter will not get you there, and fixed wings will give you lift for free. There is no Moore’s Law for batteries, and right now if you want to ship a bottle of shampoo 20 miles in 30 minutes, the way to do that is with a drone that looks like a V-22 Osprey. Please, delivery drone bros, learn physics, use a tilt-rotor, and learn to put the battery in the wing. This is how you found a company that will get an easy $100M valuation.

Continue reading “The Best New Quad Is A Bicopter”

Rasberry Pi PoE Hat Released

It was announced at the beginning of March, but now the Raspberry Pi Power over Ethernet (PoE) hat is out. Thanks to the addition of a new 4-pin header on the Raspberry Pi 3 Model B+, the Pis can get power from an Ethernet cable, provided you’ve got the setup to deliver PoE.

This is a remarkable bit of engineering, even though it’s just adding Power over Ethernet to a small single board computer. Mechanically, the PoE hat doesn’t increase the 3D bounding box volume of the Raspberry Pi at all. It adds cooling with a fan controlled over I2C. Even more bizarrely, the transformer is mounted in a PCB cutout, and we’re desperate to know how that was specced, designed, and assembled. Yeah, it might just be an add-on for the Raspberry Pi, but there’s some clever work that went into designing it.

The Raspberry Pi gained PoE capability with the introduction of the Raspberry Pi 3 Model B+ last March, a release that did require a slight change to the hardware and pinout of the Raspberry Pi. Compared to the Pi 3 Model B, the Pi 3 Model B+ sports a four-pin header right next to the Ethernet jack and one of the mounting holes. This is the same location of the ‘Run’ header found in the Pi 3 Model B, and probably caused much consternation to anyone who built a hat to take advantage of having a real power button on their Pi.

Nevertheless, what’s done is done, and now we have a real PoE solution for the Raspberry Pi. This is bound to be a boon for anyone who wants to build a Raspberry Pi cluster computer, or anyone who is dropping a few Pis into a server rack that already has PoE hardware.

You can pick up a PoE Pi hat through the usual suspects (Farnell, RS, and other resellers) for $20.

Better Motion Through Electrostatic Actuators

If you want something to move with electricity, odds are you’ll be using magnets. Deep inside every servo, every motor, and every linear actuator is a magnet and some coils of wire. There is another way of making things move, though: electrostatics. These are usually seen in tiny MEMS devices, and now we have tiny little electrostatic speakers making their way into phones and other miniature devices.

For [Nathann]’s Hackaday Prize entry, he’s building electrostatic actuators on the cheap, and not just tiny ones, either. He’s building ‘human’ scale electrostatic devices.

The reason electrostatic devices are usually very small is simple: the force of any actuator is dependent on the distance between the plates and the voltage. Moving the plates closer together is right out, or else they would be touching, so the solution to building bigger electrostatic actuators is increasing the voltage. [Nathann] is doing this with a cheap boost converter that’s actually sold as a taser module. These modules are small, output about 800kV, and cost around five bucks.

The prototype for this project is basically a 3D printed box with intersecting fins. These fins are covered in aluminum foil, and the box is filled with oil to prevent arcing. Will it work? That remains to be seen, but this project is a great example of what can be done with some creative part sourcing, a 3D printer, and a tiny bit of know-how. It’s some of the best work the Hackaday Prize has to offer, and we’re amazed that [Nathann] put in the work to make this happen.

This Hackable Phone Makes WiFi Calls.

Over the years, we’ve seen dozens of projects that sell themselves as an ‘Open Source’ cellphone, a hackable cellphone, or some other confabulation of a microcontroller, screen, and a cellular module. The WiPhone is not one of these projects. That’s not to say it’s not an Open Source phone that’s intended to be hackable. No, this is a DIY phone that doesn’t make cellular calls, because this is a phone that only works with SIP and VoIP apps. It’s a WiPhone, and something a lot of us have been waiting for.

The hardware for this WiFi enabled phone is extremely minimal, but there are some interesting tricks up its sleeve. Instead of letting the main microcontroller handle capturing all the button presses, the team behind the WiPhone are using a SN7326 key-scan controller. This cheap part is able to scan 64 buttons, although there are only 25 buttons on the phone. The audio board is a  WM8750BL, a cheap codec with a stereo microphone interface and a 400 mW speaker driver. The display is a simple SPI TFT, and apart from the microcontroller, that’s about it.

But it’s the microcontroller that makes it, and for that we turn to the incredible ESP-32. This chip has enough power to play Doom, be a Game Boy, and in this case, make and receive calls from a VoIP provider, scan and connect to WiFi networks, and yes, it can even play snake.

While this is just about the simplest phone you can imagine, and it only works where there’s a WiFi network, a device like this could be invaluable. And really, these days how far are you from a WiFi network you’re already connected to anyway?

This Is Your Last Chance To Design The Greatest Human Computer Interface

This is your last chance to get your project together for the Human Computer Interface Challenge in this year’s Hackaday Prize. We’re looking for innovative interfaces for humans to talk to machines or machines to talk to humans. These are projects that make technology more intuitive, more fun, and a more natural activity. This is your time to shine, and we’re accepting entries in the Human Computer Interface Challenge in this year’s Hackaday Prize until August 27th. This is your last weekend to work on your project, folks.

This is one of the best years of the Hackaday Prize yet, with almost one thousand projects vying for the top prize of $50,000 USD. That doesn’t mean everyone else is going home empty handed; we’ve already awarded $1000 prizes to twenty projects in each of the first three challenges, and this coming Monday, we’ll be figuring out the winners to the Human Computer Interface challenge. Twenty of those finalists will be awarded $1000 USD, and move onto the final round where they’re up for the Grand Prize.

Don’t miss your last chance to get in on the Human Computer Interface Challenge in this year’s Hackaday Prize. We’re looking for an interface that could be visual, auditory, haptic, olfactory, or something never before imagined. We’re sure we’re going to see an Alexa duct taped to a drone, and that’s awesome. We’re taking all comers. Don’t wait — start your entry now.

Continue reading “This Is Your Last Chance To Design The Greatest Human Computer Interface”

MIDI Association Releases Spec For TRS Jacks

The MIDI spec was released in 1983, and for more than thirty years every synthesizer, drum machine, and piece of computer hardware with MIDI has sported an enormous DIN-5 jack on the back. Why did they choose such a large connector? Well, MiniDIN connectors hadn’t even been invented yet, and today even MiniDIN connectors are rarely-seen, obsolete connectors.

In the last decade, MIDI has found its way into some very small machines. Those Pocket Operators have MIDI sync, you can control a Game Boy with MIDI using the right hardware, and the cute little Korg synths also have MIDI tucked away in there somewhere. You can’t put a DIN-5 jack on those things, leading to some weird implementations of MIDI over non-standard connectors.

Now the MIDI Association has weighed in on the situation. There’s now a spec for MIDI over 2.5mm and 3.5mm TRS jacks. In just a few short decades, you’ll be able to connect MIDI gear with an audio aux cable.

Although there are five connectors in a DIN-5 jack, most implementations use only two connectors to send and receive data. Synth manufacturers have capitalized on this fact and cheap TRS connectors to build their own implementation of MIDI using smaller connectors, sometimes with incompatable pinouts.

Now, though, there’s a standard. For TRS connectors, the tip is pin 5 on the DIN-5, the ring is pin 4, and the sleeve is pin 2. It sends and receives data to synths and drum machines from 1983, and it doesn’t use gigantic connectors.

The only caveats to the new MIDI standard is that 2.5mm TRS connectors are recommended, and that protection circuitry is strongly recommended in the case a headphone driver is inevitably connected to a MIDI device. Other than that, everything’s coming up roses, and this opens up the door to MIDI jacks that are much, much easier to source.