A Nicely Designed Stereo Tube Amp

tube amp

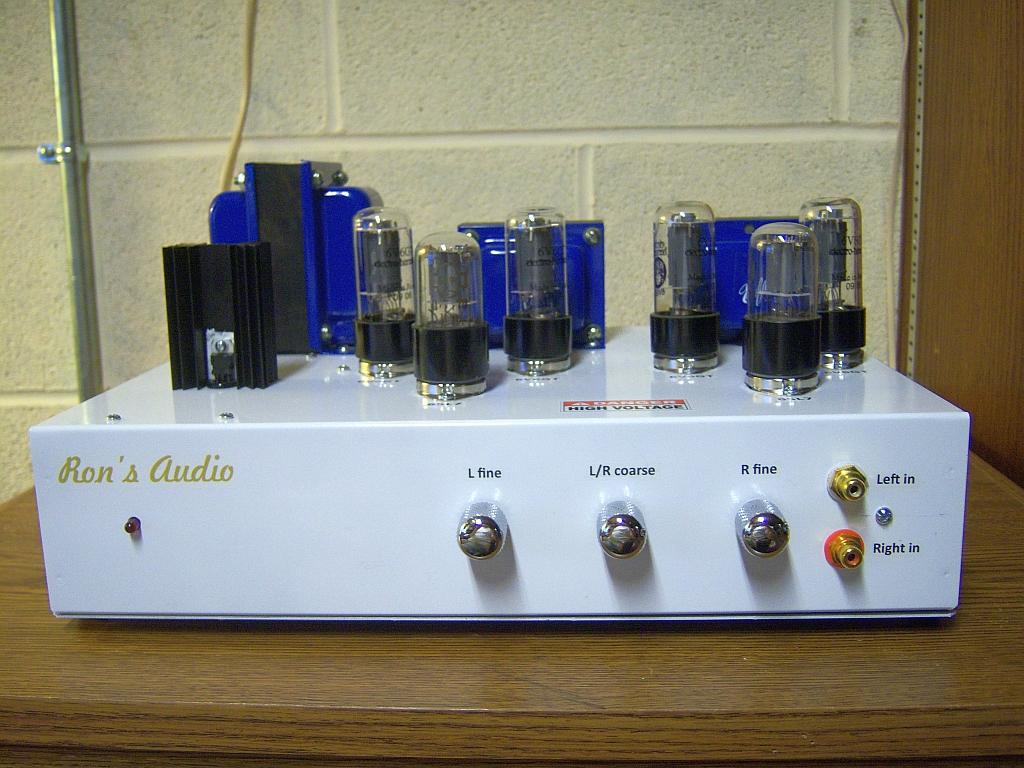
Most of the work that [Ron] has done in the past with vacuum tubes and solid state electronics has been repair. At 59 years old, he finally put together his own stereo tube amplifier and we have to admit it definitely has an awesome look.

The platform is built around the well-known 6V6 beam-power tetrodes which are mostly used by major audio brands for their guitar amplifiers nowadays. The Dynaco 6V6 circuit based PCB was bought from China and minor changes were made to it. The amplifier uses one transformer to convert the US 120VAC into 240VAC and 9VAC, the first being rectified by a glassware PS-14 power supply while the later is converted regulated at 6.3V for the tube heaters. The output stage consists of two Edcor audio transformers (one for each channel) that converts the high voltage for its 8 ohms speakers. The home-made chassis provides proper grounding and as a result you can’t hear any background noise.

We are very curious to know if some our readers have been experimenting with glass tubes for audio applications. Please let us know your experience in the comments section below.

Raspi Ambilight Integrated In A 19″ Rack Packs Lots Of Peripherals

raspi ambilight

Ambilight systems create light effects around your monitor that correspond to the video content you’re playing. [Sébastien] just build his (French translated to English, original here) and embedded all the elements in a 19 inch rack he bought from Farnell.

As most ambilight systems we’ve covered over the years the HDMI signal is first split in two, one being sent to his monitor while the other is converted into a S-Video signal. The latter is then captured with a STK1160 stick connected to a Raspberry Pi. A python script using the OpenCV library is in charge of extracting the frames pixels and figuring out what colors should be sent to the SPI connected LPD8806 LEDs. A nice web interface also allows to drive the LEDs from any platform connected to his local network. Finally, a standard HD44780 LCD and an infrared receiver are connected to the raspberry, allowing [Sébastien] to control and monitor his platform. Funny thing: he also had to use two relays to power cycle his HDMI splitter and converter as they often crash. You can check out a demonstration video from a previous revision after the break.

Continue reading “Raspi Ambilight Integrated In A 19″ Rack Packs Lots Of Peripherals”

An Excel Based High Frequency Transistor Amplifier Calculator

amplifier calculator


[Paulo] just tipped us about an Excel based high frequency transistor amplifier calculator he made. We’re guessing that some of our readers already are familiar with these class A amplifiers, commonly used to amplify small audio signals. Skipping over the fact that their efficiency is quite low — they are cheap to make, don’t require many components and usually are a great way to introduce transistors to new electronics enthusiasts. All you usually need to do is a few calculations to properly set your output signals and you’re good to go.

Things are however more complex when you are amplifying 200MHz+ signals, as all the components (complex) impedances have to be taken into account so you can get a nice amplification system. On a side note, at these frequencies your transmission lines impedances may even vary depending on how much solder and flux you left on your SMT pads along the way. [Paulo]’s calculator will therefore compute most of the characteristics of two class A common emitter/collector amplifiers for specified loads.


Developed On Hackaday: Beta Testers, Animation And Assembly Videos

3 mooltipass versions

We’re pretty sure that most of our readers already know it by now, but we’ll tell you anyway: the Hackaday community (writers and readers) is currently developing an offline password keeper, the Mooltipass. A month ago we published our first demonstration video and since then the development team has been fairly busy at work.

First things first: we heard (well, read) the comments you left in our previous articles and decided to make a small animation video that will hopefully explain why having an offline password keeper is a good thing. We welcome you to have a look at our script draft and let us know what you think. We updated our GitHub readme and more importantly our FAQs, so feel free to tell us if there are still some questions you have that we didn’t answer. We finally found a short but yet interesting paper about software based password keepers possible security flaws.

Secondly, a little more than 20 prototypes have successfully been assembled and some beta testers actually already received them. As they financially contributed to their units we offered them the possibility to pick a blue, green, yellow or white OLED screen (see picture above). We therefore expect things to gain speed as we’ll have users (or rather bosses) pushing us to improve our current platform and implement much needed features.

Finally, as I figured some of our readers may be interested, I made a quick video of the prototype assembly process (embedded below). It is still a little sketchy and a few changes will be made to make it simpler for production. We expect these next weeks to be full of interesting events as our beta testers / Hackaday readers will be able to judge the work we’ve been doing for so long. We highly recommend you to subscribe to our official Google group to stay updated with our adventures.

http://www.youtube.com/watch?v=xTOw-sVSXzQ

Developed On Hackaday: Discovering Shenzhen And Its Companies

Assembly line in shenzhen

Two weeks ago we showed a first demonstration video of the offline password keeper (aka Mooltipass) the Hackaday community had been working on for the last 6 months. We received lots of interesting feedback from our dear readers and around a thousand of them let us know they were interested in purchasing the device. We agreed that preferential pricing should be offered to them, as they have been supporting this community driven project for so long.

For the next few days I will be touring Shenzhen and finally meeting the persons who have been assembling my electronics projects for the last 2 years, including the Mooltipass beta testers’ batch. I’ll also meet with Ian from Dangerous Prototypes, talk with the people behind the Haxlr8r program, visit Seeedstudio offices and a CNC shop. If everything goes well with the camera I just purchased in Hong Kong I should have nice things to show you. In the meantime, don’t hesitate to leave a comment below in case you’re in the area…

Developed On Hackaday: Demonstration Video And Feedback Request

http://www.youtube.com/watch?v=RYaz-s5SXCc

For months our dear Hackaday readers have been following the Mooltipass password keeper’s adventures, today we’re finally publishing a first video of it in action. This is the fruit of many contributors’ labor, a prototype that only came to be because of our motivation for open hardware and our willingness to spend much (all!) of our spare time on an awesome project that might be just good enough to be purchased by others. We’ve come a long way since we started this project back in December.

In the video embedded above, we demonstrate some of our platform’s planned functionalities while others are just waiting to be implemented (our #1 priority: PIN code entering…). A quick look at our official GitHub repository shows what it took to get to where we are now. What’s next?

We need your input so we can figure out the best way to get the Mooltipass in the hands of our readers, as our goal is not to make money. The beta testers batch has just been launched into production and I’ll be traveling to Shenzhen in two weeks to meet our assembler. When materials and fabrication are taken into account we expect each device to cost approximately $80, so please take 3 seconds of your time to answer the poll embedded below: (poll has ended)

The IFind Kickstarter Campaign Was Just Suspended

A little more than one month ago we featured a Kickstarter campaign that was raising quite a lot of eyebrows and over half a million dollars. This particular product was a battery-free tag meant to be attached to anything you may lose in your daily life. It was supposed to communicate with Bluetooth Low Energy (BLE) devices and have a 200ft (60m) detection range.

The main claim was that the iFind could harvest enough power from existing RF fields inside a typical home environment to operate for centuries. As Kickstarter just cancelled its funding a few minutes ago it seems that the basic maths Hackaday did a while ago were correct and that the project was in fact a scam. We’ll direct our readers to this particular comment that sums up all the elements pointing to a fraudulent campaign and show you the email that the backers received:

A review of the project uncovered evidence of one or more violations of Kickstarter’s rules, which include:

  • A related party posing as an independent, supportive party in project comments or elsewhere
  • Misrepresenting support by pledging to your own project
  • Misrepresenting or failing to disclose relevant facts about the project or its creator
  • Providing inaccurate or incomplete user information to Kickstarter or one of our partners

Putting aside this news, this campaign’s cancellation raises a bigger question: why didn’t it happen before and how could we control Kickstarter campaigns? On a side note, it’s still very interesting to notice the nearly religious fervor of the sunk cost fallacy that such campaigns create in their comments.

Thanks [Rick] for the tip!