Milling Curved Objects With A G-Code Ripper

HaD Mouse

Milling and routing flat surfaces is pretty much the point of a CNC router, but how about curved surfaces? Auto leveling of hobby CNC machines and 3D printers is becoming commonplace, but Scorch Works is doing just the opposite: using a probe touch probe on a CNC machine to transform a G-Code file into something that can be milled on a curved surface.

The technique is pretty much the complete opposite of Autoleveller, the tool of choice for milling and routing objects that aren’t completely flat or perpendicular to the bed with a MACH3 or LinuxCNC machine. In this case, a touch probe attached to the router scans a curved part, applies bilinear interpolation to a G-Code file, and then starts machining.

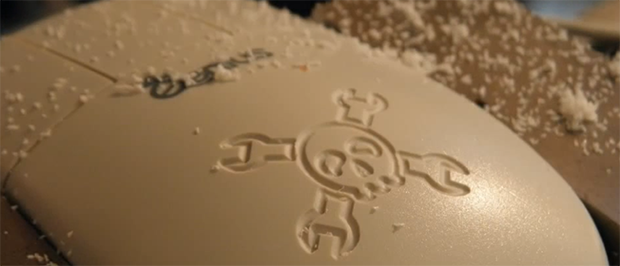
The probe can be used on just about anything – in the videos below, you can see a perfect engraving in a block of plastic that’s about 30 degrees off perpendicular to the bed, letters carved in a baseball bat, and a guaranteed way to get your project featured on Hackaday.

Continue reading “Milling Curved Objects With A G-Code Ripper”

An Excel Based High Frequency Transistor Amplifier Calculator

amplifier calculator


[Paulo] just tipped us about an Excel based high frequency transistor amplifier calculator he made. We’re guessing that some of our readers already are familiar with these class A amplifiers, commonly used to amplify small audio signals. Skipping over the fact that their efficiency is quite low — they are cheap to make, don’t require many components and usually are a great way to introduce transistors to new electronics enthusiasts. All you usually need to do is a few calculations to properly set your output signals and you’re good to go.

Things are however more complex when you are amplifying 200MHz+ signals, as all the components (complex) impedances have to be taken into account so you can get a nice amplification system. On a side note, at these frequencies your transmission lines impedances may even vary depending on how much solder and flux you left on your SMT pads along the way. [Paulo]’s calculator will therefore compute most of the characteristics of two class A common emitter/collector amplifiers for specified loads.


PS/2 Synth Will Knock You Off Your Broom

Here’s a hack centered around something a lot of people have sitting around: a PS/2 keyboard. [serdef] turned a Harry Potter-edition PS/2 into a combination synth keyboard and drum machine and has a nice write-up about it on Hackaday.io.

For communication, he tore up a PS/2 to USB cable to get a female mini DIN connector and wired it to the Nano. He’s using a Dreamblaster S1 synth module to generate sounds, and that sits on a synth shield along with the Nano. The synth can be powered from either the USB or a 9-volt.

Keymapping is done with the Teensy PS/2 keyboard library. [serdef] reused a bunch of code from his bicycle drummer project which also employed the Dreamblaster S1. [serdef] is continually adding features to this project, like a pot for resonance control which lets him shape the waveform like an analog synth. He has posted some handy PS/2 integration code, his synth code, and a KiCad schematic. Demo videos are waiting for you across the link.  Continue reading “PS/2 Synth Will Knock You Off Your Broom”

DIY USB Spectrometer Actually Works

image of diy spectrometer

When we hear spectrometer, we usually think of some piece of high-end test equipment sitting in a CSI lab. Sure, a hacker could make one if he or she put their mind to it. But make one out of a webcam, some cheap diffraction grating purchased off ebay and some scrap? Surely not.

[Renaud] pulls off this MacGyver like build with a detailed knowledge of how spectrometers work. A diffraction grating is used to split the incoming light into its component wavelengths. Much like a prism would. The wavelengths then make their way through a slit, which [Renaud] made from two pieces of highly polished brass, so the webcam sensor can see a specific wavelength. While the spectrometer-from-webcam concept isn’t new,  the build is still impressive.

Once the build was complete, [Renaud] put together some software to make sense of the data. Though a bit short on details, we hope this build will inspire you to make your own spectrometer, and document it on hackaday.io of course.

ZX Spectrum Turned Into A USB Keyboard

ZX

They’re a little hard to find in the US, but the ZX Spectrum is right up there with the Commodore 64 and the Atari 8-bit computers in England. [Alistair] wanted to recreate the feeling of sitting right in front of the TV with his Speccy, leading him to create the ZX Keyboard, a Spectrum repurposed into a USB keyboard.

While most projects that take an old key matrix and turn it into a USB keyboard use the TMK firmware, [Alistair] wanted to flex his programming muscles and wrote the firmware from scratch. It runs on an Arduino Pro Mini, scanning the matrix of five columns and eight half rows to turn combinations of keypresses into an astonishing number of commands, given the limited number of keys on the ZX.

The firmware is available on [Alistair]’s repo, available to anyone who doesn’t want to pay the £50 a new ZX Spectrum keyboard will cost. As far as the usability of a Spectrum keyboard goes, at least [Alistair] didn’t have an Atari 400 sitting in the attic.

Playing StarCraft On An ARM

Starcraft

Except for the really terrible Nintendo 64 port, StarCraft has always been bound to desktop and laptop PCs. Blizzard could take the code for StarCraft, port it to an ARM platform, put a version on the Google Play an iTunes store, and sit there while the cash rolls in. This would mean a ton of developer time, though, and potentially years tracking down hard to find bugs.

Or one random dude on the Internet could port StarCraft to an ARM platform. Yes, this means all the zerg rushes and dark templar ambushes you could possibly want are available for tablets and Raspberry Pis.

This godlike demonstration of compiler wizardry is a months-long project of [notaz] over on the OpenPandora team. Without the source for StarCraft, [notaz] was forced to disassemble the Win32 version of the game, convert the disassembly to C with some custom tools, and recompile it for ARM while linking in all the necessary Win32 API calls from the ARM port of Wine. Saying this was not easy is an understatement.

If you have an OpenPandora and want to relive your heady days of youth, you can grab everything you need here. For anyone without an OpenPandora that wants to play StarCraft on a Raspi, you might want to get working on your own recompiled port. Video below.

Continue reading “Playing StarCraft On An ARM”

A 3D(ollar) Scanner

Once you have a 3D printer, making copies of objects like a futuristic Xerox machine is the name of the game. There are, of course, 3D scanners available for hundreds of dollars, but [Joshua] wanted something a bit cheaper. He built his own 3D scanner for exactly $2.73 in parts, salvaging the rest from the parts bin at his local hackerspace.

[Josh]’s scanner is pretty much just a lazy suzan (that’s where he spent the money), with a stepper motor drive. A beam of laser light shines on whatever object is placed on the lazy suzan, and a USB webcam feeds the data to a computer. The build is heavily influenced from this Instructables build, but [Josh] has a few tricks up his sleeve: this is the only laser/camera 3D scanner that can solve a point cloud with the camera in any vertical position. This potentially means algorithmic calibration, and having the copied and printed object come out the same size as the original. You can check out that code on the git.

Future improvements to [Josh]’s 3D scanner include the ability to output point clouds and STLs, meaning anyone can go straight from scanning an object to slicing it for a 3D printer. That’s a lot of interesting software features for something that was basically pulled out of the trash.