Hypno-Jellyfish Is Great For Kids (and Kids At Heart)

hjf3_blue

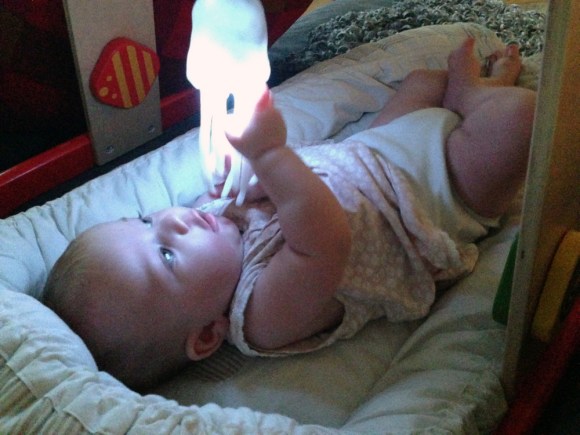
LED’s are fun. They are easily seen, not to hard to hook up, and produce a nice glow that can be gazed at for hours. Kids love them, so when [Jens] daughter was born, he knew that he wanted to create a device that would alternate colors depending on the object’s movement.

He utilized a mpu6050 accelerometer to detect changes in position, and wired together an Arduino Nano, a 9V battery, and a 12 LED neopixel ring from adafruit. Design requirements were jotted down beforehand ensuring that any child playing with the Hypno-Jellyfish would not be injured in any way. For example, anything that fits in a child’s mouth, will go in that child’s mouth; meaning that any materials used must be non-toxic, big enough not to be swallowed, and drool proof/water proof. The kids will pull, and throw, and drop the toy as well, so everything has to be of sturdy quality too. Epilepsy is also a concern when dealing with LED’s. But, [Jens] project hit the mark, making something that is kid-friendly while at the same time enjoyable for anyone else who likes color-changing lights.

Continue reading “Hypno-Jellyfish Is Great For Kids (and Kids At Heart)”

Finding And Repairing Microscopes From The Trash

scope 
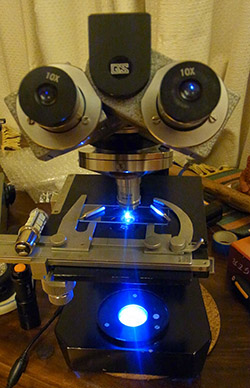
We’re not quite sure where [Andy] hangs out, but he recently found a pile of broken microscopes in a dumpster. They’re old and obsolete microscopes made for biological specimens and not inspecting surface mount devices and electronic components, but the quality of the optics is outstanding and hey, free microscope.

There was a problem with these old scopes – the bulb used to illuminate specimens was made out of pure unobtainium, meaning [Andy] would have to rig up his own fix. The easiest way to do that? Some LEDs made for car headlights, of course.

The maker of these scopes did produce a few for export to be used in rural areas all across the globe. These models had a 12 Volt input to allow the use of a car battery to light the bulb. A LED headlight also runs off 12 Volts, so it was easy for [Andy] to choose a light source for this repair.

A little bit of dremeling later, and [Andy] had the new bulb in place. An off the shelf PWM controller can vary the brightness of the LED, controlled with the original Bakelite knob. The completed scope can easily inspect human hairs, the dust mites, blood cells, and just about anything down to the limits of optical microscopy. Future plans for this microscope might include another project on hackaday.io, a stage automator that will allow the imaging of huge fields at very high magnification – not bad for something pulled out of the trash.

Home Theater, Tribute To A Friend

The Greg Williams Theater

Ever since purchasing this house, [Ed] Always wanted a to turn his living room into a home theater, but not just any old projector and a white wall would do. He wanted the whole experience. [Ed] Started with a slightly damaged 12′ wide 4:3 roll up projector screen, he removed the damaged bottom portion and built a static frame to support the now 16:9 screen. Before he could mount the screen, he needed to drywall over a window that was inconveniently located. With the screen now in place, [Ed] framed out the elevated seating platform and steps with some 2×12 topped off with plywood. Next, the carpet that was sitting directly below the platform and steps was removed and then secured on top. Down firing LED fixtures were installed in the steps, to give them that movie theater look and feel. To provide the image, a refurbished HD projector acquired from the Bay of Electronics, was installed in the loft above the living room.

With the theater functional, [Ed] turned his attention to theater decorations. Dimmable ambiance lighting fixtures, using laser cut acrylic and CNC routed starboard (a marine-grade polymer), were made to resemble a film strip. Next a coffee table was crafted out of an equipment road case filled with movie props. Studio logos were painted on the sides with the use of laser cut stencils, and with a glass top, gives the illusion it came off the set of a hollywood movie. The addition of a rebuilt movie poster marquee, movie posters, candy stand, pop corn machine, and with the existing soda fountain and the arcade in the loft, the home theater was almost complete.

In a fitting tribute, [Ed] designed and built a marquee sign to dedicate and name the theater after his cousin Greg, one of his closest friends and avid movie watcher, who had sadly passed away. Video overview of all the hard work after the break.

Continue reading “Home Theater, Tribute To A Friend”

Hackaday Retro Edition: The Compaq

It’s been a while since we’ve had any submissions to the Hackaday retro challenge, but [Philip]’s latest project more than makes up for it. He rescued the original 28 pound Compaq luggable and turned it into a work of art. He also managed to get it up on the Internet and pointed it at the Hackaday retro edition, making this one of the best retro submissions in recent memory.

[Philip] rescued this old luggable from the trash, and upon plugging it in and turning it on, heard a loud bang and cloud of smoke from the exploded tantalum caps. We’re guessing [Phil] doesn’t have a variac. After replacing all the broken components, fixing the mechanics of the hard drive, and replacing the two old 5 1/4″ floppy drives with a half-height 5 1/4 and 3 1/2 drives, [Phil] had this machine working again.

After a quick shuffle through his ‘obsolete technology box’, [Phil] found an old 3Com Ethernet card. This was a 16-bit card, but with a new driver and a TCP/IP stack for IBM compatibles it was actually pretty easy to get this old box on the Internet. Since [Phil] removed one of the 5 1/4 drives, he slightly modified a Linksys WRT54G router, wired in new front panel lights for the router, and cut a smoked gray acrylic panel. You can see it next to the drives in the picture above; the colored lights make this old luggable look even more retro, despite it being manufactured about 15 years before blue LEDs became commonplace.

You can check out all the repairs and modifications to this Compaq over on [Phil]’s site, and as always, we’re looking for people to load up the Hackaday retro edition on their old hardware.

A Nicely Designed Stereo Tube Amp

tube amp

Most of the work that [Ron] has done in the past with vacuum tubes and solid state electronics has been repair. At 59 years old, he finally put together his own stereo tube amplifier and we have to admit it definitely has an awesome look.

The platform is built around the well-known 6V6 beam-power tetrodes which are mostly used by major audio brands for their guitar amplifiers nowadays. The Dynaco 6V6 circuit based PCB was bought from China and minor changes were made to it. The amplifier uses one transformer to convert the US 120VAC into 240VAC and 9VAC, the first being rectified by a glassware PS-14 power supply while the later is converted regulated at 6.3V for the tube heaters. The output stage consists of two Edcor audio transformers (one for each channel) that converts the high voltage for its 8 ohms speakers. The home-made chassis provides proper grounding and as a result you can’t hear any background noise.

We are very curious to know if some our readers have been experimenting with glass tubes for audio applications. Please let us know your experience in the comments section below.

Restarting 3D Prints

Image of a 3D print which was restarted using a different material

If a 3D printer is interrupted during a print, it will usually result in a junk part. Resuming the print can be very difficult. A group of researchers at MIT have built an add-on for 3D printers that uses a laser scanner to evaluate the state of the print, and allows the printer to restart.

While this will allow you to salvage some partially competed prints, the interesting application is switching between materials. In the image above, the lower piece was printed in ABS. The print was interrupted to change materials, and the top cube was printed in PLA. This allows for prints to mix materials and colors.

The add-on was tested with the Solidoodle 3D printer, and can be built for about $60. It requires a laser mounted to the print head, and a low-cost webcam for performing the measurements. While the group will not be continuing work on this project, they plan to open source their work so others can continue where they’ve left off.

After the break, we have a video of the printer performing a scan and resuming a print.

Continue reading “Restarting 3D Prints”

Raspi Ambilight Integrated In A 19″ Rack Packs Lots Of Peripherals

raspi ambilight

Ambilight systems create light effects around your monitor that correspond to the video content you’re playing. [Sébastien] just build his (French translated to English, original here) and embedded all the elements in a 19 inch rack he bought from Farnell.

As most ambilight systems we’ve covered over the years the HDMI signal is first split in two, one being sent to his monitor while the other is converted into a S-Video signal. The latter is then captured with a STK1160 stick connected to a Raspberry Pi. A python script using the OpenCV library is in charge of extracting the frames pixels and figuring out what colors should be sent to the SPI connected LPD8806 LEDs. A nice web interface also allows to drive the LEDs from any platform connected to his local network. Finally, a standard HD44780 LCD and an infrared receiver are connected to the raspberry, allowing [Sébastien] to control and monitor his platform. Funny thing: he also had to use two relays to power cycle his HDMI splitter and converter as they often crash. You can check out a demonstration video from a previous revision after the break.

Continue reading “Raspi Ambilight Integrated In A 19″ Rack Packs Lots Of Peripherals”