A Lego Game Controller; Just For The Hack Of It

ExwDPUV

[StrangeMeadowlark] decided one day to create this badass Arduino-based gaming controller. Not for any particular reason, other than, why the heck not?!

It looks like a tiny Lego spaceship that has flown in from a nearby planet, zooming directly into the hands of an eager Earthling gamer. With buttons of silver, this device can play Portal 1 and 2, Garry’s Mod, Minecraft, and VisualBoy Advance. Although more work is still needed, the controller does the job; especially when playing Pokemon. It feels like a Gameboy interface, with a customizable outer frame.

Sticky, blue-tack holds a few wires in place. And, most of the materials are items that were found around the house. Like the gamepad buttons on top; they are ordinary tactile switches that can be extracted from simple electronics. And the Legos, which provide an easy way to build out the body console, rather than having to track down a 3D printer and learning AutoCAD.

Continue reading “A Lego Game Controller; Just For The Hack Of It”

A Dead Simple, Well Constructed FM Transmitter

[Angelo] is only 15, but that doesn’t mean his fabrication skills are limited to Lego and K’Nex. He’s built himself an amazingly well constructed FM transmitter that’s powerful enough to be received a quarter mile away.

The FM transmitter circuit itself is based off one of [Art Swan]’s builds, but instead of the solderless breadboard construction you would expect to find in a small demo circuit, [Angelo] went all the way, etching his own PCB and winding his own coil.

Using photosensitized copper clad board, [Angelo] laid out the circuit with Fritzing, etched a board, and went at it with a drill. The components found in the transmitter are pretty standard and with the exception of the trimmer cap and electret mic, can be picked up in the parts drawers of any Radio Shack. He gets bonus points for using a 1/4 – 20 bolt for winding the coil, too.

The power supply for the transmitter is a single 9V battery, the battery connector being salvaged from a dead 9V. Awesome work, and for someone so young, [Angelo] already seems to have a grasp of all the random, seemingly useless information that makes prototyping so much easier. Video below.

Continue reading “A Dead Simple, Well Constructed FM Transmitter”

Aerodynamics? Super Honey Badger Don’t Give A @#*^@!

honeybadger-rcplane

[Arron Bates] is a pro R/C Pilot from Australia. He’s spent the last few years chasing the dream of a fixed wing plane which could perform unlimited spins. After some promising starts with independently controlled wing spoilers, [Arron] went all in and created The Super Honey Badger. Super Honey Badger is a giant scale R/C plane with the tail of a helicopter and a soul of pure awesome.

Starting with a standard 87″ wingspan Extra 300 designed for 3D flight, [Arron] began hacking. The entire rear fuselage was removed and replaced with carbon fiber tubes. The standard Extra 300 tail assembly fit perfectly on the tubes. Between the abbreviated fuselage and the tail, [Arron] installed a tail rotor from an 800 size helicopter. A 1.25 kW brushless motor drives the tail rotor while a high-speed servo controls the pitch.

[Arron] debuted the plane at HuckFest 2013, and pulled off some amazing aerobatics. The tail rotor made 540 stall turn an easy trick to do – even with an airplane. Flat spins were a snap to enter, even from fast forward flight! Most of [Arron’s] maneuvers defy any attempt at naming them – just watch the videos after the break.

Sadly, Super Honey Badger was destroyed in May of 2014 due to a structural failure in the carbon tubes. [Arron] walked away without injury and isn’t giving up., He’s already dropping major hints about a new plane (facebook link).

Continue reading “Aerodynamics? Super Honey Badger Don’t Give A @#*^@!”

Developed On Hackaday: Beta Testers, Animation And Assembly Videos

3 mooltipass versions

We’re pretty sure that most of our readers already know it by now, but we’ll tell you anyway: the Hackaday community (writers and readers) is currently developing an offline password keeper, the Mooltipass. A month ago we published our first demonstration video and since then the development team has been fairly busy at work.

First things first: we heard (well, read) the comments you left in our previous articles and decided to make a small animation video that will hopefully explain why having an offline password keeper is a good thing. We welcome you to have a look at our script draft and let us know what you think. We updated our GitHub readme and more importantly our FAQs, so feel free to tell us if there are still some questions you have that we didn’t answer. We finally found a short but yet interesting paper about software based password keepers possible security flaws.

Secondly, a little more than 20 prototypes have successfully been assembled and some beta testers actually already received them. As they financially contributed to their units we offered them the possibility to pick a blue, green, yellow or white OLED screen (see picture above). We therefore expect things to gain speed as we’ll have users (or rather bosses) pushing us to improve our current platform and implement much needed features.

Finally, as I figured some of our readers may be interested, I made a quick video of the prototype assembly process (embedded below). It is still a little sketchy and a few changes will be made to make it simpler for production. We expect these next weeks to be full of interesting events as our beta testers / Hackaday readers will be able to judge the work we’ve been doing for so long. We highly recommend you to subscribe to our official Google group to stay updated with our adventures.

http://www.youtube.com/watch?v=xTOw-sVSXzQ

A Real Raspberry Pi Clone (Not ‘Inspired By’)

odroid A few years ago, Broadcom had a pretty nice chip – the BCM2835 – that could do 1080 video, had fairly powerful graphics performance, run a *nix at a good click, and was fairly cheap. A Broadcom employee thought, “why don’t we build an educational computer with this” and the Raspberry Pi was born. Since then, Broadcom has kept that chip to themselves, funneling all of them into what has become a very vibrant platform for education, tinkering, and any other project that could use a small Linux board. Recently, Broadcom has started to sell the BCM2835 to anyone who has the cash and from the looks of it, real Raspberry Pi clones are starting to make their way into the marketplace.

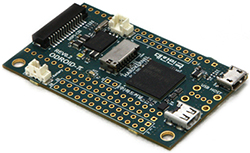
Other Raspberry Pi clone boards out there like the Banana Pi and the HummingBoard don’t use the same BCM2835 found in the Raspi and the new Odroid. The new board also has the same 26 pin GPIO expansion socket, and runs the same binaries as the Raspberry P;. It is a clone in every sense, with a slightly different form factor geared towards very tiny, portable, and battery-powered use cases.

Unlike the official Raspberry Pi Compute Module, the Odroid isn’t meant to be used as a system on module, shoved into any product that needs a fast-ish ARM core without needing engineers to actually design a circuit with an ARM. The Odroid is a cut-down, extremely minimalist version of the Raspi, perfect for any project where space is at a premium.

There are a few interesting features included on the Odroid: there’s an on-board battery connector, a real-time clock on the board, and more of the BCM2835 GPIOs are exposed (although not the same ones as the upgraded RPi Model B+). There’s no Ethernet, but odds are if you’re building something that’s battery-powered, you won’t need that anyway.

As far as price goes, you can pick one of these Odroids up for $30 USD, with $9 shipping from South Korea. That’s pretty comparable to the price of a real Raspberry Pi, but if the features in the Odroid are worth it to you, it might be a worthwhile clone.

Call For Proposals: Hackaday 10th Anniversary

call-for-proposals

On October 4th Hackaday is celebrating our 10th anniversary. We’ll be hosting a live event in Pasadena that day which includes some hardware hacking, some workshops, a mini-conference, and a party. Details to follow on most of this, but we are putting out a call for proposals to those who would like to present a talk at the mini-conference. We plan to record the talks, workshops, and events so that those unable to attend can also enjoy the festivities.

The mini-conference will be about 3 hours long on the afternoon of Saturday, 10/4. We are looking for approximately four talks on topics interesting to the Hackaday community. These will be no more than 20-minutes in length with a short Q&A after.

In addition to the talks we will invite a limited number of hackers to give 7-minute lightning presentations on hardware projects they bring with them to the event.

Talk Proposals

Please email your proposal of no more than 350 words to conference -at- hackaday.com. Preference will be given to speakers who are able to be at the event in person. Exceptional presentations given via video-chat will also be considered. Talk proposals should be submitted before Friday, August 22nd. Please specify whether you will present in person or via video.

Hardware Project Lightning Talks

Please email your proposal of no more than 350 words to conference -at- hackaday.com. Your proposal should mention what stage of development/operation your hardware is currently in. Lighting talks must be presented in person.


Adding Bluetooth And A Lightning Connector To Beats Pro Headphones

Beats

Not wanting to wait for Apple to step up their game and complete their purchase of Beats headphones, [Carnivore] decided he wanted his own pair of Apple-compatible Beats cans with Bluetooth. He created something that will probably be for sale in the Apple store come Christmas: a pair of Beats Pro headphones with Bluetooth and a Lightning connector for charging.

[Carnivore] liked the sound of his Beats Pro headphones but hated the wires. After disassembling the headphones, he carefully rewired the speakers with smaller gauge wire, added a small Bluetooth module and battery, and sealed everything back up.

There are a few interesting bits to this build – by getting rid of all external wires, [Carnivore] was left with a few holes in the headphones. These were a perfect place to add a 3D printed mount for the power button and the Lightning adapter taken from an Apple Lightning extension connector.

Thanks [Tony] for the tip!