A MIPI DSI Display Shield/HDMI Adapter

MIPI DSI shield

[Tomasz] tipped us about the well documented MIPI DSI Display Shield / HDMI Adapter he put on hackaday.io. The Display Serial Interface (DSI) is a high speed packet-based interface for delivering video data to recent LCD/OLED displays. It uses several differential data lanes which frequencies may reach 1 GHz depending on the resolution and frame rate required.

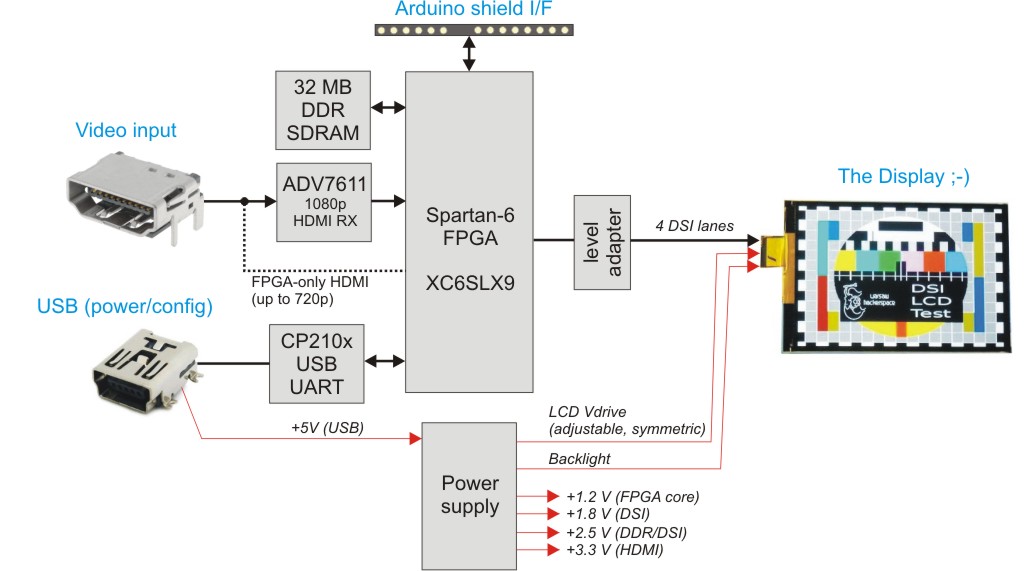
The board explained in the above diagram therefore allows any HDMI content to be played on the DSI-enabled scrap displays you may have lying around. It includes a 32MB DDR memory which serves as a frame buffer, so your “slow” Arduino platform may have enough time to upload the picture you want to display.

The CP2103 does the USB to UART conversion, allowing your computer to configure the display adapter internal settings. The platform is based around the XC6SLX9 Spartan-6 FPGA and all the source code may be downloaded from the official GitHub repository, along with the schematics and gerbers. After the break we’ve embedded a demonstration video in which a Raspi drives an iPhone 4 LCD.

Continue reading “A MIPI DSI Display Shield/HDMI Adapter”

Developed On Hackaday: Beta Testers And Automated Testing

Mooltipass with Holder

At Hackaday we believe that your encrypted vault containing your credentials shouldn’t be on a device running several (untrusted) applications at the same time. This is why many contributors and beta testers from all over the globe are currently working on an offline password keeper, aka the Mooltipass.

Today we’re more than happy to report that all of our 20 beta testers started actively testing our device as they received the v0.1 hex file from the development team. Some of them had actually already started a few days before, as they didn’t mind compiling our source files located on our github repository and using our graphics generation tools. We are therefore expecting (hopefully not) many bug reports and ways to improve our device. To automatize website compatibility testing, our beta tester [Erik] even developed a java based tool that will automatically report non-working pages found inside a user generated list. You may head here to watch a demonstration video.

An Open Hardware Platform For ECG, EEG And Other Measurements

[Eric] tipped us about the OpenHarwareExG project which goal is to build a device that allows the creation of electrophysiological signal processing applications. By the latter they mean electrocardiography (ECG, activity of the heart), electroencephalography (EEG, signals on the scalp), electromyography (EMG, skeletal muscles activity), electronystagmography and electrooculography (ENG & EOG, eye movements) monitoring projects. As you can guess these signals are particularly hard to measure due to their small amplitude and therefore susceptibility to electrical noise.

The ADS1299 8-channel 24-bit analog front end used in this platform is actually electrically isolated from the rest of the circuit so the USB connection wouldn’t perturb measurements. An Arduino-compatible ATSAM3X microcontroller is used and all the board is “DIY compatible” as all parts can be sourced in small quantities and soldered by hand. Even the case is open source, being laser cut from acrylic.

Head to the project’s website to download all the source files and see a quick video of the system in action.

Interested in measuring the body’s potential? Check out an ECG that’s nice enough to let you know you have died, or this Android based wireless setup.


Reverse Engineering A GPS Watch To Upload Custom Firmware


Sometimes GPS watches are too good to be left with their stock firmware. [Renaud] opened his Kalenji 300 GPS watch, reverse engineered it in order to upload his own custom firmware.

The first step was to sniff the serial traffic between the PC and the microcontroller when upgrading firmware to understand the protocol and commands used. [Renaud] then opened the watch, figured out what the different test points and components were. He used his buspirate with OpenOCD to extract the existing STM32F103 firmware. The firmware helped him find the proper value to store in a dedicated register for the boot loader to start.

By looking at the disassembly code he also found the SPI LCD initialization sequence and discovered that it uses a controller similar to the ST7571. He finally compiled his own program which uses the u8glib graphics library. Follow us after the break for the demonstration video.

Continue reading “Reverse Engineering A GPS Watch To Upload Custom Firmware”

An Open Source 1MHz Arbitrary Waveform Generator With An Awesome UI

1MHZ DDS


[Herp] just shared a nice 1MHz Arbitrary Waveform Generator (right click -> translate to English as google translation links don’t work) with a well designed user interface. His platform is based around a PIC32, a TFT module with its touchscreen and the 75MHz AD9834 Direct Digital Synthesizer (DDS). Of course the latter could generate signals with frequencies up to 37.5MHz… but that’s only if two output points are good enough for you.

As you can see in the video embedded below, the ‘tiny dds’ can generate many different kinds of periodic signals and even ones that are directly drawn on the touchscreen. The offset and signal amplitude can be adjusted using several operational amplifiers after the DDS ouput and a separate SMA TTL output is available to use a PIC32 PWM signal. The platform can read WAV audio files stored on microSD cards and also has an analog input for signal monitoring. Follow us after the break for the video.

Continue reading “An Open Source 1MHz Arbitrary Waveform Generator With An Awesome UI”

Reverse Engineering A NAND Flash Device Management Algorithm

unsoldered flash chip

Put your hand under you chin as here comes a 6 months long jaw-dropping reverse engineering work: getting the data back from a (not so) broken SD card. As you can guess from the picture above, [Joshua]’s first step was to desolder the card’s Flash chip as the tear-down revealed that only the integrated SD-to-NAND Flash controller was damaged. The flash was then soldered on a breadboard so it could be connected to a Digilent Nexys-2 FPGA board. [Joshua] managed to find a similar Flash datasheet, checked that his wire-made bus was reliable and generated two 12GiB dump files on his computer.

In order to extract meaningful data from the dumps he first had to understand how SD-to-NAND controllers work. In his great write-up he provides us with a background of the Flash technology, so our readers can better understand the challenges we face with today’s chips. As flash memories integrate more storage space while keeping the same size, they become less reliable and have nifty problems that should be taken care of. Controllers therefore have to perform data whitening (so neighboring blocks of data don’t have similar content), spread data writes uniformly around the flash (so physical blocks have the same life expectancy) and finally support error correcting codes (so damaged bits can still be recovered). We’ll let our users imagine how complex reverse engineering the implementation of such techniques is when you don’t know anything about the controller. [Joshua] therefore had to do a lot of research, perform a lot of statistical analysis on the data he extracted and when nothing else was possible, use bruteforce…

Sniffing NRF24L01+ Traffic With Wireshark

Wireshark trace

We’re sure that some of our readers are familiar with the difficult task that debugging/sniffing nRF24L01+ communications can be. Well, [Ivo] developed a sniffing platform based on an Arduino Uno, a single nRF24L01+ module and a computer running the popular network protocol analyzer Wireshark (part1, part2, part3 of his write-up).

As these very cheap modules don’t include a promiscuous mode to listen to all frames being sent on a particular channel, [Ivo] uses for his application a variation of [Travis Goodspeed]’s technique to sniff Enhance Shockburst messages. In short, it consists in setting a shorter than usual address, setting a fix payload length and deactivating the CRC feature. The Arduino Uno connected to the nRF24L01+ is therefore in charge of forwarding the sniffed frames to the computer. An application that [Ivo] wrote parses the received data and forwards it to wireshark, on which can be set various filters to only display the information you’re interested in.