Robot Performing A Tightrope Act

This robot is able walk the tightrope (translated). Well, it’s more of a shuffle than a walk, but still a lot better than we could do.

In the video after the break you can see the bot starting on the platform to the right. As it steps out onto the wire (which rides in a groove on the bottom of its foot) the robot spreads its arms to help maintain balance. When the other foot leaves the platform that is the last stride we will see until it reaches the other side. The rest of the act consists of sliding the feet a little bit at a time until it gets all the way across.

[Dr. Guero] has been working on at least one other balancer as well. Also embedded after the break is a robot riding a bicycle. It actually puts a foot down when stopped, and gives a stuttering push-off to get going again. This guy would be right at home riding past you in the hallways of the Death Star.

Continue reading “Robot Performing A Tightrope Act”

APRS IGate Built Using A Raspberry Pi

The hardware seen above is used to bridge a local RF radio network to the APRS-IS network. The APRS-IS is an Internet Service that uses a web connection to communicate between APRS networks in different parts of the world. The Raspberry Pi is perfect for this application because of its ability to connect to a network, and its native use of Linux.

On the software side the majority of the work is done by a Python script. It is responsible for setting up and monitoring a connection with an APRS-IS server. To connect to the handheld radio unit a USB sound card was used. The Multimon package is used to send and receive audio packets through this hardware.

[Sunny] has a few upgrades planned for the system. The device needs to report its location to the APRS-IS server and the plan is to add functionality that will look of the WiFi AP’s location automatically. It may also be possible to get rid of the radio all together and use a DVB dongle as a software defined radio.

Red-bullet: Cooking Stove From Cans, Fueled By Gas Additive

A couple of beverage containers and a little bit of fuel additive bring together this aluminum can stove project. When lit it shoots flames out each of those holes around the top to heat the vessel resting upon it. [Peter Geiger] calls it the Red-Bullet because one of the stove pieces started as a Red Bull can and the other piece was a Coors (aka silver bullet).

This is basically an alcohol stove. We remember seeing a very well designed version of the penny stove several years back. This is different as it uses a side burner so the stove itself functions as the kettle stand. [Peter] started by cutting the Red Bull can just a bit taller than the final height. He then inserted the top portion of one of those aluminum beer cans that are shaped like glass bottles. The neck was lopped off and inverted. It is joined with the other can base using JB weld and by rolling the aluminum in on itself. After that has dried the holes are added and it’s filled with HEET from a yellow bottle. This gasoline additive is meant to sequester water and keep your gas line from freezing. The yellow bottle is mainly alcohol, the red is methanol so make sure you use the right one!

The Inner Workings Of Servo Motors

Servos seem to be the go-to option when adding motors to hobby projects. They’re easy to hack for continuous rotation for use in a robot, but with the control board intact they are fairly accurate for position-based applications. But do you know how the hardware actually works? [Rue Mohr] recently published an article that looks at the inner world of the servo motor.

As you know, these motors use a voltage, ground, and signal connection for control. The position of the horn (the wheel seen on the servos above) is dependent on that control signal. The duty cycle of a 20 ms pulse decides this. Inside the housing is a control board capable of measuring this signal. It’s got a chip that monitors the incoming PWM pulses, but that’s only half of the equation. That controller also needs feedback from the horn to know if its position is correct or needs to be changed. Integrated with the gear box that connects the motor to the horn is a potentiometer. It’s resistance changes as the horn turns. Knowing this, it is possible to fine tune a servo by altering that resistance measurement.

27 MHz Transmitter/receiver Pair Made With 555 Timers

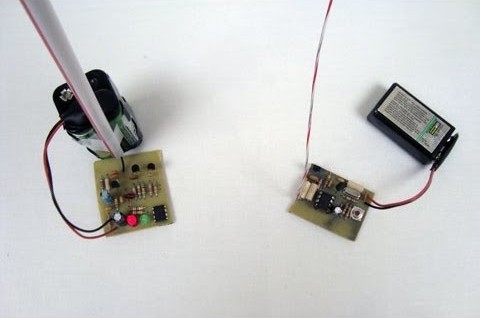
Get your feet wet with radio frequency transmitters and receivers by working your way through this pair of tutorials. [Chris] built the hardware around a couple of 555 timers so you don’t need to worry about any microcontroller programming. He started by building the transmitter and finished by constructing a receiver.

Apparently the 27 MHz band is okay to work with in most countries as long as your hardware stays below a certain power threshold. The carrier frequency is generated by the transmitter with the help of a 27.145 MHz crystal. The signal is picked up by the receiver which uses a hand-wrapped inductor made using an AL=25 Toroid Core. We’d say these are the parts that will be the hardest to find without putting in an order from a distributor. But the rest of the build just uses a couple 555 timer chips and passive components, all of which will be easy to find. The video after the break shows the project used to receive a Morse-code-style message entered with a push button. It would be fun to interface this with your microcontroller of choice and implement your own one-way error correction scheme.

Open Source Finger Prosthesis

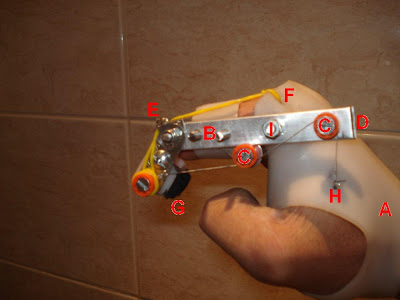
Here’s a project that is striving to develop a set of open source finger prosthesis. They are aimed at patients who have partial amputations. This means that part of the digit remains and can be used as the motive force behind a well designed mechanical prosthesis like you see above. This uses levers, pulleys, and wire to move a gripper in much the same way the pad of a pointer finger works. There’s even a video (embedded after the jump) which shows it being used to grab a toothpick from a dispenser… pretty impressive. This is similar to the prosthesis we saw in August which managed to work without pulleys and wire.

This isn’t limited to fingers. The same posts that shows off the unit seen above also includes a prosthetic thumb. The leverage for that design is provided by a woven nylon strap which attaches to a bracelet on the wrist.

Continue reading “Open Source Finger Prosthesis”

Hackaday Links: October 18, 2012

Capacitive touch plants

Here’s a proof of concept for using plants as a capacitive touch sensor. The sensor is simply a hunk of double-sided copper clad board attached to a microcontroller. But it seems to be able to sense what part of the plant is being touched. [Thanks Fabien]

Adding wireless charging to a Nokia N900

This hack is quite common, but it’s still fun to see what hardware is being outfitted with an inductive charger. This time it’s a Nokia N900 that’s ditching the charging cables.

Wii carrying suitcase from a plastic tackle box

This Wii carrying case (translated) looks great and cost just a few bucks. It started as a tackle box for carrying around your fishing lures. But a bit of creative cutting and there’s a place for everything.

Browser based schematic and board layout

There’s a new kid on the block when it comes to circuit design. Circuits.io offers in-brower schematic design and board artwork layout. [Thanks ADIDAIllinie (and a few others)]

Bender-o-lantern

Halloween rapidly approaches and we hope that [Tim’s] carving of Bender in a pumpkin will inspire you to send in your own Halloween projects.