Wild Lego-Bot Pronks About Your Patio

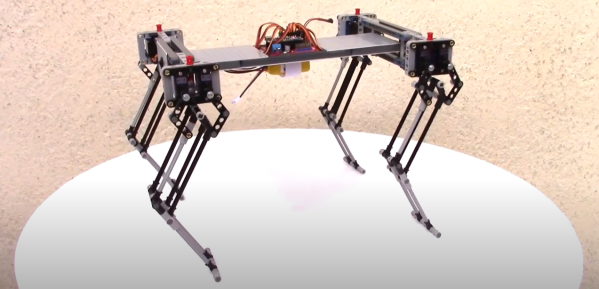
Legged robots span all sorts of shapes and sizes. From the paradigm-setting quadrupeds built from a pit-crew of grad students to the Kickstarter canines that are sure to entertain your junior hackers, the entry point is far and wide. Not one to simply watch from the sidelines, though, [Oracid] wanted to get in on the quadruped-building fun and take us all with him. The result is 5BQE2, a spry budget quadruped that can pronk around the patio at a proper 1 meter-per-second clip.

Without a tether, weight becomes a premium for getting such a creature to move around at a respectable rate. Part of what makes that possible is [Oracid’s] lightweight legs. Designing the legs around a five-bar linkage tucks the otherwise-heavy actuators out of the leg and into the body, resulting in a limb that’s capable of faster movement. What’s more, 5BQE2 is made from the LEGO plastic building bricks of our heydays. And with a full bill-of-materials, we’re just about ready to head over to our parents’ garage and dust off those parts for a second life.

For some action shots of 5BQE2, have a look at the video after the break. And since no set would be complete without the building instructions, stay tuned through the full video to walk through the assembly process step-by-step.

Here at Hackaday, we’re certainly no stranger to walking automatons, but not all robots use their legs for walking. For a trip down memory lane, have a look at [Carl Bugeja’s] buzzing Vibro-bots and UC Berkeley’s leaping Salto.

Continue reading “Wild Lego-Bot Pronks About Your Patio”

Capstan Drive Is Pulling The Strings On This Dynamic Quadruped

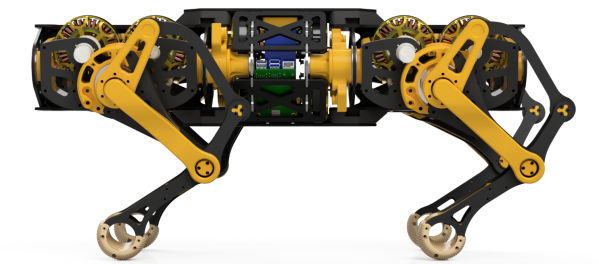
When it comes to legged robots, it’s easy to think that the complexity and machining costs would keep these creatures far away from becoming anyone’s garage hobby. But, through a series of clever design choices, [Damian Lickindorf] has found a way to beat the odds and give life to Stanley, a low-cost, dynamic quadruped with some serious kick!

As if building a working legged robot weren’t already a tricky task, [Damian] has made some classy design choices to keep the price low and reduce fabrication complexity without sacrificing performance. Keeping up with the latest trend in Quasi-Direct Drive legged robots that started with the MIT Mini Cheetah, [Damian] constructed a small transmission with a gear reduction under 1:9. This choice slightly reduces the amount of heat produced by operating the motor at low-speeds with high torque without sacrificing too much control bandwidth (think: “leg responsiveness”).

Unlike the Cheetah, though, which uses a planetary gearbox, [Damian] opts for a capstan drive, a cable-driven transmission that’s both backlash free and backdriveable: two must-haves for force-sensitive dynamic legged robots. For legs, he’s opting for 2d machined FR4 (think: circuit board material). And for motors, he’s chosen a set of brushless motors with a large gap radius and driven by Moteus Drivers. The result is high fidelity, dynamic build that’s a fraction of the cost of some of the creatures we’re seeing emerge from academic research labs.

If you’re looking to feast your eyes on some action shots, look no further than [Damian’s] YouTube and Instagram presence. And if you’re looking to follow the project, have a look at the Hackaday.io project. While we’re eager to see the project continue to unfold, we’re thrilled by how far it’s come. In the meantime, be sure to take a look at one of the project’s inspirations: the Mjbots Quad A0.

Finally, since we’ve not seen capstan drives much on Hackaday, if you’re curious about these mechanisms and can get past the paywall, these two research papers might be a good place to dig deeper.

Continue reading “Capstan Drive Is Pulling The Strings On This Dynamic Quadruped”

Custom Caliper Tracks For When You’re Going The Distance

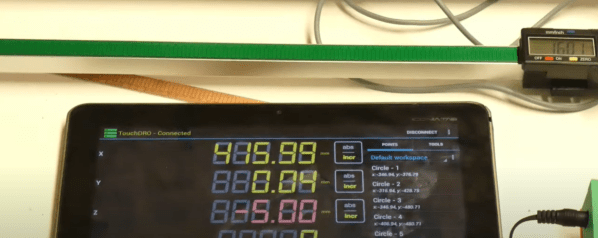
The working principle of digital calipers is mysterious enough that we’d never think to dismantle, much less improve them, right? Well, think again, as [Limi DIY] retrofits the processing element onto a custom track, extending the calipers measurement distance to a whopping 650 mm. Combined with a prior project to extract the measurement data, the result makes for a working multi-axis digital readout, a handy device for machine tools like a manual lathe or milling machine.

Digital calipers operate on the principle of measuring an array of variable capacitors. If we scratch our heads and look back at our physics notes, we’ll recall that the capacitance between two parallel conductive plates is linearly proportional to the surface area. By fixing one dimension of both plates and by sliding one plate over the other, we effectively change the area, giving ourselves a simple linear displacement sensor! (There are some classy error-correcting techniques too, and this [PDF] is a great place to look for more details.)

The theory takeaway is that this array of parallel plates can be embedded directly into a printed circuit board. We just need to know the dimensions. After some close measurement work, [Limi DIY] extracted the crucial measurements and fabbed a PCB with the pattern duplicated over 650 mm. After retrofitting the original processing element onto this new track, they had a working measurement device that’s far longer than the original!

If you’ve ever been tempted to disassemble your calipers but too nervous to bite off the investment, now’s your chance to follow along as [Lima DIY] demonstrates the gratuitous disassembly process for you in video format. And the fruits of their labor is also captured on a project post that includes the key dimensions if you’re looking to do the same thing.

If you’re looking for other ways to improve your calipers, why not start by giving them a major battery life boost.

Thanks to [absd] via [Jubilee Discord] for the tip!

Continue reading “Custom Caliper Tracks For When You’re Going The Distance”

Ball Balancing Wheel Puts A Spin On Inverted Pendulums

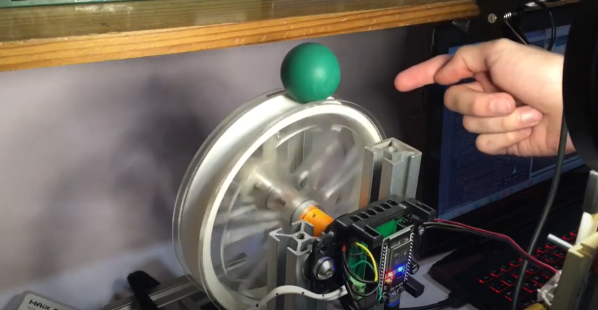
If you march sufficiently deep into the wilderness of control theory, you’ll no doubt encounter the inverted pendulum problem. These balancing acts have emerged with a number of variants over the years, but just because it’s been done before doesn’t mean there’s no space for something new. Here, [David Gonzalez], has taken this classic problem and given it an original own spin–literally–where the balancing act is now a ball balanced precariously upon a spinning wheel. (Video, embedded below.) Mix in a little computer vision for sensing, a dash of brushless motor control, a bit of math, and you have yourself a closed-loop system that’s bound to turn a few heads.

[David’s] implementation is a healthy mix of classic control theory with some modern electronics. From the theory bucket, there’s a state-space controller to drive both the angle and angular velocity of the ball to zero. The “state” is a combination of four terms: the ball angle, the ball’s angular velocity, the wheel angle, and the wheel’s angular velocity. [David] weights each of these terms and sums them together to create an input value to adjust the motor velocity driving the wheel and balance the ball.

From the electronics bin, [David] opted for an ESP32 running Arduino, the custom Janus Brushless Motor Controller running SimpleFOC, and a Maix Bit Microcontroller with an added camera running MicroPython to compute the ball angle. Finally, if you’re curious to dig into the source code, [David] has kindly posted the firmware on Github.

We love seeing folks mix a bit of control theory into an amalgamation of familiar electronics. And as both precision sensors and motor controllers continue to improve, we’re excited to see how the landscape of projects changes yet again. Hungry for more folks closing the loop on unstable systems? Look no further than [UFactory’s] ball balancing robot and [Gear Down for What’s] two wheeled speedster.

Continue reading “Ball Balancing Wheel Puts A Spin On Inverted Pendulums”

SimpleFOC Demystifies Precision BLDC Motor Control

Brushless DC (BLDC) motors are standard fare in low-precision, speedy RC applications. The control schemes needed to run them slowly or precisely go deep into motor theory and might put these motors out of reach for your next homebrew robot project. [Antun Skuric] and crew aim to change just that. They’ve taken the field-oriented control algorithm and encapsulated it into a compact Arduino library, added a host of examples, and minted a stackable BLDC motor control shield to boot. The sum of their efforts is captured into the SimpleFOC Project in the aim of bringing precision BLDC control to a wide community of new hackers.

Field-Oriented Control is a BLDC motor control scheme that involves using a microprocessor to control the stator winding current in such a way that it always applies torque to the rotor. Doing so requires that your processor measure both motor current (think: shunt resistor) and rotor position (think: encoder). Implementing the algorithm, though, can get a bit tricky since it touches bits of linear algebra, motor physics, and control theory. But that’s the magic behind SimpleFOC. With the library at your fingertips, you don’t have to! And with that, the hardest part of brushless motor control has been made simpler with a solution that’s almost plug-in-and-play.

SimpleFOC has been implemented to extend to a variety of possible implementations. While you can certainly design your own control board, you can also start with the SimpleFOC motor shield for a single motor pulling up to 5 A of current. From there, you’ve got a pretty wide range of micros to choose from as the library has been extended to work on the Arduino, Teensy, STM32, and a few other microcontroller families. For implementation details, theory, and setup, there’s a healthy set of documentation to reference. And if you’re looking to share your project or ask questions, you can pop into the community forum for some high-fives and tips. Best of all, the source code has been offered for your enjoyment under a generous MIT License.

While the project kicked off last year, it’s undergoing continuous improvements including added support for current sensing and torque control in addition to position control. With a healthy community emerging around the project, we’ll keep our eyes peeled for more projects that build off of this fantastic reference design.

If BLDC motor control has your interest piqued, have a look through our archive for other BLDC motor control projects, including motor/controller hybrids, anti-cogging control schemes, and other low-speed position controllers. And if you’re up for a real challenge, why not 3D print the motor too?

Continue reading “SimpleFOC Demystifies Precision BLDC Motor Control”

A Pi USB Webcam That Was Born To Boot Quick

In the age of business Zoom rooms, having a crisp webcam is key for introducing fellow executives to your pet cat. Unfortunately, quality webcams are out of stock and building your own is out of the question. Or is it? [Dave Hunt] thought otherwise and cooked up the idea of using the Raspberry Pi’s USB on-the-go mode to stream video camera data over USB. [Huan Trong] then took it one step further, reimagining the project as a bootable system image. The result is showmewebcam, a Raspberry Pi image that transforms your Pi with an attached HQ camera module into a quality usb camera that boots in under 5 seconds.

Some of the project offerings on showmewebcam are truly stunning. Not only does the setup boot quickly, the current version requires a mere 64MB micro SD card for operations. What’s more, the project exposes camera settings like brightness, contrast, etc. via UVC, a standard USB protocol such that they can be controlled via typical software applications.

What’s truly exciting about this project is to see it take shape as different people tackle the same concept whilst referencing the prior milestone. [Dave Hunt] landed early to the scene with a blog post that established that the Pi could indeed be used as a USB webcam. [Huang Truong] built on that starting point, maturing it into an uploadable system image with notes to follow. Now, with showmewebcam on Github, it has seen contributions from over a dozen folks. Its performance specs are gradually improving. And it has a detailed wiki complete with suggested lenses and user-contributed cases to make your first webcam building experience a success.

And that’s not to say that others aren’t tackling this project from their own perspective either! For an alternate encapsulated solution, have a look at [Jeff Geerling’s] take on Pi-based USB webcams.


Continue reading “A Pi USB Webcam That Was Born To Boot Quick”

Toolchanging Printers Get A Nozzle Hanky Like No Other

When it comes to toolchanging 3D printers, idle nozzles tend to drool. Cleaning out that nozzle goo, though, is critical before switching them into use. And since switching nozzles can happen hundreds of timesĀ per print, having a rock-solid cleaning solution is key to making crisp clean parts. [Kevin Mardirossian] wasn’t too thrilled with the existing solutions for cleaning, so he developed the Pebble Wiper, a production worthy nozzle wicking widget that’s wicked away nozzles thousands of times flawlessly.

With a little inspiration from [BigBrain3D’s] retractable purge mechanism, [Kevin] is first purging tools onto a brass brad. Rather than have filament extrude into free space, it collects into a small bloblike “pebble” that cools quickly into a controlled shape. From here, after one quick flick with a servo arm and a small wipe with a silicone basting brush, the nozzle is ready to use. The setup might sound simple, but it’s the result of thousands and thousands of tests with the goal of letting no residual ooze attach itself to the actual part being printed. And that’s after [Kevin] put the time into scratch-building his own toolchanging 3D printer to test it on first. Finally, he’s kindly made the files available online on Github for other hackers’ tinkering and mischief.

So how well does it work? Judging by the results he’s shared, we think spectacularly. Since adopting it, he’s dropped any sacrificial printing artefacts on the bed entirely and been able to consistently pull off stunning multimaterial prints flawlessly with no signs of residual nozzle drool. While toolchanging systems have been great platforms for hacking and exploration, [Kevin’s] Pebble Wiper takes these machines one step closer at hitting “production-level” of reliability that minimizes waste. And who knows? Maybe all those pebbles can be sized to be ground up, remade into filament, and respooled back into usable filament?

Continue reading “Toolchanging Printers Get A Nozzle Hanky Like No Other”