Vintage Test Equipment Addiction Justified

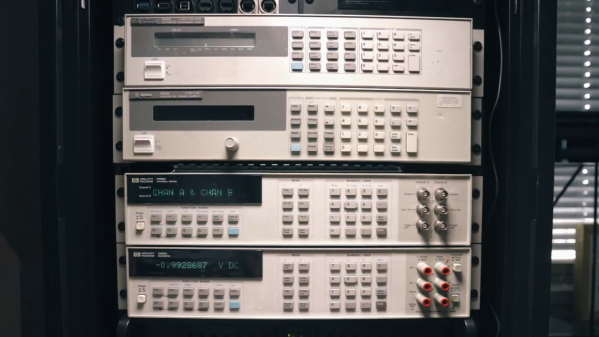
Recore 3D printer board developer [Elias Bakken] has posted about the automatic test procedure he developed using a stack-up of four (at least) pieces of vintage HP test equipment. In addition, his test jig and test philosophy is quite interesting.

Besides making a bed-of-nails test jig, he also designed a relay multiplexing board to that selects one of the 23 different voltages for measurement. We like his selection of mechanically latching relays in this application — not only does it save power, but it doesn’t subject the test board to any magnetic fields (except when switching state).

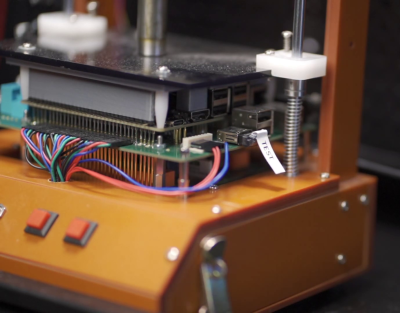
In [Elias]’s setup, the unit under test (UUT) actually orchestrates the testing process itself. This isn’t as crazy as it might sound. The processor is highly integrated in one package plus external DRAM. If the CPUs boot up at all, and pass simple self-test routines, there’s no reason not to utilize the on-board processor as the main test control computer. This might be a questionable decision if your processor was really small with constrained resources and connectivity. But in the case of Recore, the processor is a four-core ARM A53 SoC running Debian Linux — an arrangement that itself could well serve as an automated test computer in other projects.

In the video down below, [Elias] walks us through the basic tests, and then focuses on the heart of the Recore board tests: calibrating the input signal conditioning circuits. Instead of using very expensive precision resistors, [Elias] selected more economical 1% resistors to use in the preamp circuitry. The tradeoff here is the need to calibrate each channel, perhaps at multiple temperature points. This is a situation where using a test jig, automated test scripts, and and stack of programmable test equipment really shines.

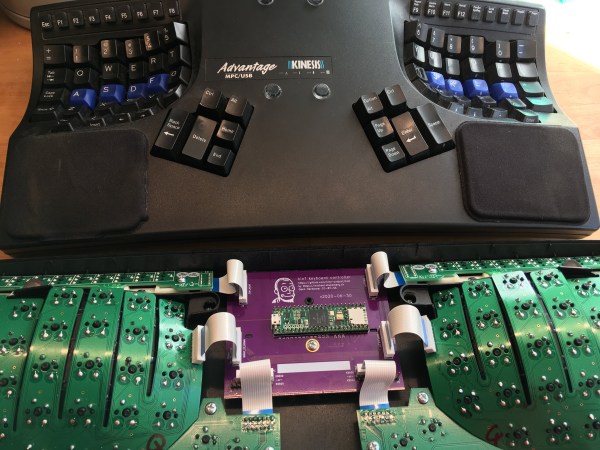
[Elias] is still pondering some issues he found trying to calibrate thermocouples, so his adventure is not quite over yet. If you are wondering what Recore is, check out this article from back in June. Have you ever used the microprocessor on a circuit board to test itself, either standalone or in conjunction with an external jig? Let us know in the comments below.

Continue reading “Vintage Test Equipment Addiction Justified”

Raspberry Pi Pico Used As A Transputer

You can’t fake that feeling when a $4 microcontroller dev board can stand in as cutting-edge 1980s technology. Such is the case with the working transputer that [Amen] has built using a Raspberry Pi Pico.

For a thorough overview of the transputer you should check out [Jenny List’s] longer article on the topic but boiled down we’re talking about a chip architecture mostly forgotten in time. Targetting parallel computing, each transputer chip has four serial communication links for connecting to other transputers. [Amen] has wanted to play with the architecture since its inception. It was expensive back then and today, finding multiple transputers is both difficult and costly. However, the RP2040 chip found on the Raspberry Pi Pico struck him as the perfect way to emulate the transputer design.

The RP2040 chip on the Pico board has two programmable input/output blocks (PIOs), each with four state machines in them. That matches up perfectly with the four transputer links (each is bi-directional so you need eight state machines). Furthermore, the link speed is spec’d at 10 MHz which is well within the Pico’s capabilities, and since the RP2040 runs at 133 MHz, it’s conceivable that an emulated core can get close to the 20 MHz top speed of the original transputers.

Bringing up the hardware has been a success. To see what’s actually going on, [Amen] sourced some link adapter chips (IMSC011), interfacing them through an Arduino Mega to a computer to use the keyboard and display. The transputer architecture allows code to be loaded via a ROM, or through the links. The latter is what’s running now. Future plans are to figure out a better system to compile code, as right now the only way is by running the original INMOS compiler on DOS in a VM.

Listen to [Amen] explain the project in the first of a (so far) six video series. You can find the links to the rest of those videos on his YouTube channel.

Continue reading “Raspberry Pi Pico Used As A Transputer”

Kinesis + Teensy = QMK Advantage Over Your Keyboard

Back in 2013, [Michael Stapelberg] created what is lovingly referred to as the Stapelberg controller: a replacement keyboard controller for the original Kinesis Advantage, the decades-old darling of the ergonomic clacking world. Whether you’re building a new keeb, you’ve got a broken Kinesis, or you simply want to run QMK on the thing and don’t mind getting your hands dirty, there’s a new Stapelberg controller on the block. It’s called the kinT, for Kinesis + Teensy.

[Michael] built kinT in response to the Advantage 2, which came along in 2017 and changed the way the thumb clusters connect to the main board from a soldered cable to an FPC connector. Whereas the original Stapelberg controller was built in Eagle, this one was done in KiCad and is open-source, along with the firmware. You can use a Teensy 4 with this board but if you don’t have one, don’t worry — kinT is backwards-compatible with pretty much every Teensy, and it will even work on the original Advantage.

Are you on the fence about going full ergo? Check out my in-depth review of the original Kinesis Advantage I got that’s almost 20 years old and still clacking along like new. But don’t wait for a repetitive stress injury to go full ergo. Trust me.

Custom Caliper Tracks For When You’re Going The Distance

The working principle of digital calipers is mysterious enough that we’d never think to dismantle, much less improve them, right? Well, think again, as [Limi DIY] retrofits the processing element onto a custom track, extending the calipers measurement distance to a whopping 650 mm. Combined with a prior project to extract the measurement data, the result makes for a working multi-axis digital readout, a handy device for machine tools like a manual lathe or milling machine.

Digital calipers operate on the principle of measuring an array of variable capacitors. If we scratch our heads and look back at our physics notes, we’ll recall that the capacitance between two parallel conductive plates is linearly proportional to the surface area. By fixing one dimension of both plates and by sliding one plate over the other, we effectively change the area, giving ourselves a simple linear displacement sensor! (There are some classy error-correcting techniques too, and this [PDF] is a great place to look for more details.)

The theory takeaway is that this array of parallel plates can be embedded directly into a printed circuit board. We just need to know the dimensions. After some close measurement work, [Limi DIY] extracted the crucial measurements and fabbed a PCB with the pattern duplicated over 650 mm. After retrofitting the original processing element onto this new track, they had a working measurement device that’s far longer than the original!

If you’ve ever been tempted to disassemble your calipers but too nervous to bite off the investment, now’s your chance to follow along as [Lima DIY] demonstrates the gratuitous disassembly process for you in video format. And the fruits of their labor is also captured on a project post that includes the key dimensions if you’re looking to do the same thing.

If you’re looking for other ways to improve your calipers, why not start by giving them a major battery life boost.

Thanks to [absd] via [Jubilee Discord] for the tip!

Continue reading “Custom Caliper Tracks For When You’re Going The Distance”

Magnus-Effect RC Aircraft Is A Lot Harder Than It Looks

Conventional airfoil wings have come out on top for getting flying machines airborne over the last century, but there were a few other interesting designs that have come and gone. One of these is the Magnus effect plane, which makes use of the lift produced by a spinning cylinder. [James Whomsley] from [Project Air] decided to build one as a side project, but it ended up being a lot more challenging than what he initially suspected. (Video, embedded below.)

The Magnus effect achieved a bit of viral fame a few years when [How Ridiculous] dropped a basketball down a dam wall with some backspin. [James] T-shaped Magnus effect plane has a pair of spinning cylinders at the top to create lift, driven by a brushless motor using a belt. A second brushless motor with a propeller is on the center carbon fiber tube provides forward thrust, and a rudder provides yaw control. The battery is attached to the bottom of the tub for stability.

The very first flight looked very promising, but [James] quickly ran into a series of problems related to center of gravity, power, pitch control, and drag. After iterations of the build-crash-rebuild cycle, he ended up with larger motors and rudder, shorter “wings”, and a higher thrust motor position. This resulted in a craft still only marginally controllable, but stayed in the air for quite a while. Since the intention was never to turn it into a long-term project, James] called it a success to avoid more yak shaving, and continue work on his airboat and rocketplane.

If you are interested in building one of your own, he put all the findings of his experimentation in a short report. For more inspiration, check out the other Magnus effect plane we covered that used KFC buckets for the wings.

Continue reading “Magnus-Effect RC Aircraft Is A Lot Harder Than It Looks”

Hands On: DEF CON 29 Badge Embraces The New Normal

To say that 2020 was a transformative year would be something of an understatement. The COVID-19 pandemic completely changed the way we worked, learned, and lived. Despite all those jokes about how much time people spend on their devices rather than interacting face-to-face with other humans, it turns out that when you can’t get more than a few people together in the same room, it throws our entire society into disarray.

Our community had to rethink how we congregated, and major events like HOPE, DEF CON, and even our own Hackaday Supercon, had to be quickly converted into virtual events that tried with varying degrees of success to capture the experience of hundreds or thousands of hackers meeting up in real life. While few would argue that a virtual hacker convention can ever truly replace a physical one, we learned there are undeniable benefits to embracing the advantages offered by cyberspace. If nothing else, the virtual hacker meetups of 2020 saw a far larger and more diverse array of attendees and presenters than ever before.

As we begin seeing the first rays of light at the end of the long, dark, tunnel we’ve been stuck in, it’s clear that some of the changes that COVID-19 forced on our community are here to stay. As eager as we all are to get back to the epic hackfests of old, nobody wants to close the door on all those who would be unable to attend physically now that they’ve gotten to peek behind the curtain.

With this in mind, this year’s DEF CON is being presented in both physical and virtual forms simultaneously. If you made to Las Vegas, great. If not, you can follow along through chat rooms and video streams from the comfort of your own home. Following the theme, the DC29 badge is not only a practical tool for virtual attendees, but an electronic puzzle for those who are able to bring a few of them together physically. Let’s take a closer look at this socially distanced badge and the tech that went into it.

Continue reading “Hands On: DEF CON 29 Badge Embraces The New Normal”

Vintage Computer Festival West Is This Weekend

This weekend is the Vintage Computer Festival (VCF) West, which will be held in-person at the Computer History Museum in Mountain View, California. Here is the complete schedule of events.

If you’re in the area, go get your retrocomputing on at this two-day event that Hackaday are proud to sponsor. Who knows? You may end up hobnobbing with original system developers who are finally at liberty to spill the tea about the old days.

Case in point: Hackaday’s own Bil Herd will be there virtually to talk about the new Commodore inside history book he wrote with Margaret Moribito. Other speakers include Bob Purvy, who will discuss his novel about the Xerox Star. This isn’t your average history book — it uses fictional characters to play out actual events. Another talk delves into the history of computerized tic-tac-toe, and yet another will cover recovering lost floppy disks with an oscilloscope. Finally, Liza Loop will speak about the history of computing in education to close out the weekend’s talks.

There are also plenty of exhibitions on the schedule, too, including Rare Computers from Japan and Analog Computing in the 1960s. And don’t forget, you’re at the Computer History Museum, so there should never be anything approaching a dull moment. Have fun!