Creating Full Color Images On Thermoformed Parts

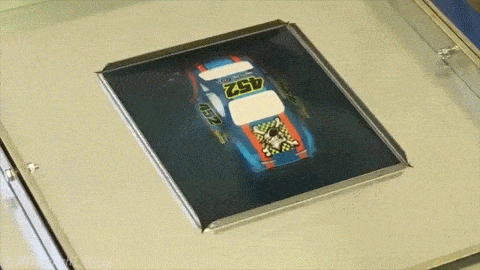
In a race to produce the cheapest and most efficient full-color 3D object, we think Disney’s Research facility (ETH Zurich and the Interactive Geometry Lab) may have found the key. Combining hydrographic printing techniques with plastic thermoforming.

You might remember our article last year on creating photorealistic images on 3D objects using a technique called hydrographic printing, where essentially you print a flattened 3D image using a regular printer on special paper to transfer it to a 3D object in a bath of water. This is basically the same, but instead of using the hydrographic printing technique, they’ve combined the flattened image transfer with thermoforming — which seems like an obvious solution!

Continue reading “Creating Full Color Images On Thermoformed Parts”

Plexitube Owl Clock Watches You Sleep

Wait, plexitube? Is that a typo? Surely we mean Nixie tubes!

For a Christmas project [Kurt] wanted to build some owl-inspired clocks — with bit of a retro feel. Given the complexities of finding and using actual Nixie tubes, he went with an alternative — a Plexitube.

lightguidescloseup
Closeup of Plexitube

Plexitubes look like futuristic Nixie tubes. They can have different stylized numbers. They’re crisp, they’re bright, and they are completely customizable. They’re made of edgelit acrylic! By laser etching the design onto pieces of acrylic and feeding LED light into the edge, very much like how a light-pipe works, it’s possible to have a neon-light effect — using nothing more than plastic and some LEDs.

He designed custom PCBs for the project, with SMD LEDs for the plexitubes. Making use of a laser cutter, he designed the actual owl to be made out of lightly formed wood cutouts — the entire thing looks absolutely fantastic.

As far as “Nixie tube” clocks this has gotta be one of the most aesthetically pleasing ones we’ve seen in a while, but if you’re looking for an all-out-Nixietube-extravaganza… take a look at this whopping thirteen tube clock.

[Thanks for the tip Lawrence!]

Modifying A Raspberry Pi 2 To Fit In Small Places

Still can’t get your hands on a Pi Zero? We know. Why not de-solder a few headers from a Raspberry Pi 2 to fit in your next project instead? Using a pair of 2.5″ HDD enclosures, [nodenet] made a mini linux laptop using the Raspberry Pi 2 — It even has a touch screen, and features a 1000mAh battery!

All in all it cost him about $120 for all the components, but before you JrECiM0rush out to make your own, you will need pretty good skills with a soldering iron to successfully downsize your Raspberry Pi 2. The modifications require removing both USB ports, the Ethernet plug, the GPIO pins, the HDMI port, the A/V jack and the camera connectors.

He used a combination of a mini hacksaw, and a soldering iron to remove all the components — what you’re left with his a business card sized computer — but the real fun part is re-attaching all the components with leads.

Continue reading “Modifying A Raspberry Pi 2 To Fit In Small Places”

Desktop Siege Weapon: Fireball Cannon

Looking for a harmless way to really step up your office warfare game? Why not build a nitrocellulose desktop cannon!?

On of our favorite science DIY YouTube channels, [NightHawkInLight] shows us how he made this awesome cannon — with interchangeable cannon cartridges! It even has a bit of a steampunk feel to it.

Nitrocellulose, or flash cotton as it’s more commonly known, is used by magicians for fireball magic tricks. Similar to flash paper, it burns up very fast and leaves almost no ash or residue. Creating the fireball effect is as simple as igniting it inside a tube — expanding gases take care of launching it out quite violently.

All the action is in the 3/4″ copper tube cartridges that come complete with home-made glow-plugs made from nichrome wire harvested from a broken hairdryer. These interchangeable cartridges allow [NightHawkInLight] to load up ahead of time and fire them off in quick succession.

Continue reading “Desktop Siege Weapon: Fireball Cannon”

Box ‘o Bangs, A 2,180J Capacitor Bank

What happens when you wire up 16 capacitors? Sixteen 2500V 40uF capacitors to be precise… [Lemming] calls it the Box ‘O Bangs. Theoretically it outputs 4000A at 2500V for a split second.

They bought the capacitors off of eBay, and they appear to be good quality BOSCH ones, straight from Germany. They were apparently used for large-scale industrial photo-flashes, but who knows since they’re from eBay.

Soldering it all together proved to be a challenge, as once they realized just how many amps this thing was going to put out, they needed some thick wire. It looks like about 2ga wire, which, spoiler alert, still isn’t enough for 4000A — but since it’s only for a split second it seems to do fine.

Once everything was built, it was time for some scientific tests — what can we put between the leads to explode? Stay tuned for some slow-motion glory.

Continue reading “Box ‘o Bangs, A 2,180J Capacitor Bank”

Designing A 360 Degree All Metal Hinge

Looking for a 360 degree hinge that had no slop was harder than [Mr. LeMieux] thought it would be. Add to the fact it had to be made completely out of metal with no plastic components — and basically fireproof. He was coming up blank.

You see, [Mr. LeMieux] is casting metal components, and needed a hinge to close two halves of a mold. When he couldn’t find anything commercially available, he decided to design his own. Using aluminum, he machined the two halves with an interlocking mechanism between the two. Essentially, it’s a 3-bar linkage, but if he stopped there, it would have too much slop. So he actually designed in two fixed gears that roll over each other — this ensures the hinge stays perfectly smooth throughout its entire range of movement — it’s actually quite ingenious.

Continue reading “Designing A 360 Degree All Metal Hinge”

Using Rapid Prototyping To Make A Clock

[Markus] is attending the Royal Institute of Technology in Stockholm. For his Advanced Prototyping class he had to make something using rapid prototyping technology — i.e. 3D printers, laser cutters, and breadboards. He chose to make a fantastic looking clock.

He started by designing the entire thing in CAD. The base is 3D printed on a Ultimaker. The world clock display is a piece of laser engraved acrylic which he heated up and curved to fit. Using an Arduino and a 16×2 LCD matrix he created a simple clock program with the ability to show different time zones. The way you select them is very clever.

Continue reading “Using Rapid Prototyping To Make A Clock”