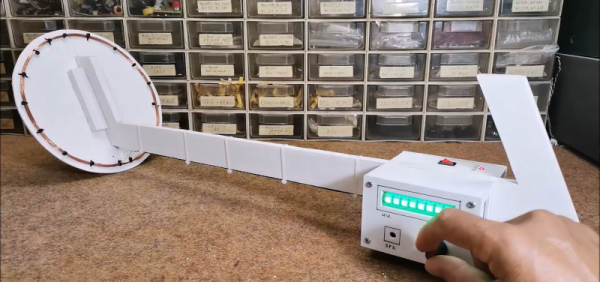
If you want to get rich by hunting with a metal detector, you might want to consider how much you invested in the hardware to start with. Finding a tin can with a $200 detector might not make economic sense. But building a metal detector yourself doesn’t have to be hard, as [Mirko] shows in a recent post. His STM32-based pulse induction metal detector looks good and works well, as you can see in the video below.
[Mirko] reports that the device can detect a coin at 30 cm and a large metal object at more than 80 cm. The project uses the Arduino IDE and a Blue Pill STM32 module. The project looks good with an LED module and a rotary encoder to set sensitivity.
Having a history of shell commands is a great idea. It is, of course, enormously handy when you have to run something repetitively or you make a simple mistake that needs correction. However, as I’ve mentioned in the past, bash history isn’t without its problems. For one thing, by default, you don’t get history in one window from typing in another window. If you use a terminal multiplexer or a GUI, you are very likely to have many shells open. You can make them share history, but that comes with its own baggage. If you think about it, we have super fast computers with tons of storage compared to the “old days,” yet shell history is pretty much the same as it has been for decades. But [Rcaloras] did think about it and created Bashhub, a history database for bash, zsh, and probably some other shells, too.
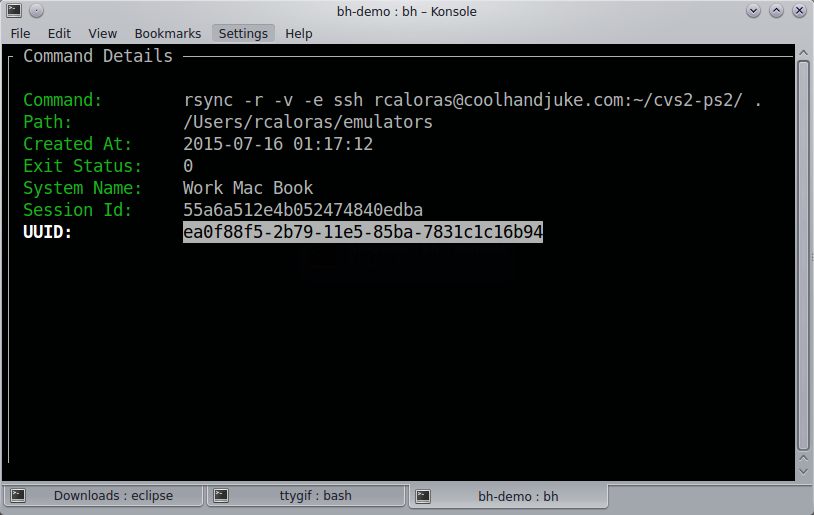
Command detail screen
You might think you don’t need anything more than what you have, and, of course, you don’t. However, Bashhub offers privately stored and encrypted history across machines. It also provides context about commands you’ve executed in the past. In other words, you can see the directory you were in, the exact time and date, the system you were on, and the last return code of the command.
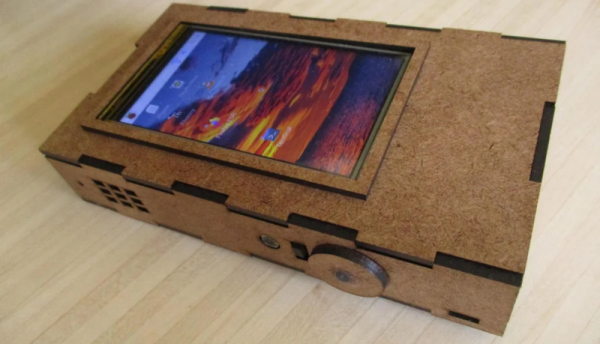
[Evan] couldn’t find a phone he liked, so he decided to build his own. There are advantages and disadvantages, as you might expect. On the plus side, you have the ultimate control. On the negative side, it doesn’t quite have the curb appeal — at least to the average user — of a sleek new cell phone from a major manufacturer.
The phone uses a Raspberry Pi, along with a 4G modem and a 480×800 touchscreen. There’s a laser cut box that measures 90x160x30 mm. For reference, a Google Pixel 7 is about 73x156x9 mm, so a little easier on the pocket.
But not one the pocketbook. The OURPhone only costs about $200 USD to build. There are trade-offs. For example, the touchscreen is resistive, so you’ll want a stylus (there’s a slot for it in the case). On the other hand, if you don’t like something, it is all there for you to change.
Obviously, a better screen would help. Thinner batteries might be a good enhancement too. But that’s the beauty of an open project. You can do all these things and more.
We wondered if you could get one of the “mobile” Linux editions to run or even Android. It seems like the hardest part is coming up with a sophisticated enclosure.
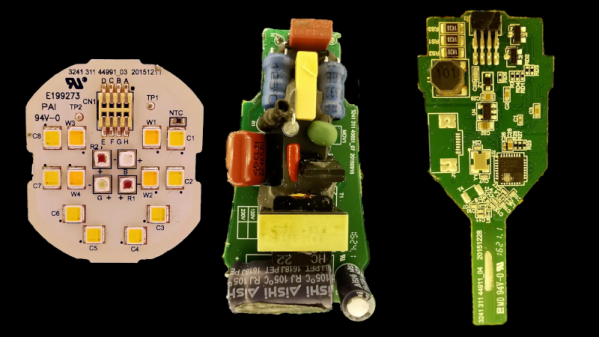
What do you do with a Hue smart lightbulb? Well, if you are [Chris Greening], you take it apart and get hacking. If you ever wondered what’s inside, the teardown is pretty good, and you can also watch the video below. The potting compound, however, makes a mess.
Once you get the potting undone, there are three PCBs: an LED carrier, a power supply, and a logic board. The arrangement of the LEDs is a bit confusing, but [Chris] explains it along with providing schematics for all of the boards.
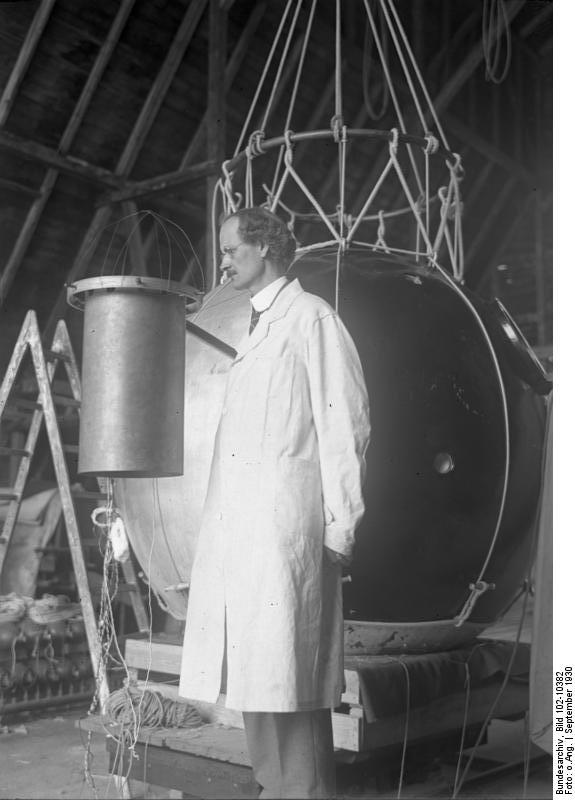
Piccard inspects an instrument on his balloon (Image: Bundesarchiv, Bild 102-10382 / CC-BY-SA 3.0)
We think of human flight as a relatively modern affair, with a few claims to the first airplane all around the turn of the last century. But people flew much earlier than that by using hot air balloons as well as gas-filled ones. While the Montgolfier brothers get most of the credit for hot air ballooning in 1783, there are some reports that a Brazilian priest may have lifted himself with a balloon as early as 1709.
Regardless, we’ve had balloons a good century earlier than winged flight, if not longer. While the device is deceptively simple, it is possible to get a balloon to very high altitudes without a lot of specialized technology. Airplanes at high altitudes need a way to get enough oxygen to fuel their engines, or they have to rely on rockets. Either way, there are plenty of design and operational challenges.
Balloons, of course, can simply rise to the occasion. Auguste Piccard and an assistant took a gas-filled balloon to 15,781 meters in 1931. Their gondola was pressurized, and they were the first humans to see the curvature of the Earth and the dark sky above. That record wouldn’t stand for long, though.
CCCP-1
The Soviet Union was keenly interested in Piccard’s flight, and the Soviet Air Force set about to build a research vessel, CCCP-1 (in English, USSR-1), that flew in 1933. The envelope was a large amount of thin fabric impregnated with latex and filled with hydrogen. The air-tight gondola presented several challenges in design. Most of the science experiments were outside, of course, and in 1933, you didn’t have an Arduino and RC servos to control things.
Tinkercad is like the hamburger helper of 3D design. You hate to admit you use it, and you know you should put in more effort, but — darn it — it’s easy, and it tastes pretty good. While I use a number of CAD programs for serious work, sometimes, when I just want a little widget like a flange for my laser cutter’s exhaust, it is just easier to do it in a few minutes with Tinkercad. However, I heard someone complaining the other day that it wasn’t of any use anymore because they took away custom shape generators. That statement is only partially true. Codeblocks allow you to easily create custom parametric items for use in Tinkercad.
There was a time when you could write Javascript to create custom shapes, and it is true that they removed that feature. However, they replaced it with Codeblocks which is much easier to use for their target audience — young students — and still very powerful.
If you’ve used parametric design in a professional package or even used something like OpenSCAD, you probably don’t need to be sold on the benefit. This is, of course, a simple form of it, but the idea is to define things as mathematical relationships. As an example, suppose you have a front panel with two rows of four holes for switches evenly spaced and centered. That would be easy to draw. But if you later decide the top row needs five holes and the bottom only needs three, it will be a fair amount of work. But if you have the math defining it right, you change a few variables, and the computer does the rest. Continue reading “Parametric Design With Tinkercad”→
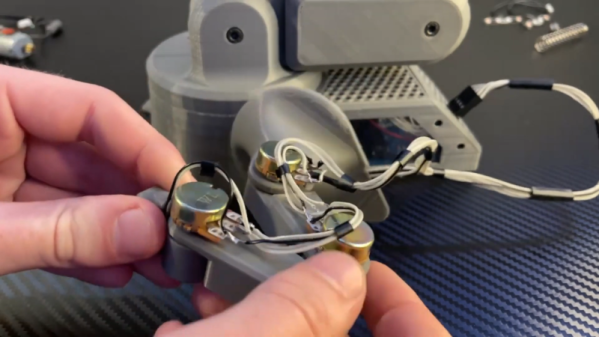
Thanks to 3D printing and inexpensive controllers, a robot arm doesn’t need to break the bank anymore. Case in point? [Build Some Stuff] did a good-looking compact arm with servos for under $60. The arm uses an interesting control mechanism, too.
Instead of the traditional joystick, the arm has a miniature arm with potentiometers at each joint instead of motors. By moving the model arm to different positions, the main arm will mimic your motions. It is similar to old control systems using a synchro (sometimes called a selsyn), but uses potentiometers and servo motors.