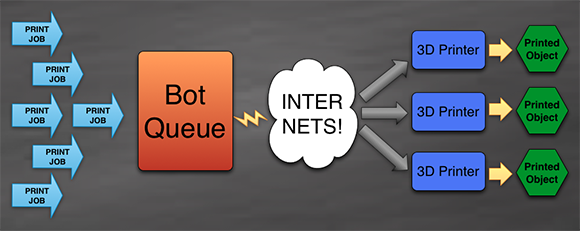
An Industrial RepRap

rep

It may just be another 3D printer, but [Jonas] and [Simon]’s Kühling & Kühling RepRap Industrial is a cross between a work of art and a beautiful machine tool. It also looks to be a pretty nice 3D printer, to boot.

The Kühling RepRap is built out of 20mm t-slot aluminum with plastic sides that keep the machine’s internals at a toasty 70° C, just about the optimal temperature for making large, complex prints. The machine has two extruders with all the cables tucked away in 3D printed cable carriers. One really interesting bit of innovation is the tool less belt t tensioning system.

On the list of upcoming features, [Jonas] and [Simon] say they want to add a touch screen controller powered by a Raspberry Pi, and a controller that’s even more capable than RAMPS electronics boards. No word on how much a Kühling & Kühling RepRap will cost, but like any quality-looking tool, we don’t expect it to be cheap.

Custom 3D Printed Designs With Makerbot’s Customizer

custom

Although having a 3D printer means you can create custom object of your own design, that doesn’t change the fact that most object printed on Makerbots and RepRaps are copies, or slight derivations, of already existing object. If you need a gear, just go grab an OpenSCAD file for a gear, and a custom smart phone case can be easily made by modifying an already existing one. The problem with this approach, though, is you’ll need to learn OpenSCAD or another 3D design tool. Enter the Makerbot Customizer, a web app that allows you to create custom versions of other people’s work right in your browser.

The idea behind Customizer is simple: someone creates an OpenSCAD file with a few variables like the number of teeth on a gear or the number of turns on a screw. Customizer takes this OpenSCAD file, puts sliders and radio buttons on a web page, and allows you to create custom objects based on user-created templates.

Already we’ve seen a lot of Hackaday readers send in some pretty cool customizable things, like [Bryan]’s coil form for DIY inductors and [Greg]’s customizable PVC pipe couplers. If you already know OpenSCAD, it’s easy to create your own objects that are customizable by anyone on the Internet.

Adventures In 3d Printing: Our First Week With The LulzBot AO-100

Lulzbot-3D-printer-RT

Recently, we acquired a LulzBot AO-100. It was given to us, free of charge.  After having it for about a week, I’ve figured out enough that I feel I can finally share my thoughts, impressions, and experiences.  I will be completely honest about the machine. It was given to us, which is insanely awesome, but hey, I have to share the real information with the readers.

When we first started looking for a printer, we decided we didn’t want to build one from scratch. While that might seem initially to be the opposite of Hack a Day, there is a reason. I simply can’t build every tool I use from scratch.  I have projects in mind that could benefit from a 3d printer, and I want to work on those.  This meant that I was looking for a pre-assembled unit. Many people asked for an article on getting a reprap going, so we started to consider reprap based kits as well.

When LulzBot contacted us, I was initially skeptical. I mean, the name is lulzBot. Is this an internet troll? Is this somehow connected to Lulzsec, the hacking group? Did they seriously name their printer LulzBot? Well, as it turns out, they are legitimate. Not only that, we’ve seen them before, they are also AlephObjects, who sent in the video of the wall o’ printers working. Why did they name it LulzBot? The answer was basically, for the lulz. It is worth noting that [Jeff] has been a strong proponent for free software for a long time and that Lulzbot is built from the ground up to be completely open and shareable. You can go to the website right now and download the list of parts as well as all source code and configurations.

As you read further, please remember that the model they sent me was not their newest. They don’t even sell this model any more. Technically speaking, it is roughly 2 generations behind.

Continue reading “Adventures In 3d Printing: Our First Week With The LulzBot AO-100”

SCARA Arm 3D Printer

scara-3d-printer

[Quentin Harley] must really have wanted to test his snuff when it comes to mechanical engineering. He’s been hard at work for a couple of years now designing his own SCARA arm 3D printer. That link leads to a recent summary article in which he shows off the build as seen above. It’s not fully functional yet, but he’s at the point where it’s time to develop the driver circuitry and firmware so he’s close. His blog is dedicated to this single project so click around and see what he went through along the journey.

The SCARA arm is seen in blue, using a couple of stepper motors to move the extruder mount along the x and y axes. The bed itself moves along the Z axis via two precision rods with a threaded rod in the center. As you can see, some of the parts are made of wood, and he used PVC for the cross supports between the upper and lower base platforms. But the majority of the build uses 3D printed parts, including the arms, drive gears, and mounting brackets.

[Thanks Peter]

Help Hackaday Buy Our Own 3D Printer UPDATED!

beggars

UPDATE: We’re getting a LulzBot thanks to [Jeff Moe].

ALL DONATIONS ARE BEING REFUNDED. YOU WILL STILL RECEIVE YOUR STICKERS.

We’ve held out for far too long. Hackaday now needs a 3D printer.   We get emails all the time asking why we don’t have a donate button. Well, we’re kind of stubborn and would rather just do with what we have. Unfortunately this hasn’t gotten us very far in the 3d printer department.

We have a few projects in mind that could really utilize a 3d printer, namely building custom game controllers for children with special physical needs.

If you have any interest in helping us get a 3D printer for Hackaday, read on. Otherwise, carry on with your day.

Continue reading “Help Hackaday Buy Our Own 3D Printer UPDATED!”

Touchscreen Control For A Reprap

display

After you’ve got your Reprap running smoothly with acceptable resolution and good quality prints, the next order of business for any 3D printer hobbyist is headless printing. While the greatest and newest 3D printers come with controls to allow jogging, homing, temperature control, and printing from an SD card, the home-built versions will require an add-on attached to the electronics board. [Marco] has been spending his time improving the character LCD control panel projects we’ve seen for Repraps with an awesome graphical version that emulates the control interface found in the Pronterface control software.

The biggest problem with adding a control interface to a Reprap is the number of pins available on the electronics board. While an electronics board like RAMPS has enough spare I/O pins to drive a display, other boards such as the Sanguinololu and the Melzi are extremely limited in their expansibility. To get around this limitation, [Marco] used a 4D Systems serial touchscreen display.

This display only requires two pins to fully interact with a printer running the Marlin firmware; the graphical processing, communication, and SD card access is handled by the on-board PICASO micocontroller, leaving the ATMega on the electronics board free for important things like printing stuff out of plastic.

[Marco] has a git full of modified Marlin firmware and firmware for the 4D Systems display. There’s also a neat printed case for the display, making a very professional-looking standalone controller a weekend project instead of a months-long ordeal.

Thanks [Antonio] for sending this one in.

[Prusa] Interviews A Whole Bunch Of RepRappers

prusa

Any time a media outlet or conference wants an expert on 3D printing there are two people to turn to. The most famous is [Bre Pettis] of MakerBot. The other is an awesome guy named [Prusa], designer of the most popular RepRap and possibly the most popular 3D printer of all time. He’s been putting his fame to use by interviewing all the big names in 3D printing and putting them all up on his YouTube account.

First up is [Kliment], RepRap core dev and creator of the Sprinter firmware and Pronterface host.

[Ruben Lubbes], RepRap community guru, tells [Prusa] about his collection of RepRap parts from famous RepRappers. It sound like a quite interesting collection that’s probably very valuable from a historical perspective. Who knows, in a few years it could be as interesting as [Gutenberg]’s first printing press or [Tim Berners-Lee]’s NEXT cube.

Next up is [Tonokip]. He developed the original Tonokip firmware, the firmware that all major RepRap firmwares are based on.

[Prusa] also interviewed [Jordan Miller] a.k.a. [jmil] of the Philly hackerspace Hive76 and the University of Pennsylvania. He made his name in the RepRap community for 3D bio printing.

Wrapping up the most interesting people, there’s also an interview with [Sound], developer of the Slic3r firmware. We’ve seen an interview of [Sound] before, and this interview continues the earlier one by talking about multiple extruders and how awesome the RepRap community is.

Lastly, and unfortunately, is a short video of [Prusa] interviewing me at the world Maker Faire last September[Prusa] is a huge fan of Hackaday, so this interview is just two guys being star struck at each other.

Actually, the 2012 World Maker Faire had the largest number of current and former Hackaday alumni in one place ever. A group interview of  [Ian] (now of Dangerous Prototypes), [Phillip Torrone] (Adafruit), [Phil Burgess] (Adafruit), current Hackaday boss man [Caleb] and myself would have been awesome. We’ll try harder next year.

You can check out the good videos after the break.