Cyclone PCB Factory: 3d Printable Circuit Board Mill

printable-cyclone-pcb-factory

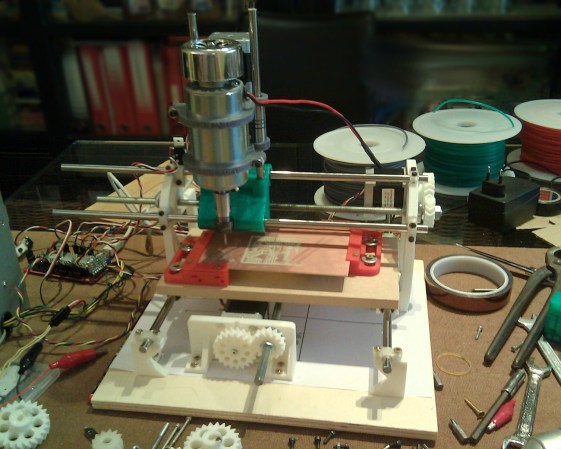
If you can 3D print most of the parts for another 3D printer, why not also for a PCB mill? That’s the question answered by the Cyclone PCB Factory. It will help you kiss those toner transfer or photo resist days goodbye.

Homemade circuit boards tend to be rather small, which really helps keep the cost and scope of this project down. Most of the mounting parts, as well as the gears, are 3D printed. Of course there’s the usual machine tool items which you pretty much have to purchase: the ball screws, precision rod, stepper motors, and a motor to spin the routing tool.

Check out the video below to see where the project is right now. One of the crucial aspects of PCB milling is to have a level build table. The cutter head tends to be ‘V’ shaped so cutting just a bit too deep can blow out the traces you’re trying to isolate. The demo shows that this can automatically calibrate the software to account for any variances in the height of the copper clad.

We remember seeing a snap-together PCB mill. But we’re pretty sure that that one used parts milled from HDPE rather than 3D printed components.

Continue reading “Cyclone PCB Factory: 3d Printable Circuit Board Mill”

Using Electrical Conduit For A 3D Printer Frame

electrical-conduit-for-cnc-frame

We’re always on the lookout for parts that can be source locally and that don’t cost a bundle. This hack fits both of those criteria. [Lee Miller] came up with a way to use steel electrical conduit as a 3D printer frame. He recently finished building the device seen above, and has been showing it off at Solid State Depot, a Hackerspace in Boulder, Colorado where he is a member.

Look closely at the corners of the frame in this image and you’ll see the 3D printed parts that make up the clamping mechanism. Each has three components that screw together. The two gaps in between each have a rubber ‘O’ ring. When the plastic clamps are screwed together they squeeze the rings which hold the electrical conduit firmly. This also has the side benefit of dampening vibrations.

It’s certainly easy to find this type of conduit which is sold at every home store (and most hardware stores). Just make sure that you check that a piece is straight when you pick it out. The SCAD files for the parts are available from his Github repo.

Continue reading “Using Electrical Conduit For A 3D Printer Frame”

The First 3d Printed Gun Has Been Fired, And I Don’t Care.

3d-printed-gunSeveral people have sent us this story. I’ve seen it everywhere. A lot of people are upset, on several sides.  A gun has been 3d printed that can actually fire a round.

First, we have people scared that this will bring undetectable guns to people who wouldn’t have had access before. Then we have the gun fans that are reacting to the others with shouts of freedom and liberty and stuff.  The 3d printing community has had mixed reactions, but many are concerned that this will harm 3d printing in general.

I simply don’t care.

Continue reading “The First 3d Printed Gun Has Been Fired, And I Don’t Care.”

Midwest RepRap Festival

We’re a US-centric site, but aside from events in New York or California, we don’t see many hacker, maker, or 3D printer events aimed at the parts of the country filled with corn and WalMarts. The 1st annual Midwest RepRap Festival aims to change that with enough events, speakers, and activities to make Elkhart, Indiana look like the hoppingist place around.

Officially, the festival started yesterday but the schedule of events really ramps up today. [Josef Prusa] will be taking the stage talking about the state of the RepRap, and a ton of 3d printing vendors will be there showing off their wares and selling some really cool stuff. There’s also tons of experienced RepRappers available to help you tune your machine to perfection; just as well, because the festival is going for the world record for the greatest number of 3D printers printing simultaneously.

If you’re around northern Indiana, you might want to check out the festival and send us a few pics or videos.

Cloud Support For Fleets Of 3D Printers

bot

More than ever, 3D printers are being used for small prototype and production runs, and the normal way of using a 3D printer with a single desktop app is becoming more and more out of date. [Zach ‘Hoeken’ Smith] has a solution to the frustration of printing out multiples of objects: it’s called BotQueue, and allows anyone to submit print jobs to multiple 3D printers over the Internet.

The idea behind BotQueue is to allow anyone to send jobs to a 3D printer over the Internet. Queues and multiple printers are supported, meaning small-scale manufacturing just got a lot easier for anyone dealing with multiple printers.

We’ve seen a few 3D printer fleets that could benefit from an online print server for multiple 3D printers. It’s not a project meant for everyone – one 3D printer per person should be enough for just about everybody – but if you’re part of a hackerspace with a few printers, we could see this being used to great effect among your fellow makers. You’re not limited to using the official BotQueue servers, either. You can run your own BotQueue from [Zach]’s git

Finally, A Machine That Makes Cheap 3D Printer Filament.

If there’s one problem with the RepRap, it’s the cost of filament. Sure, there’s also the computationally difficult problem of slicing 3D models, but a 5 to 10 times markup on turning plastic pellets into filament is the biggest problem. It’s even a bigger problem than the problems of compatibility and interchangeable parts that comes with everyone forking a ‘standard’ printer design dozens of times. The cost of filament, though, is the biggest problem, right up there with RepRap developers focusing nearly entirely on different printer designs instead of the software, firmware, and electronics that are also vitally important to the RepRap project.

Nearly a year ago, we caught wind of a competition to create a home-based filament manufacturing station that takes cheap plastic pellets available for about $5/kg and turns them in to 3D printer filament that usually sells for $50/kg. A winner for this competion has finally been announced. The winner, [Hugh Lyman] just won $40,000 for his home filament creation station, the Lyman Filament Extruder

The goal of the Desktop Factory Competition was to create a machine that produces filament suitable for 3D printers with a total build cost of under $250 USD. [Lyman] met the goal by using a few motors, 3D printed parts, a PID controller, and off the shelf auger drill bit (that’s the actual model and supplier he used, by the way) that is able to reliably churn out plastic filament.

If you want to build your own Lyman Extruder, all the plans are up on Thingiverse, but LulzBot, the awesome people who gave us a 3D printer, hope to sell a pre-assembled version of this extruder sometime in the future, hopefully with a chain guard around that sprocket.

Giving 3D Printed Parts A Shiny Smooth Finish

No matter how good a 3D printer gets, you’re always going to have visible print layers. Even with very high-quality prints with sub-0.1mm layer height, getting a shiny and smooth finish of injection molded plastic is nearly impossible. That is, of course, until you do some post-print finishing. [Neil Underwood] and [Austin Wilson] figured out a really easy way to smooth out even the jankiest prints using parts you probably already have lying around.

The technique relies on the fact that ABS plastic and acetone don’t get along together very well. We’ve seen acetone used to smooth out 3D printed objects before – either by dunking the parts in an acetone bath or brushing the solvent on – but these processes had mixed results. [Neil] and [Austin] had the idea of using acetone vapor, created in a glass jar placed on top of a heated build plate,

The process is pretty simple. Get a large glass jar, put it on a heated build plate, add a tablespoon of acetone, and crank the heat up to 110C. Acetone vapor will form in the jar and react with any printed part smoothing out those layers. The pic above shows from right to left a 3D printed squirrel at 0.35 mm layer height, 0.1 mm layer height – the gold standard of high-end repraps – and another print with 0.35 layer height that was run through a vapor bath for a few minutes. Amazing quality there, and cheap and easy enough for any 3D printer setup.

You can check out the tutorial video after the break along with a video showing exactly how dangerous this is (it’s not, unless you do something very, very dumb).

Continue reading “Giving 3D Printed Parts A Shiny Smooth Finish”