Minimalist User Interface For Headless Raspberry Pi Applications

minimial-ui-for-headless-rpi

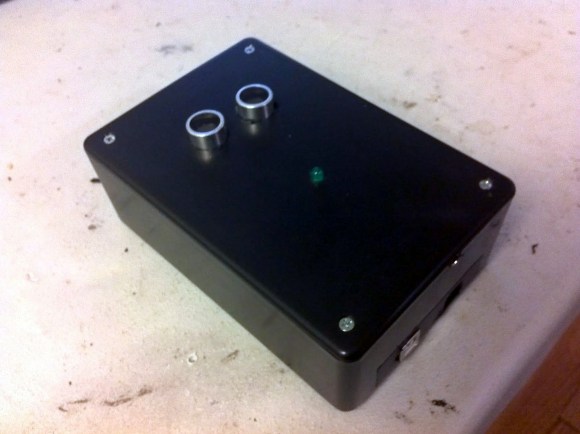
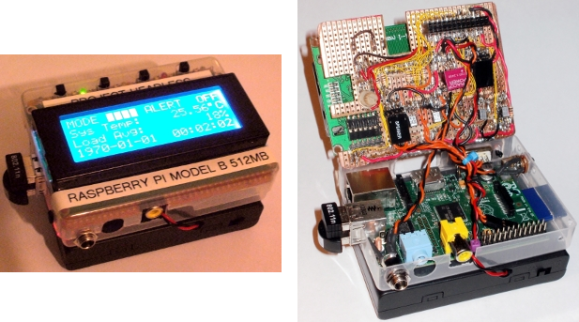
[Jason Birch] just finished building a beautifully simple user interface for the Raspberry Pi. The goal was to keep it small and intuitive while still providing a range of functionality. His add-on hardware gives feedback using several LEDs and a four-line character LCD screen. It provides control using just four momentary press switches.

The base for the add-on hardware is a chunk of protoboard the same size as the Pi itself. This is just slightly wider than the LCD screen, leaving room along the top for the row of buttons with different colors of LEDs in between them. Look closely in that nest of point-to-point wiring and you’ll find the dual pin-socket which mates with the RPi GPIO header. One important note from [Jason] mentions that the LCD screen R/W pin must be tied to ground. This keeps it from going into read mode, which would push 5V over the I/O pins, potentially damaging the 3.3V tolerant header on the RPi.

Throw in a battery and that pretty much covers the hardware. To see how he’s using it you’ll want to view the video clip after the break.

Continue reading “Minimalist User Interface For Headless Raspberry Pi Applications”

Cardboard Lampshade Makes Ordinary Recycling A Centerpiece Of Your Room

This cube lamp was assembled using common cardboard. Not only does it look interesting, but it’s basically free with every Ikea purchase since all you need is a source of cardboard, cutting implements, and glue.

[Lindarose92] fabricated the shade out of narrow strips of corrugated cardboard. This particular lamp also has a cardboard base but we’re sure you could use it for just about any light source with doesn’t generate enough heat to cause problems. The build starts out with the tedious process of cutting 5mm by 8cm strips, and you’re going to need a lot of them. Each strip is cut perpendicular to the corrugation, which allows the light to shine through the wave pattern. The strips are then glued into 8cm x 8cm squares, which are in turn glued together into the four by four panels that make up each side of the cube.

Boom, you’re done. And if you get tired of it, just toss the thing in your recycling bin.

[via Hacked Gadgets]

Retrotechtacular: Mechanical Targeting Computers

retrotechtacular-mechanical-computer

The device that these seamen are standing around is a US Navy targeting computer. It doesn’t use electricity, but relies on mechanical computing to adjust trajectories of the ship’s guns. Setting up to twenty-five different attributes by turning cranks and other input mechanisms lets the computer automatically calculate the gun settings necessary to hit a target. These parameters include speed and heading of both the ship and it’s target, wind speed and bearing, and the location of the target in relation to this ship. It boggles the mind to think of the complexity that went into this computer.

The first of this seven part series can be seen after the break. The collection covers shafts,  gears, cams, and differentials. Sounds like it would be quite boring to sit through, huh? But as we’ve come to expect from this style and vintage of training film it packs a remarkable number of simple demonstrations into the footage.

Continue reading “Retrotechtacular: Mechanical Targeting Computers”

Cloud Support For Fleets Of 3D Printers

bot

More than ever, 3D printers are being used for small prototype and production runs, and the normal way of using a 3D printer with a single desktop app is becoming more and more out of date. [Zach ‘Hoeken’ Smith] has a solution to the frustration of printing out multiples of objects: it’s called BotQueue, and allows anyone to submit print jobs to multiple 3D printers over the Internet.

The idea behind BotQueue is to allow anyone to send jobs to a 3D printer over the Internet. Queues and multiple printers are supported, meaning small-scale manufacturing just got a lot easier for anyone dealing with multiple printers.

We’ve seen a few 3D printer fleets that could benefit from an online print server for multiple 3D printers. It’s not a project meant for everyone – one 3D printer per person should be enough for just about everybody – but if you’re part of a hackerspace with a few printers, we could see this being used to great effect among your fellow makers. You’re not limited to using the official BotQueue servers, either. You can run your own BotQueue from [Zach]’s git

No-touch Music Player

no-touch-mp3-player

This little box not only plays tunes, but it lets you control several aspects of playback without touching a thing. [Thomas Clauser] calls it the LighTouch and we like it because it uses inaudible sound to control audible sound.

We think the pair of cylinders sticking up through the top of this project enclosure will be recognized by most readers as the business end of an ultrasonic rangefinder. This is the only control interface which [Thomas] chose to use. Although he didn’t write very extensively about the specific control scheme he implemented, the video embedded in his post shows some of the gestures that cause the Arduino inside to change its behavior. For instance, a swipe of the hand at higher level starts playback, swiping at a lower level pauses it. When adjusting the volume the box responds to how close his hand is to that sensor. With this control in place, the music side of these things is simply handled by a music shield he is using.

Mailbox Notifier Texts When The Letter Carrier Arrives

mailbox-notifier

[Felix Rusu’s] mailbox is on the other side of the street and he’s got a pretty big front yard. This means checking for mail is not just a pop your head out of the door type of activity. This becomes especially noticeable during the winter months when he has to bundle up and trudge through the snow to see if his letter carrier has been there yet. But he’s made pointless trips a thing of the past by building a notifier that monitors the mailbox for him.

He’s using a Moteino, which is an Arduino clone of his own making. It’s tiny and features an RF module on the underside of the board which takes care of communicating with a base station inside the house. The module seen above rolls the microcontroller board up along with a 9V battery and a hall effect sensor which can tell if the mailbox door is open or closed. When the Arduino detects a change to that sensor it pushes some data back to the base station which then relays the info to a computer or Raspberry Pi in order to send him a text message. All of this is shown off in the video after the break.

Continue reading “Mailbox Notifier Texts When The Letter Carrier Arrives”

Remote Control Car That Packs Its Own Beretta

remote-control-car-packs-a-beretta

We’ve never really thought to ourselves “This RC car is fun, but it really needs more handguns”. And if we did, it certainly would not be a built to undertake with students. But to each his own. [Jerod Michel] is a mathematician working in China. He recently built the project seen above with a group of students. Look closely and you’ll notice that the remote control car includes a remote control Beretta strapped to the side.

He doesn’t have a blog post about the project, but you can find a couple of images and his build instructions after the break. The firearm has a motor attached to the trigger that allows it to be fired by tapping into one of the extra channels on the RC car’s PCB. But you won’t just be firing blindly. The project also includes a video transmitter which can be viewed from an LCD screen mounted on top of the remote control unit. There’s even a laser sight that will show what you’re aiming at.

We wonder what the recoil of the firearm does to this light-weight vehicle?

Build Instructions (.txt file)

Continue reading “Remote Control Car That Packs Its Own Beretta”