Quick And Easy Rocket Stove

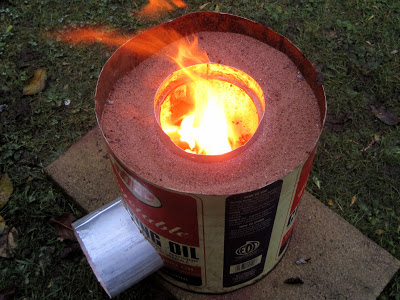
[Simon], a gardener in the United Kingdom, created this super cheap and easy to build rocket stove. The great thing about this little guy is that the methods and materials used to create it are so basic, anyone should be able to quickly make their own for just a few bucks. If nothing else, this is a good introductory project for people wanting to experiment with these stoves.

The only materials required are a metal 5 gallon cooking oil drum, a few scrap pieces of chimney liner pipe, and some sand. That’s it.

[Simon] cut off the top of the oil drum and made a hole in the front to fit the pipe. He then trimmed the scrap pieces of pipe to form a 90 degree elbow and positioned that in place inside the drum.  Sand poured around the pipe acted as the insulator. Finally, he cut and flattened a scrap piece of pipe to use as a front loading tray for the wood.

Simple as that. Party on.

[via The Flying Tortoise]

24V Relay Driver Circuit

driving-24v-relays

[Glitch] got his hands on a slew of relays which are meant for use in industrial equipment. They are designed to operate at 24V. He wanted to use these with common microcontrollers and instead of buying a driver he designed and built his own.

There’s a few things to consider with a project like this. You need a power source, a way to level convert the driver pins, and some protection in case something goes wrong with the circuit. Looking at the board above should give you some idea of what’s going on. There’s a big transformer taking up half of the footprint. This steps down mains voltage to something a 7824 regulator can handle. That’s a 24V linear regulator which is fed by a bridge rectifier along with some smoothing capacitors. With the source taken care of [Glitch] uses an optoisolator for both protection and level conversion. After working the bugs out of the design he was able to control the relay using 3.3V, 5V, or 12V.

Oreo Separators Episode 2 Chucks Food At Your Face

Here’s a portable, well-built Oreo separator that still manages to border on ridiculous. Instead of just ditching the creme filling, it dispenses the cookie and the creme separately. Ostensibly the two creators like different things. One enjoys the cookies while the other only likes the creme. Of this division was born the professional-looking snack divider.

Unlike the hatchet-based system shown off in the first episode this machine has a hopper into which several Oreos may be loaded. The demo cookie is like none we’ve seen before because the top portion is pushed off as if it took no effort at all. The creme is then softened with a stream of hot air before the gooey creme is blasted into the other creators face. Some of it may even have entered his mouth. The final step ejects the remaining chocolate cookie by launching it straight up into the air.

Our favorite part of the video after the break is the “DO NOT ATTEMPT” subtitle that flashes on the screen whenever the apparatus is launching food into the guys’ mouths.

Continue reading “Oreo Separators Episode 2 Chucks Food At Your Face”

NES Annoyance Timer Makes No Friends At Your Work

mario-annoyance-timer

Still trying to solidify that reputation as the office Grinch? This project will let everyone know you’re a complete jerk in no time. It’s called the 8-bit Annoying Person Remover. It detects when someone enters your office at which point it starts to play the Super Mario Bros. theme song while the display counts down 400 seconds. Just like in the game the music gets faster at the end and when it stops they know it’s time to get the heck out.

The hardware inside isn’t too complicated. An Arduino and a Wave shield do most of the work. The song played is stored on an SD card and can easily be changed. There’s a speaker mounted under the top heat vent of the enclosure. The device defaults to displaying the time of day, but monitors a motion sensor on one side to detect when someone comes through the door. This also works when someone leaves, cutting off the music and resetting the display. Don’t miss a video of it in action after the break.

It’s as if this was made specifically for the Comic Book Guy

Continue reading “NES Annoyance Timer Makes No Friends At Your Work”

Viscerally Pleasing Electromechanical Doorbell

steam-punk-doorbell

Sure, we could just slap the steam-punk label on this doorbell hack, but we think that cheapens it. The rig uses a combination of mercury switch and creative mechanics to form a doorbell. And we think it goes beyond aesthetics to a statement of who you are starting with the front door of your house. No wonder [Nick Normal] has moved it along with him from home to home over the years.

The portion to the right is the ringer itself. Pulling on the lever moves the chain through an eyelet to affect the mercury switch mounted above. That switch completes the circuit which drives the motor on the “bell” unit. We use quotes because instead of ringing a bell it’s striking the large valve control wheel which looks like it came straight from the same industrial plant where The Joker took his unfortunate fall into a vat of acid.

This certainly gives you something to aspire to. And if you think you’ve already achieved a doorbell setup on similarly-geeky footing why haven’t you tipped us off about it?

SparkFun Takes Their Educational Show On The Road

sparkfun-national-education-tour

They’ve bought an RV and are headed for your state with buckets full of hobby electronic hardware. It’s SparkFun’s National Education tour and if you want them to host a workshop for kids in your area now’s the time to sign up!

It’s no stretch to say that our everyday lives are tightly bound with technology. Chances are every one of the kids in this picture will walk around with an embedded system in their pockets by the time they hit middle school if not earlier (seriously, many of them have the newest generation of high-end smart phones). The sad fact is that nearly 100% will never have any idea how the hardware in those devices functions. And that’s where we think this program really shines.

SparkFun is scheduling 50 stops where $1000 of the cost is subsidized. The team will work with each school/organization to come up with an appropriate workshop for the age of the students and their base knowledge on the topic. Hopefully this will inspire a new generation of hardware hackers who will eventually contribute to using technology to solve world issues. Check out their promo clip after the jump.

We mentioned subsidized visits. The program still costs $1500 and will go up to $2500 after the first 50 stops. But the hardware used in the workshop stays with the kids. And we hope that the $37.50-$125/head price tag will be seen as a worthwhile investment in getting kids interested in more than just entertaining themselves with the social medial offerings running on the hardware.

Continue reading “SparkFun Takes Their Educational Show On The Road”

Digging Deep Into How The 8085 Processor’s Registers Were Designed

Hardware design enthusiasts should already be salivating just looking at this image. But [Ken Shirriff’s] write-up on how the 8085 processor’s registers were designed will put you in silicon reverse-engineering heaven. He manages to get to the bottom of the tricks the designers used to make register access as efficient as possible, like routing some through the ALU on their path elsewhere.

We’re certainly not experts in studying dies like the one seen above. Luckily [Ken] does a great job of zooming in on important parts, then dissecting how they work by representing the silicone image as a functional flow chart. One of the parts which we found most interesting is the WZ temporary registers. These are a set of internal registers that are not accessible to the programmer. They’re only used internally by the chip. They act as temporary storage for multiple operand functions, and also hold register addresses for a handful of instructions (JMP, CALL, RST, etc.).

If you’re more interested in how images of these chips are attained you should do some searching on Hackaday. Just last week we featured one such project in a links post.

[via Reddit]