Print In Chocolate, Sugar, And Clay With A Universal Paste Extruder

With a glut of Easter candy acquired over the last week, you might be thinking what to do with mountains of chocolate and other sugary delights. How about sending them through a 3D printer with [RichRap]’s universal paste extruder?

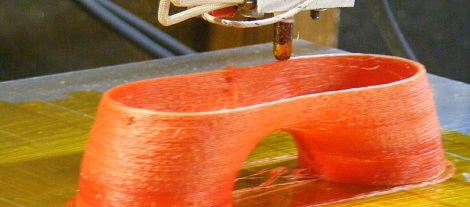
[RichRap]’s extruder uses a common 10cc syringes slowly squeezed by an off-the-shelf stepper motor. Chocolate wasn’t the only goal for this build;  [RichRap] also tested out cake icing, corn chip dough, muffin and sponge cake batter with his new toy. The most interesting paste in our humble opinion is porcelain ceramic clay. [RichRap] was able to make some very nice 3D printed greenware, but we’ll withhold our judgement until the ceramic parts are fired later this week.

After the break you can check out the introduction video for the Universal Paste Extruder, as well as a quick glimpse of [RichRap]’s very cool porcelain clay prints. We’re very interested in the ceramics printed with this extruder, if only for printing reprap parts that will be exposed to plastic-melting temperatures.  Of course, all the files to build your own paste extruder are up on Thingiverse.

Tip ‘o the hat to [Josef Prusa] for sending this one in.

Continue reading “Print In Chocolate, Sugar, And Clay With A Universal Paste Extruder”

3D Printer With Insane Accuracy Uses A DLP Projector

After years of work, [Junior Veloso] is finally getting his 3D printer project out to the public. Unlike the Makerbots and repraps we usually see, [Junior]’s printer uses light-curing resin and a DLP projector to build objects with incredibly fine detail.

One highlight of [Junior]’s project is the development of low-cost resins. Normally, light curing resins are extremely expensive, but [Junior] is actively trying to get the price of resin down to $150 USD per kilogram. A quick back-of-the-wolfram calculation tells us you should be able to print about 7-800 cubic centimeters with a kilogram of resin. It’s much more expensive than plastic filament used in other 3D printers, but that’s the price you pay for quality.

There’s a very popular Indiegogo campaign that is trying to raise money to mass produce the resin and some components of this kit. We’re not impressed with the rewards for this campaign – $59 for a .PDF description of the printer without any dimensions, $159 for a BOM, dimensions and the formula to make your own resin, and $400 for the closed-source software [Junior] devleoped – but hopefully this Indiegogo gets cheap resin out onto the market. There’s a short FAQ about this printer, so we’ll leave our readers to tactfully discuss the merits of this printer in the comments below.

You can check out the process of printing a remarkably detailed alien skull in the video after the break.

Continue reading “3D Printer With Insane Accuracy Uses A DLP Projector”

3D Printing From An Android Device

[skullkey] over at the House4Hack hackerspace in Pretoria, South Africa wanted a way to get kids excited about technology and desktop fabrication labs. Wanting to give kids a visceral feel for the march of technology, he created Makerdroid, an android app that allows for the creation 3D objects on an Android tablet and preparing them to be printed on a Reprap or Makerbot.

What’s really interesting about this build is not only the fact that [skullkey] and his lovely beta testers are generating .STL files on an Android device, the object files are also being converted to GCode on the Android, without the need for a conventional computer. Makerdroid uses the very popular Skeinforge to generate the instructions for the printer (although a lot of people are switching over to Slic3r).

Makerdroid doesn’t need a PC to print objects out on a 3D printer, but we think the process of shuffling GCode files from a tablet to the printer with an SD card is a little archaic. It might be possible to print directly from an Android tablet over Bluetooth with the Android Bluetooth Reprap app that is currently in development. Still, we love the idea of printing objects we just created on a touch screen, as shown in the Makerdroid demo video after the break.

Continue reading “3D Printing From An Android Device”

Hackaday Links March 8th, 2012

Solder Your Pin headers Straight

straight-header solder

If you’re worried about how to solder your pin headers straight, why not try this simple trick and put them into a breadboard before soldering?

Etiquette for Open Source Projects

soapbox Phillip Torrone

If you use or develop open source projects, it’s worth checking out [Phillip Torrone]’s Unspoken rules of Open Source article. You may not HAVE to do all the things he says, but it’s certainly a good starting point for being ethical with your hacks.

The [GoAmateur] Camera Mount

go-amateur camera mount for bike

If you can’t afford a professional camera mount for your bike, why not make one yourself? As pointed out in the article, normal cameras aren’t really made for this, so do so at your own risk. If this isn’t shoddy enough for you, why not make a mount for your 4 year old dumb-phone (Env2) out of a block of wood?

A 3D Printer BOM

If you’re wondering how much a 3D printer will cost you, or where to source the parts, this Bill of Materials for a Prusa Mendel should help. We would assume this project will be updated as everything is built, so be sure to check back!

MakerBot Assembly Time-Lapse

makerbot time lapse

Along the same lines, if you’re wondering about getting into 3D printing, this time-lapse of the Thing-O-Matic being assembled may give you some insight into what’s involved in getting one functional!

New Extruder 3D Prints Tasty Treats Using Chocolate

If you’ve never felt at home with a piping bag in your hands this chocolate extruder will come to your rescue. It can replace the plastic extruder head on your 3D printer (RepRap, Makerbot, most 3-axis CNC machines, etc.), letting you turn your digital creations into decadent reality.

The head uses a progressive cavity pump to feed the chocolate from a reservoir through the printing nozzle. It’s important to keep the chocolate warm or it will set up so when [Tomi Salo] designed the print head he included a heat shroud through which warm air can be circulated. He uses a shoe dryer to source the hot hair which is patched into the heat shroud with a length of tubing.

This extruder can be 3D printed but be careful what material you use. [Tomi] mentions that PLA is ‘sort of food-safe’ but ABS is not. We wonder if the design could be altered for milling out of aluminum or stainless? At any rate, if you’re going to give it a try you might find [Tomi’s] advice on working with chocolate useful.

[via @clothbot]

3D Printed Lugs For Your Custom Bike

We haven’t heard much about 3D printing using stainless steel as the medium, but that’s exactly what’s going on with the lugs used to assemble this bicycle frame. They’re manufactured using LaserCusing, which is a brand name for parts produced using Selective Laser Melting. The video after the break gives you an overview of what it takes to clean up each of these parts.

The laser melts metal power to solidify areas needed in the final part. Just like the hobby printing we’ve seen on the RepRap or Makerbot there are structural supports necessary to complete the print job, and these need to be removed after the laser has done its work. This is where the majority of the labor comes in. You’ll see a ton of waste material pulled out of the cage-like lug, and we’re sure there’s no shortage of filing and polishing to finish up. But wow, what an interesting result. We just need to figure out if anyone has found a cost-effective way to hack together one of these metal-powder printers.

Continue reading “3D Printed Lugs For Your Custom Bike”

3d Printer Software Tutorials

It’s no secret that the 3D printer community is extremely fragmented. With three models of RepRaps, three printer kits from Makerbot, and hundreds of ‘printers of the week,’ it’s extremely frustrating for beginners to wrap their heads around the pros and cons of each machine. The software for these printers is segmented nearly as much as the hardware itself, but thankfully [Mike] has put up a series of videos so beginners can wrap their head around all the software packages.

[Mike] used Alibre 3D CAD software to generate the .stl files for all his printable objects. These .stl files were converted into printer-readable GCode by the very popular Skeinforge. The GCode is sent over to [Mike]’s SUMPOD with ReplicatorG, an awesome program that serves as the front end to a printer.

Although we’d like to see a tutorial for Sfact, the new hotness in .stl to GCode conversion, [Mike] does a very good job at breaking down the complexity of Skeinforge into manageable bites.