The build is simple enough, beginning with a translucent Christmas ornament shell readily available from most craft stores. Inside, a small motor spins a pinion, which turns a larger gear inside the body. As the larger gear spins, magnets embedded inside pick up steel balls from the base of the ornament and lift them up to the top. As they reach their zenith, they’re plucked off by a scoop, and then they roll down a spiral inside. As for power, [Sean] simply handled that with a couple of wires feeding the motor from a USB power bank. Just about any small battery pack would do fine.
The build is beautiful to watch and to listen to, with a gentle clacking as the balls circulate around. Files are on MakerWorld for the curious. We’ve featured some great Christmas decorations before, too. Video after the break.
One can 3D print with conductive filament, and therefore plausibly create passive components like resistors. But what about active components, which typically require semiconductors? Researchers at MIT demonstrate working concepts for a resettable fuse and logic gates, completely 3D printed and semiconductor-free.
Now just to be absolutely clear — these are still just proofs of concept. To say they are big and perform poorly compared to their semiconductor equivalents would be an understatement. But they do work, and they are 100% 3D printed active electronic components, using commercially-available filament.
How does one make a working resettable fuse and transistor out of such stuff? By harnessing thermal expansion, essentially.
Vacuum forming is perhaps one of the less popular tools in the modern maker arsenal, something which surprises us a bit because it offers many possibilities. We’ve created our own vacuum forms on 3D printed moulds for ages, so it’s interesting to see [Pisces Printing] following the same path. But what you might not realize at first is that the vacuum forming sheets themselves are also 3D printed.
The full video is below the break, and in it he details making a mould from PETG, and in particular designing it for easy release. The part he’s making is a belt guard for a table top lathe, and the PETG sheet he’s forming it from is also 3D printed. He makes the point that it’s by no means perfect, for example he shows us a bit of layer separation, but it seems promising enough for further experimentation. His vacuum forming setup seems particularly small, which looks as though it makes the job of making a sheet somewhat simpler.
The cost of a vacuum forming sheet of whichever polymer is hardly high, so we can’t see this technique making sense for everyday use. But as we’ve seen in previous experiments, the printed sheets so make it easy to add color and texture to the final product, which obviously adds some value to the technique.
Good news for everyone who cannot get enough from improbably shaped boats that get referred to as a bench: the current owner (NTI Group) of the copyright has announced that 3DBenchy has been released into the public domain. This comes not too long after Prusa’s Printables website had begun to purge all derived models to adhere to the ‘no derivatives’ license. According to NTI, the removal of these derived models was not requested by NTI, but by a third-party report, unbeknownst to NTI or the original creator of the model. Recognizing its importance to the community, 3DBenchy can now be downloaded & modified freely.
NTI worked together with the original creator [Daniel Norée] and former Creative Tools CEO [Paulo Kiefe] to transition 3DBenchy and the associated website to the public domain, with the latter two having control over the website and associated social media accounts. Hopefully this means that the purged models on Printables can be restored soon, even if some may prefer to print alternate (literal) benches.
The unfortunate part is that much of this mess began courtesy of the original 3DBenchy license being ignored. If that point had been addressed many years ago instead of being swept under the rug by all parties involved, there would have been no need for any of this kerfuffle.
If you’re taking any medication, you probably need to take it in a certain dose on a certain schedule. It can quickly become difficult to keep track of when you’re taking multiple medications. To that end, [Mellow_Labs] built an automated pill dispenser to deliver the right pills on time, every time.
The pill dispenser is constructed out of 3D printed components. As shown, it has two main bins for handling two types of pills, controlled with N20 gear motors. The bins spin until a pill drops through a slot into the bottom of the unit, with the drop detected by a piezo sensor. It uses a Beetle ESP32 as the brains of the operation, which is hooked up with a DS1307 real-time clock to ensure it’s dosing out pills at the right time. It’s also wired up with a DRV8833 motor driver to allow it to run the gear motors. The DRV8833 can run up to four motors in unidirectional operation, so you can easily expand the pill dispenser up to four bins if so desired.
We particularly like how the pill dispenser is actually controlled — [Mellow_Labs] used the ESP32 to host a simple web interface which is used for setting the schedule on which each type of pill should be dispensed.
Bleach is a handy way to mark fabrics, and it turns out that combining bleach with a 3D-printed design is an awfully quick-working and effective way to stamp a design onto a shirt.
Plain PLA stamp with bleach gives a slightly distressed look to this design.
While conceptually simple, the details make the difference. Spraying bleach onto the stamp surface helps get even coverage, and having the stamp facing “up” and lowering the shirt onto the stamp helps prevent bleach from running where it shouldn’t. Prompt application of hot air with a heat gun (followed by neutralizing or flushing any remaining bleach by rinsing in plenty of cold water) helps keep the edges of the design clean and sharp.
We wondered if combining techniques with some of the tips on how to 3D print ink stamps would yield even better results. For instance, we notice the PLA stamp (used to make the design in the images here) produces sharp lines with a slightly “eroded” look overall. This is very much like the result of inking with a stamp printed in PLA. With a stamp printed in flex filament, inking gives much more even results, and we suspect the same might be true for bleach.
Of course, don’t forget that it’s possible to 3D print directly onto fabric if you want your designs to be a little more controlled (and possibly in multiple colors). Or, try silkscreening. Who knew there were so many options for putting designs onto shirts? If you try it out and learn anything, let us know by sending in a tip!
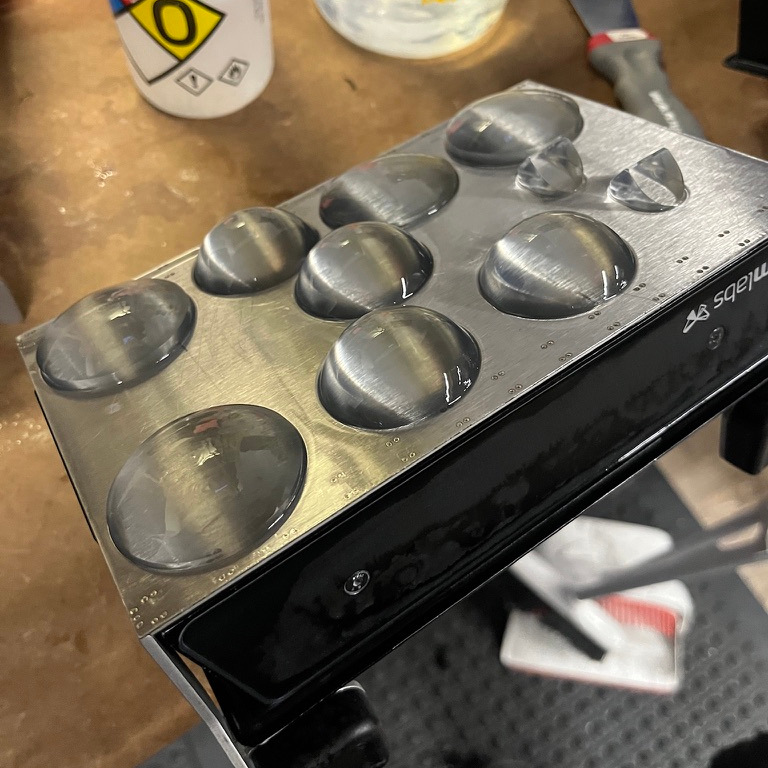
This technique shared by [Andy Kong] is for 3D printed lenses, but would probably be worth a shot for any resin prints that need to be made nice and clear. The link to his post on X is here, but we’ll summarize below.
It’s entirely possible to print lenses on a resin printer, but some amount of polishing is inevitable because an SLA print still has layer lines, however small. We have seen ways to minimize the work involved to get a usable lens, but when it comes right down to it the printing process creates tiny (but inevitable) surface imperfections that have to be dealt with, one way or another.
3D-printed lenses fresh (and wet) from the printer look clear, but have tiny surface imperfections that must be dealt with.
One technique involves applying a thin layer of liquid resin to the surface of the printed lens, then curing it. This isn’t a complete solution because getting an even distribution of resin over the surface can be a challenge. [Andy] has refined this technique to make it ridiculously simple, and here’s how it works.
After printing the lens, place a drop of liquid resin on the lens surface and stretch some cling wrap over the lens. The cling wrap conforms to the shape and curve of the lens while trapping a super thin layer of liquid resin between the cling wrap film and the lens surface. One then cures the resin while holding the cling film taut. After curing, [Andy] says the film peels right off, leaving an ultra-smooth surface behind. No tedious polishing required!
But what about the flat back of the lens? [Andy] suggests that instead of using cling film (which is better at conforming to a curved surface) simply use a drop of resin in a similar way to bond the flat side of the lens to a smooth piece of glass. Or bond the backs of two lenses together to make a duplex lens. This technique opens quite a few possibilities!
Even if one isn’t 3D printing optical lenses, we suspect this technique might be applicable to making crystal-clear 3D prints with a little less effort than would otherwise be needed.
Keep it in mind, and if you find success (or failure!) let us know on the tips line because we absolutely want to hear about it.