Can’t Stand Your Noisy Fan? Here’s A Plan, Man

[Brian] adores his GW Instek GPC-1850D power supply, but it’s annoyingly loud and disruptive to his audio projects. The thing works great, so he decided to regulate the fan’s speed based on usage level to save his sanity.

Once [Brian] got under the hood, he found that it actually has four separate heatsinks: one for the bridge rectifiers and one for each power transistor on the three output channels. The heatsinks are electrically and thermally isolated from each other and change temperature based on the channel being used.

[Brian] and his associates had several Microchip MCP9803 temperature sensors kicking around the lab from previous projects, so they put one on each heatsink. The great thing about these is their address selection pins which let all four of them sit together on the I²C bus to Arduinoville. Each sensor is insulated and clamped to its heatsink with a piece of meccano and a dab of thermal paste.

[Brian] used an Arduino Mini and built the circuit on stripboard. The fan runs at 24V, so he’s sharing that with the Arduino through a 7805. He controls the speed of the fan with PWM from the Arduino fed through a MOSFET. The Arduino reads from each sensor and determines which one is hottest. [Brian] wanted the fan to run at all times, so he set a base speed of 20%. When the heatsinks reach 30°C/86°F, the fan speed is increased to 40%. After that, the speed increases at 5°C/9°F intervals until it reaches max speed at 65°C/149°F.

You can grab the code and schematic from [Brian]’s repo. If you want to study your heatsinks, build this heatsink tester first.

Ridiculously Accurate Mission Control Panel

We are absolutely blown away by the level of detail that went into this amazing mission control panel that [Jeff Highsmith] made for his son.

His kid just started school and needed a desk to do homework on. They had recently visited the Kennedy Space Center, and his son found a new interest in all things space — So [Jeff] took the opportunity to make the desk into this mind-boggling control panel. 

We saw a similar project recently, but this one seems to take it to the next level. The desk itself is hand-made from MDF sheet and with oak boards making up the structural members. He’s cut out over a dozen individual control panels, added switches, LEDs and potentiometers, and printed the labels on transparencies which give the whole thing a very professional and finished look. An iPad sits in the middle which plays a curated collection of space videos.

Continue reading “Ridiculously Accurate Mission Control Panel”

Gamebuino: A Handheld Arduino Gaming Console Ready For Prime Time

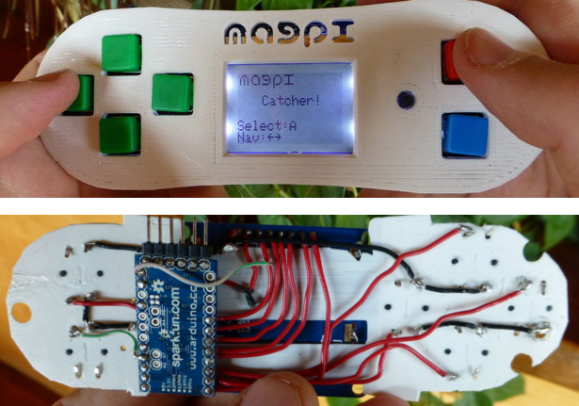
[Rodot] wrote in to tell us about the Gamebuino, a very nicely designed and easily reproducible version of his handheld Arduino gaming console. We originally featured [Rodot’s] Arduino based gaming console over a year ago.

With the Gamebuino, you too can build your own games and gaming hardware around the Arduino. While there is a lot of information currently missing from the site’s Wiki, such as the layout and game code, [Rodot] plans on making everything open source. The console includes a rechargeable lithium battery, a micro SD card, and I2C expansion connectors. This is one project to keep an eye (and two hands) on, especially since a full game library is going to be provided, letting you easily create your own games. See what the console can do in the demo video after the break.

It would be amazing so see some old Game Boy games ported to run on the Arduino, or maybe one of our readers can make an Game Boy emulator for the Arduino!
Continue reading “Gamebuino: A Handheld Arduino Gaming Console Ready For Prime Time”

Taste-O-Vision Is Now A Thing

taste

Not satisfied with late 1950s concepts of Smell-O-Vision [Nimesha]  has created something extraordinary: A digital taste sensor, capable of representing taste with a little bit of heat, electricity, and an Arduino

The device purportedly works by via thermal and electrical stimulation of the tongue using silver electrodes. According to this video, different tastes are created with different currents and temperatures. For example, a sour taste is produced on the electrodes by varying the current from 60uA to 180uA and increasing the temperature up to 30 degrees C. Mint is produced by simply decreasing the temperature from 22C to 19C.

The control electronics include an Arduino, a motor controller, and a heat sink attached to one of the silver electrodes. Communication is done through USB, and of course there’s a mobile app for it, more specifically a protocol called Taste Over IP. This allows anyone to send a taste to anyone with one of these devices.

Videos below, and before you laugh, we’d really like to try one of these out.

Thanks [Jess] for the tip.

Continue reading “Taste-O-Vision Is Now A Thing”

RFID Keepsake Box Is Sweet And Secure

box-tag-top

[Mike Buss] wanted to make his girlfriend something unique for her upcoming birthday — she had mentioned she wanted something to keep small mementos in, but [Mike] decided to step it up a notch on the awesomeness scale.

You see, a few years ago [Mike] read about the Reverse Geocache Puzzle by [Mikal Hart], which is an awesome box that gives you feedback as to how far away you are from the “secret” location that the box will open at — To raise the stakes however, if you ask for the distance more than 20 times it locks itself forever! Now, unfortunately, a memento box wouldn’t be very useful if you had to go to a secret place every time you wanted to open it… so [Mike] decided to secure it another way, using RFID!

It makes use of an Arduino, a Parallax RFID Reader, a micro servo, a button, an RGB LED, and a cleverly designed latch made of a metal eye hook and small copper rod. Since the box is battery powered, [Mike] has added an extremely clever fail safe mechanism. The 9V battery inside includes two extra contacts to the outside of the box via small screws. Completely inconspicuous, but if the battery is dead, simply hold a new 9V to the screws with the RFID card in place, and bam, the box opens!

We’re pretty sure she’s going to like it — check it out after the break!

Continue reading “RFID Keepsake Box Is Sweet And Secure”

Confuse The Birds With This Daylight Simulation System

F7WW1DAHQP02H5D.LARGE

Hackers love a challenge. So when [Patrick’s] father-in-law asked him to look into a daylight simulation system for his bird breeding cages, [Patrick] quickly discovered the ridiculous prices for commercial systems… so he convinced his father-in-law to let him design and build one instead.

Like any project, [Patrick] quickly listed the requirements of the system before starting anything.

  • It must brighten gradually in the morning
  • Stay constant throughout the day
  • Dim in the evening to a very low intensity

In addition to this, the lighting transition should be smooth, and the lights cannot flicker, as this can be stressful for the birds — oh, and it needs to be reliable.

To build the system, [Patrick] has chosen an Arduino Duemillenova, an RTC, a small LCD screen, some cheap LEDs from eBay and a handful of N-channel NPN transistors to provide the PWM for the LEDs. The entire system cost less than $100 — a much cheaper alternative to commercial systems.

We think the system looks great, but as a big fan of the Hack a Day community, [Patrick] would love to hear your feedback!

EL Wire Nixie Tube Is In Your Reach

FUQ84C3HS0D05D9.MEDIUM

Nixie tubes are awesome, but sometimes a little out of reach for some makers, whether it is a matter of obtaining them, or figuring out how to drive them. The hackerspace over at H3 Laboratories decided to try making a fun alternative — EL wire nixie tubes.

[Marty] leads us through the build in a very detailed Instructable, which makes use of CoolNeon EL wire. He’s using an Arduino Uno with a CoolNeon shield to control it. The trickiest part of this build is forming the numbers to minimize the overlap — to figure this out he modeled it in Blender. He created a test jig and formed the numbers using coat hanger wire first before playing around with the EL wire.

EL wire can be soldered together — it’s just a bit of a fine art, which is explained in another detailed Instructable. To black out parts of the number and the trailing wires, [Marty] made use of black plastic dip. The numbers are mounted on a Styrofoam cylinder which fits into the bottom of a large masonry jar. It’s a great build and a fun project to get into Nixies … without actually getting into Nixies.

Stick around for a video of it in operation.

Continue reading “EL Wire Nixie Tube Is In Your Reach”