Build Your Own Backyard Pizza Oven

backyard-pizza-oven

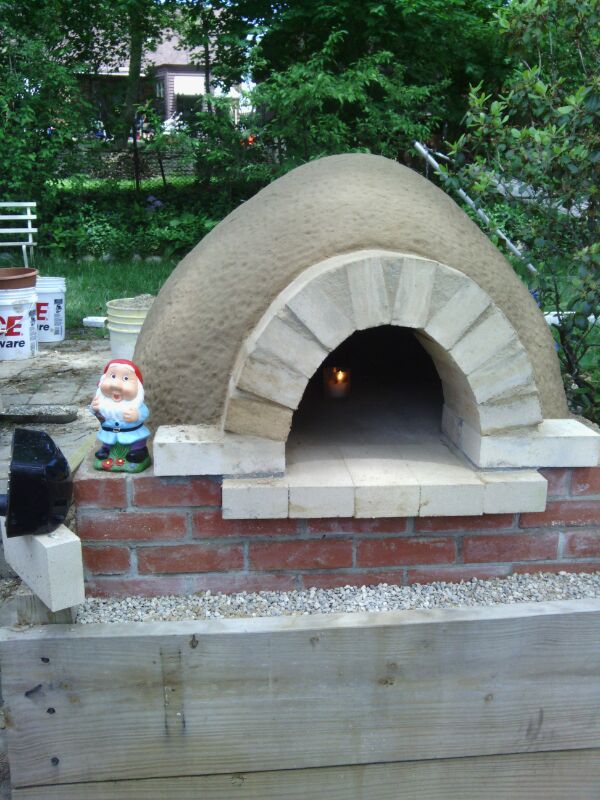
Don’t heat up your house this summer, build your own backyard pizza oven instead. We love to using our garden produce, homemade dough, and fresh farmer’s market mozzarella to whip up a tasty pie in the summer. But it can be tricky to cook it on the grill and we hate heating up the oven when it’s hot out. This could be a perfect solution.

The footprint of the oven used to be a flower bed in [Furiousbal’s] yard. He removed the soil and side walls, laid down a bed of pea gravel, then started building the brick base for the oven. The base is insulated by encasing beer bottles in a bed of clay which he harvested locally. Fire brick then makes the floor of the cooking area as well as the arched opening. To support the clay during construction he built a dome of wet sand and covered it with damp newspaper. The clay is built up in layers before removing the sand from the inside. The final step (not shown above) is to build a little shelter to ensure the elements don’t wash away your hard work.

Of course you need to build your own fire inside to use it. If that’s too much work perhaps you should try solar cooking?

[via Reddit]

Help us decide, should this project gone on LIFE.hackaday?

Low Water Indicator For Coffee Maker Couldn’t Be Simpler

low-water-indicator-for-coffee-maker

The coffee maker which [Donald Papp] uses every morning has a water reservoir on the back that can last for several days. This means he forgets to check it and from time to time will return to find that nothing has brewed. He decided to add a low-water indicator to the machine. His approach is about as simple as it gets and we admire that accomplishment.

If it were our project we’d probably try to complicate it in one way or another. The use of a microcontroller and ultrasonic rangefinder (like this tank level indicator from a February links post) would be overkill. No, [Donald] boiled down the electronics to a homemade switch, a blinking LED, and a battery. The switch is a flexible piece of metal attached to a plastic cap using some monofilament. The cap goes in the reservoir and floats until the water gets too low, it then pulls on that metal, completing a circuit between the battery and the LED. That’s it, problem solved.

Now he just needs to plumb the coffee maker into a water line and he’ll really be set.

Keurig Hack Runs A Water Supply Line To Your Coffee Maker

We were skeptical about Keurig machines when we first heard about them. Although we still scoff at the added waste of throwing away a plastic container of used grounds for each cup of coffee made, we tried one at the in-laws and it does brew a great cup of Joe. One of the draws of the machine is that it does it pretty much automatically as long as you fill it with water first. [Joseph Collins] is even taking the work out of that by adding a water supply line to his Keurig.

His coffee maker sits right next to the fridge, which has its own water supply. So one day he thought, why not run a line to the coffee maker as well? As far as plumbing projects go it’s very simple. He pulled out the refrigerator and added a T-fitting to split the water supply line. From there he ran an extension next to the coffee maker that terminates with a valve being pointed to by the arrow in the lower left. The plastic supply line leaving the valve passes through a rubber grommet in the lid of the water reservoir pointed to by the other arrow.

[Joseph] figures the whole project came in at under $30 and shows how he did it in the clip after the break.

Continue reading “Keurig Hack Runs A Water Supply Line To Your Coffee Maker”

Used Hard Drive Repurposed As A Cotton Candy Machine

hard-drive-cotton-candy-machine

If you’re reading this website, you’re probably someone who likes to take things apart. As such, you probably also have one or more old computer hard drives just sitting around in a parts bin.  Of all the projects you could have for an old drive, here’s an interesting one – A Chinese engineer who operates a hard drive repair and data recovery center decided to turn a used drive into a cotton candy machine.

Possible sanitary concerns set aside, his creation is very cheap and easy to build. Most hackers probably have all the necessary gear just sitting around already. The only parts he used were: a hard drive that still powered up, a generic plastic basin, an aluminum can, a flat round metal tin, and six bicycle spokes.

It might not be pretty, but it works. If you want to create your own, be sure to check out the above link. There’s a full DIY guide complete with step-by-step photos.

[Thanks Fabien]

Low-resolution Toaster Prints On Slices Of Bread

low-resolution-bread-toaster

Why toast your bread evenly when you can burn low-resolution images instead? Meet the Super Mega Mega Toaster, a University project created by [Scott van Haastrecht] for his Creative Technology course.

Now you may be thinking that this has been done before. And indeed, a bit of searching will lead you to a post about toasting Jesus.  But that is a one-shot toaster hack which simply used a stencil to block heat to create a certain pattern. This is a mechanical overhaul for the toaster concept. It uses one row of six heating elements. Each is connected to a servo motor which moves the element next to the bread or away from it based on the pattering being printed. A stepper motor then moves the bread up so that the next row can be printed. All of this is mounted in a laser-cut wood frame which makes us just a bit nervous because the purpose of the elements is to burn stuff.

See a demo of the toaster, as well as its internal components in the clip after the jump.

Continue reading “Low-resolution Toaster Prints On Slices Of Bread”

Bakery Automation Mixes Single Cookies

bakery_automation

[Ben Krasnow’s] latest project is a delicious one. In the image above he’s showing off the beginnings of his cookie dispenser. No, it’s not another take on a way to eat Oreo cookies. It actually comes much earlier in the production chain. His device is akin to a 3D printer for baked goods in that it will be able to automatically combine raw ingredients to form production runs as small as a single serving of cookie dough.

When we first heard about it we wondered why you would want to bake just one cookie? But of course that’s not the purpose at all. The machine will allow you to bake a full sheet of cookies, but provides the option of making each one of them with a different recipe. As with all baking, combining ingredients in the proper proportions is paramount. In the post linked at the top he’s working on a butter dispenser. But in an earlier post he hacked an electronic scale to help weigh other ingredients. You can watch both video clips after the break.

Imaging a dozen cookies with slightly different amounts of flour in them. A few test sheets and he should be able to dial in the very best recipes.

Continue reading “Bakery Automation Mixes Single Cookies”

Coffee Pot Aquarium Keeps Fish Warm Without Cooking Them (hopefully)

coffee-pot-aquarium

Beta fish are one of the easiest pets to care for. So when [Derek] gave his girlfriend one for Valentine’s day he thought the job was done. Turns out these tropical pets want 75-80 F water and that’s not going to happen in a plain old bowl when you keep your home thermostat in the mid sixties during the winter. While looking for a simple heating solution he stumbled across the idea of using a cheap drip coffee maker as an aquarium.

The two main components are already in place: a clear glass vessel for the water and a way to heat it. The real trick is to use the heating element to gently warm the water to the appropriate temperature. Perhaps the key piece of the project is that the device already had a timer that shut off the heating element. This translates to easy control with his MSP430 microcontroller as it means there’s a relay present. He also patched into the two seven-segment displays to give him feedback on the temperature currently being read by the RL1003 thermistor which is submerged in the water. You’ll also note that he added a few LEDs to the lid to give the aquarium some inner glow.