So You Want To Run A Kickstarter?

Earlier this year, [Anthony Clay] wanted to test the waters of Kickstarter with a low-risk project. The idea he came up with was a series of EE reference posters we featured in a Hackaday links post. Now that [Anthony]’s project is over, he decided to write about the whole ordeal of putting together a Kickstarter, giving all the gory details of putting on your own crowd-sourced project.

We’ve got to give [Anthony] credit for doing his homework. Even before he designed his first poster, he looked over unsuccessful Kickstarter campaigns to see what they did wrong. Once he knew what he was going to offer, [Anthony] put on his project manager hat and made sure he knew exactly what everything was going to cost, had contingency plans in place, and knew what his Kickstarter was before he spread the word.

The best laid schemes of mice and men ‘oft go awry, so of course [Anthony] hit a few snags in his Kickstarter. In his microcontroller quicknotes poster, a few weird underlines made it into the final draft of the voltage characteristics section. Everyone he showed this to thought it was no big deal, but this is something that should have been caught in proofing. Keeping in mind that [Anthony] was only doing a poster and not an electronics project, we think this is a valuable lesson for future Kickstartees.

If you’re wondering what the one thing that [Anthony] credits for the success of his Kickstarter, it’s actually the small blurb we featured in a links post. Once that happened, word started to spread and the funding picked up. To be honest, we’re impressed by that fact, and we’ll try to wield our powers carefully in the future.

RA 3D Printer Controller Board Does Everything, Has Disco Lights

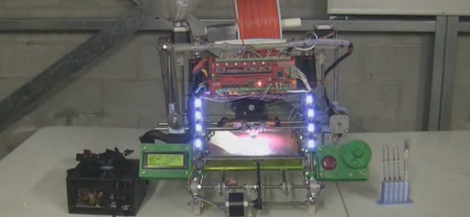
3D printers are getting far, far more complicated than a 4-axis, plastic-squirting CNC machine. These days, you really haven’t earned your geek cred unless you’ve hacked an LCD and SD card interface into your 3D printer, or at least experimented with multiple extruders. There’s a problem with the controller boards everyone is using, though: most boards simply don’t have enough output pins, greatly reducing the number of cool things a 3D printer can do.

Enter RA. It’s a new 3D printer controller board with IO for any imaginable setup. Going down the feature list of RA, we’re wondering why we haven’t seen some of these features before. A 24-pin ATX power header is soldered directly to the board, giving RA users a stupidly easy way to power their printer. Of course there are outputs for LEDs, camera triggers (printer time-lapse movies are really cool), light rings, buzzers, an LCD/rotary encoder/SD card control panel, and support for two heated beds for gigantic printers. If printing in one color isn’t good enough for you, RA has support for three extruders

Compared to other 3D printer boards such as RAMPS or the Sanguinololu, the number of outputs on this board is simply amazing. If you’re planning to build a huge, feature-laden 3D printer, you probably couldn’t do much better than what RA is offering.

3D DLP Printer Builds An Orange TARDIS

This micro-sized TARDIS is the latest print from [Ron Light]’s Sedgwick 3D DLP printer. Yes, it’s orange, but the print quality for such a small object is pretty astounding.

The Sedgwick 3D printer is currently available as a kit on Kickstarter. For five hundred bones, the Sedgwick provides all the parts – minus a DLP projector and resin – to make your own miniature Type 40 with a broken chameleon circuit. There’s a lot more this printer can do, from miniature cathedrals to hollow geodesic spheres.

This is the latest in what will be a long line of DLP projector / resin 3D printers, and the most affordable one to date. The last one we saw was an awesome $2400 machine that included a projector and resin. At $500 for a projector-less kit, the Sedgwick still handily beats even the cheapest option we’ve seen so far.

[Ron Light] is from Kansas City, and our boss man [Caleb] ran into him at the KC Maker Faire a few weeks ago. You can check out that little interview and a few videos of the Sedgwick doing its thing after the break.

Continue reading “3D DLP Printer Builds An Orange TARDIS”

Knut Logs Data, Sends It To Your Email

[Richard] and [Jay] needed a WiFi connected data logger for remotely monitored aquariums. After working diligently for three years, they’re finally finished. While the Knut was originally designed to keep tabs on a few huge aquariums, it’s more than capable to log all sorts of data and send those sensor readings to your email address.

Knut is a small WiFi enabled device replete with a few plugs for temperature, humidity, accelerometer, and other sensors. All this data goes directly into the memory of Knut, and when the memory is full the data is sent to an email address. As a bonus, there’s also an iDevice app (Android and Windows coming soon) to parse the generated .CSV file and display the results on an iPhone

The Knut may be a touch expensive for our tastes, but if you’re looking for an off-the-shelf solution for sending alerts, logging data, or just reading a few sensors via WiFi, Knut may be just the ticket.

[Richard] and [Jay] put together a demo video showing off the capabilities and operation of the Knut app; check that out after the break.

Continue reading “Knut Logs Data, Sends It To Your Email”

ArduSat Puts Arduino Experiments In Space

CubeSats are nothing new – hundreds have been launched into Earth orbit by schools and universities over the past decade. Like anything cool, an Arduino eventually gets thrown into the mix. That’s what the folks behind ArduSat are doing: they’re launching an Arduino-laden satellite into orbit with a bunch of sensors to enable anyone to become a citizen space scientist.

On board the ArduSat is a suite of sensors including a spectrometer, Geiger counter, IR light sensor, electromagnetic wave sensor, a temperature sensor, gyroscope, accelerometer, magnetometer, GPS unit, CO2 sensor, and of course a few cameras. The rewards for this Kickstarter are fairly interesting: backers who pledge $500 are able to buy a week’s worth of time using the ArduSat sensors for your own personal experiment.

As for how this Arduino-powered satellite is getting a ride up to Low Earth Orbit, the team plans to send an application into NASA for the CubeSat Launch Initiative ride-along program. If NASA selects the ArduSat, it’ll get a ride into space along with other CubeSats on a larger commercial launch. If the ArduSat isn’t selected by NASA, the team behind this satellite has secured funding to piggyback on a commercial launch.

Tip ‘o the hat to [HackTheGibson] for sending this in.

Open Rail, Or, Why Didn’t We Think Of This?

Hackaday readers familiar with the with the CNC and automated machinery scene will be familiar with MakerSlide, the open-source linear bearing system. This linear movement system composed of special aluminum extrusions and mounting plates riding on v-wheels has been used in a lot of awesome builds including the Quantum ORD Bot 3D printer and the Shapeoko CNC router. If there’s one downside to the MakerSlide, it’s the hard-to-source aluminum extrusion with the requisite v-wheel guides. [Mark] and [Trish] of Phlatboyz have an ingenious solution to this problem: just have bolt-on v-wheel guides. It’s an idea so simple we’re kicking ourselves for not thinking of it first.

Open Rail is completely compatible with the MakerSlide linear bearing system. Instead of requiring a special aluminum extrusion, the Open rail system uses regular, plain-jane aluminum extrusions available at any reputable hardware store. Just pop a few t-nut into the Open Rail and attach it to your extrusion. Couldn’t be easier.

Considering how easy it is to find surplus aluminum extrusion, we’ll expect a few gigantic MakerSlide and Open Rail derived CNC projects in the very near future.

Putting Every Chiptune Ever In An FPGA

Finally one device combines the power of the Commodore 64 SID, Atari ST YM2149, and Amiga MOD audio into one awesome box. It’s called the RetroCade Synth, and there’s a Kickstarter that is perfect for starting your chiptune composing journey.

[Jack]’s RetroCade synth is connects directly to the Papilio One 500k FPGA. All the classic chiptune ICs can be emulated in this FPGA including the Commodore 64 SID chip, and an Amiga MOD player. Being a follow-up to [Jack]’s previous FPGA YM2149 project, he also threw that chip into the project for good measure. While the RetroCade doesn’t ship with every old chiptune IC – there isn’t support for NES, Atari, GameBoy, or SN76489-based chiptunes yet – that is something [Jack] will add once the Kickstarter is completed.

After the break you can see [Jack] jamming out on his RetroCade project playing a YM2149, SID, and Amiga MOD sounds simultaneously. For $100, it’s comparable to the venerable MIDIbox SID, but also allows anyone to play whatever genre of chiptunes they desire.

Continue reading “Putting Every Chiptune Ever In An FPGA”