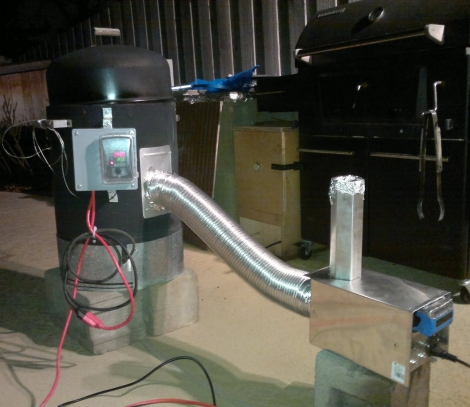
Electronic Watering Can

When [Deddies lab] was looking to keep their (rather large) Ficus Lyrata appropriately watered, they followed their motto, stuck a micro controller on it and whipped up an Electronic Watering Can .

The whole thing starts off with power that is switched on once a day for 15 minutes by a traditional mechanical lamp timer, and that is connected to a atmega8 micro controller running @ 1MHz which increments a counter by one. When that counter hits 7 the mega switches on a pump, watering the plant with roughly half a liter of water per week out of a bucket reservoir , which according to the article’s calculations should last about 4 months.

In order to assure that the pump does not run out of water a rubber duck was attached to a string, the other end is attached to a micro switch, and when the water gets too low the string is pulled, switching one of the micro controller’s pins low.

While we agree that it could use a low water indicator, that is trivial to add, and over all the project represents a great hack done on a Sunday using parts and materials already on hand. Join us after the break for a quick video too!

Continue reading “Electronic Watering Can”

Custom Enclosures Made Of Paper

[Sivan Toledo] needed a enclosure for a unique sized electronic project, not finding what he needed in off the shelf solutions, he went to the next best thing, … Papier Mâché!

Using a mold made out of standard corrugated cardboard, he slowly built up layers made of magazine paper, and ordinary “white glue” diluted with water. After getting near the thickness wanted he switched over to typing / copy type paper for a nice clean outer surface. Ports were made in the usual fashion when dealing with soft or thin material, drill a smaller hole, going back with successively larger holes, and then follow up with an appropriate file, all while taking things slow along the way to prevent unwanted results. Finishing up with layers of paper carefully cut into strips to meet the circumferences / edges, along with the final outer surface to make it all even.

The end result is awesome as it stands, but we cant help but wonder what some sanding and paint would look like on a enclosure made like this, though any way you finish it, the idea comes down to custom enclosures that do not need special tools or materials to complete (on the cheap).

Thanks [Drone]

8×8 LED Infinity Mirror

[chromationsystems] put out a couple instructibles on building infinity mirrors. One with an 8×8 array of LEDs and one with a 32 LED ring. These are very well  documented covering the construction of the mirror enclosure as well as the circuit and code. The effect is quite nice. The 8×8 array is interesting, we haven’t seen that before. These would make a fine addition to any geek cave/electronics lab. While it looks like these were basically advertisements for a product he sells, you can definitely make your own from his instructions. We like this kind of advertising.

Charging Timer For R/C Batteries

arduino_controlled_socket

Santa brought [Quinten’s] son a shiny R/C truck for Christmas, but this new toy had one drawback – its batteries could only be connected to the charger for a maximum of 6 hours, lest he turn his house into a pile of smoldering ash.  With grave warnings from the manufacturer dancing in his head, he searched around for a timer that would allow him to cut power to the battery after charging for its allotted time.  Coming up empty, he decided to create his own timed electric socket regulated by an Arduino he had sitting around.  He grabbed a project box and wired up a nice looking socket timer, complete with an LCD status display.  To make things easy for his son, he added two buttons to the front of the controller – one for selecting the amount of charging time, and one to set the timer in motion.  As with his previous hacks, [Quinten] has provided plenty of documentation in the form of pictures, code, and even a video of the timer in action.

PID Controlled Smoker

[dafonso] purchased a nice 1500W smoker but was somewhat dismayed that it only had one cooking temperature. To compensate he designed his own PID control system which allows him to set the cooking temperature digitally. At the heart of the system is a PICAXE 18 micro which switches the smoker on and off using a solid state relay. Rather than testing the 110V system on the smoker itself (which would have been a pain indoors) he used a lamp instead. To see if he was getting the correct temperature he taped his thermocouple to the light bulb and let the PID switch the lamp on and off. Also be sure to checkout his video which does a good job of explaining how he was able to solder the surface mount components required for the control board.

Building Infra Red Light Sources With Regular Lights

[Oneironaut] sent us another IR hack. This time it is a writeup on the best ways to create IR light sources from regular lights. Since normal flashlight bulbs emit a broad enough spectrum to include visible light and IR light, this basically comes down to filtering. [Oneironaut] explores different light sources and different materials in depth, along with great pictures to show his results. This is a great resource if you’re needing to do some night vision for cheap.

Water-dosing Coffee Maker Augmentation

[Arthur Benemann] has the worst part of making coffee licked. His add-on for a drip coffee maker fills the water to the proper levels for you, saving the drudgery of rinsing out the carafe, carefully filling it to the appropriate level, then pouring it into the machine without getting everything wet. This isn’t limited to a full pot, but is user selectable by the cup based on how many times in a row you hit that red button. One LED gives feedback on the selected mode, then the device uses a washing machine water valve to turn on the tap for the appropriate amount of time. We’re a little bit leery of connecting homebrew hardware to the water pipes in our house. Make sure you’ve done a good job of debugging so that an infinite loop doesn’t flood you out.